Communications Software & Zoom
- Zoom: Video Conferencing at MLML
- Zoom for Remote Teaching at MLML
- Guide for Zoom Seminar Participants
- Zoom Security Best Practices & Recommendations
- Phone Alternatives: Zoom and Google Hangout
- Adding the Zoom Chrome Extension for Scheduling Zoom Meetings via Calendar
Zoom: Video Conferencing at MLML
To learn how to teach remotely at MLML using Zoom, follow this link.
Quick Tips:Zoom is a video conferencing application available to CSUMB and SJSU affiliates (students, faculty, staff, etc.) Users are able to host or join conference calls, video conference call, and share their screen.
Keep Zoom meetings secure:
|
Make sure your name on Zoom is your name in real life!Your displayed name in Zoom meetings should read as your first name followed by your last name (i.e., "Jane Doe")
How to change your display name on Zoom:
|
If you use Chrome as your primary web browser, try downloading the Zoom extension for Chrome
|
Join a Zoom Meeting
By Computer
- Download and install the Zoom App.
- Click the Join URL in a Zoom invitation
- or -
Navigate to Zoom:- SJSU's Zoom website: https://sjsu.zoom.us/ (Login with your SJSUID)
- CSUMB’s Zoom website: https://csumb.zoom.us/ (Login with your OtterID)
- Select “Join a Meeting”
- Enter the Meeting ID number (your meeting ID is a 9, 10, or 11-digit number) or Personal Link Name
- Find Meeting ID in email invite or...
- Hosts or current participants can find Meeting ID at top of Zoom browser.
(You can prepare for a scheduled Zoom meeting by downloading and installing the Zoom Client.)
Call In By Phone
- Dial an in-country number found at https://zoom.us/zoomconference or provided by host
- For calls in the US use this phone number: +1 646-876-9923
- If calling in with MLML conference phone dial 7 first.
- Enter the Meeting ID followed by # (your meeting ID is a 9, 10, or 11-digit number) or Personal Link Name
- Find Meeting ID in email invite or...
- Hosts or current participants can find Meeting ID at top of Zoom browser.
- Enter your participant ID, followed by # (Press # only to skip)
- To enter your participant ID once you are in the meeting, enter #Participant ID# on your phone
Start a Zoom Meeting
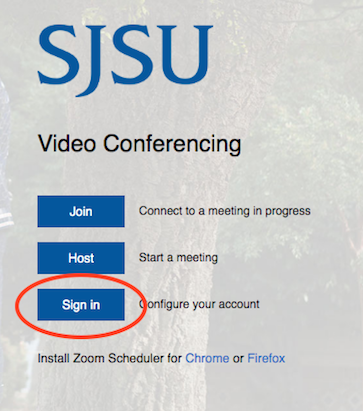
Step One: Sign into Zoom for SJSU (using your SJSU ID) or CSUMB (OtterID)
Host a Meeting
- Select Host a Meeting in top right of Zoom screen.
- The Zoom App will launch
- Join audio and/or video by clicking the microphone and video camera icons, respectively
- Invite others while meeting is started, click the Invite button at the bottom of the Zoom user interface and select the participants via email address or contact list
- You could also edit the participant list by clicking Manage Participants, which is next to the Invite button
Schedule a Meeting
See our Zoom Security Best Practices & Recommendations.
- Select Schedule a Meeting in top-right of Zoom screen
- Fill in the information, below are recommended options:
-
Registration Required: Unchecked
-
Require Meeting Password: Unchecked
-
Video: Off for both
-
Audio: Both
-
Meeting Options - Select the Following:
-
Enable join before host
-
Mute participants upon entry
-
-
-
Save
- Click the Copy the invitation link and send the info to your meeting attendees.
- When you are ready to start the Zoom meeting:
-
Go to https://sjsu.zoom.us/, sign-in, and click Meetings on the left
-
Click the Start Meeting button to start the Zoom meeting.
-
-
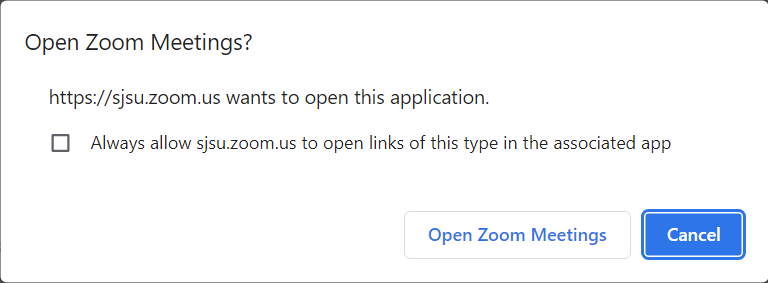
Zoom will download a launcher and click Open zoom.us if a system dialog pops up
- To Invite others while meeting is started, click the Invite button at the bottom of the Zoom user interface and select the participants via email address or contact list
- You could also edit the participant list by clicking Manage Participants, which is next to the Invite button
NOTE: All CSUMB, SJSU, and Research Foundation Faculty, Staff, and Students should be able to login to Zoom. If you are unable to login to Zoom, please submit an IT Helpdesk Ticket.
Large Meeting Tips:
- Wait to admit participants until the meeting starts
- Participants with raised hands will rise to the top of the recipient list
- Assign multiple Co-Hosts to help moderate a large meeting
- Pause the recording until all participants are in the meeting and the meeting starts
- Open up Zoom in your internet browser and sign in to your account
- Go to the "settings" tab on the left hand side

- Under the "meeting" settings, go to the "security" subsection
- Check the box next to "embed passcode in invite link for one-click join"


Enabling and Adding a Co-Host for Room Moderation
When hosting large Zoom Meetings, you might want to add a co-host, to help you moderate or facilitate the meeting.
Enabling Co-host
Enabling Co-host on Your Account
To enable the Co-host feature for all members of your organization:
1. Sign into the Zoom web portal, click settings.
3. If the setting is disabled, click the Status toggle to enable it. If a verification dialog displays, choose Turn On to verify the change.

Enabling Co-host on a Specific Group
To enable the Co-host feature for all members of a specific group:
1. Sign into the Zoom web portal as an administrator with the privilege to edit User groups, and click Group Management.
2. Click the name of the group, then click the Settings tab.
4. If the setting is disabled, click the Status toggle to enable it. If a verification dialog displays, choose Turn On to verify the change.
5. Note: If the option is grayed out, it has been locked at the Account level, and needs to be changed at that level.
6. (Optional) If you want to make this setting mandatory for all users in this group, click the lock icon, and then click Lock to confirm the setting.
Enabling Co-host in your own meetings
To enable the Co-host feature for your own use:
1. Sign into the Zoom web portal and click My Meeting Settings (if you are an account administrator) or Meeting Settings (if you are an account member).
3. If the setting is disabled, click the Status toggle to enable it. If a verification dialog displays, choose Turn On to verify the change.
4. Note: If the option is grayed out, it has been locked at either the Group or Account level, and you will need to contact your Zoom administrator.
Using Co-host in a Meeting
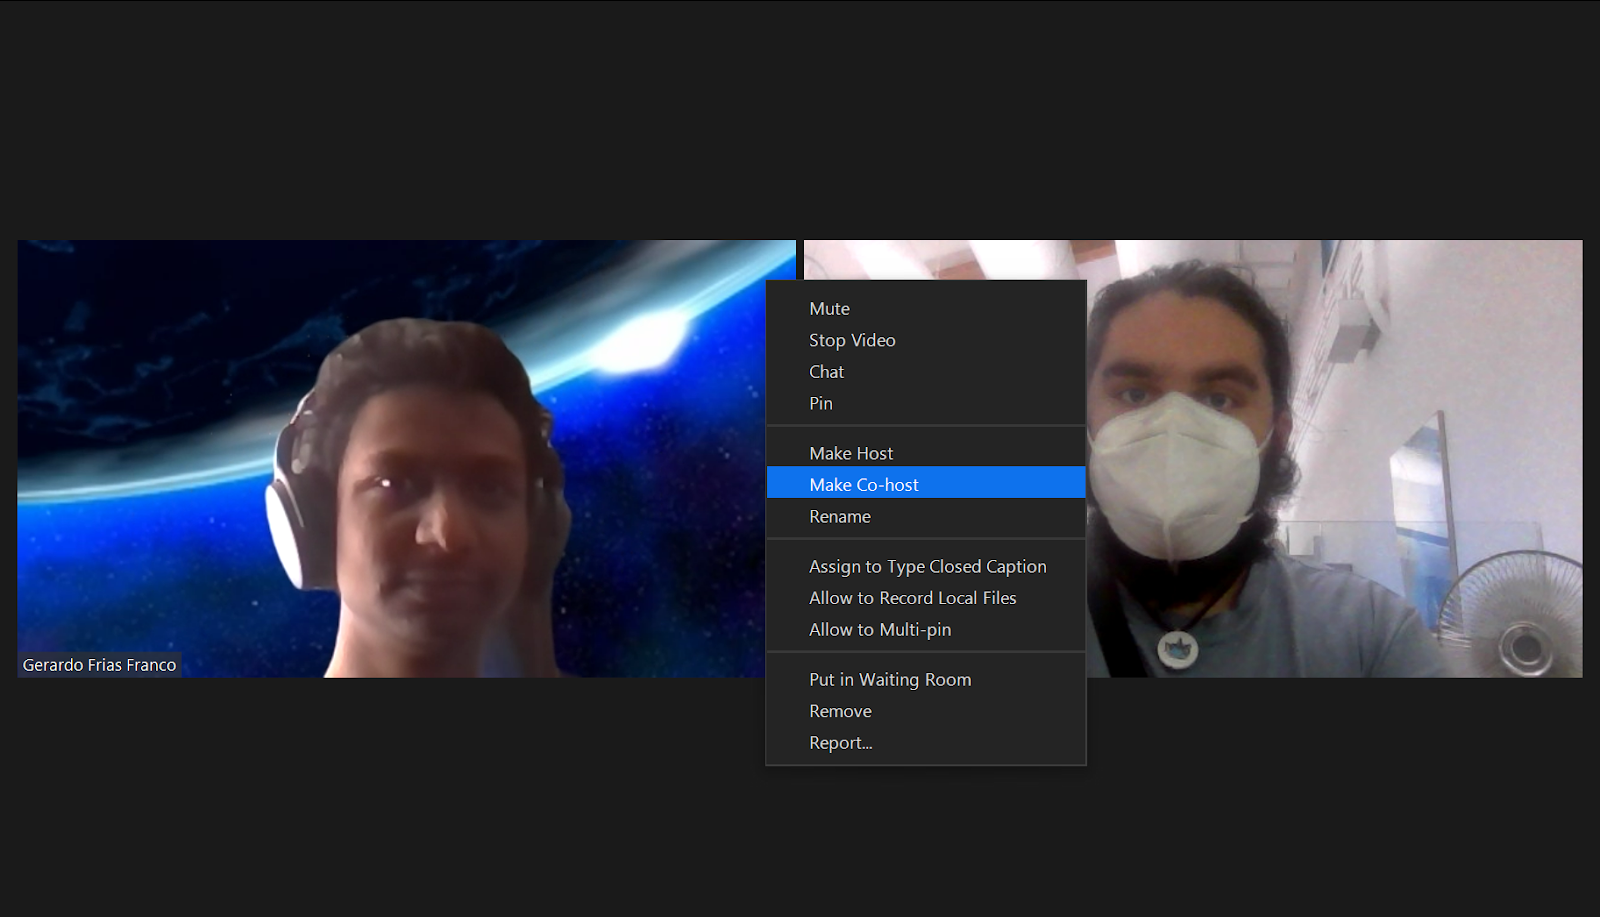
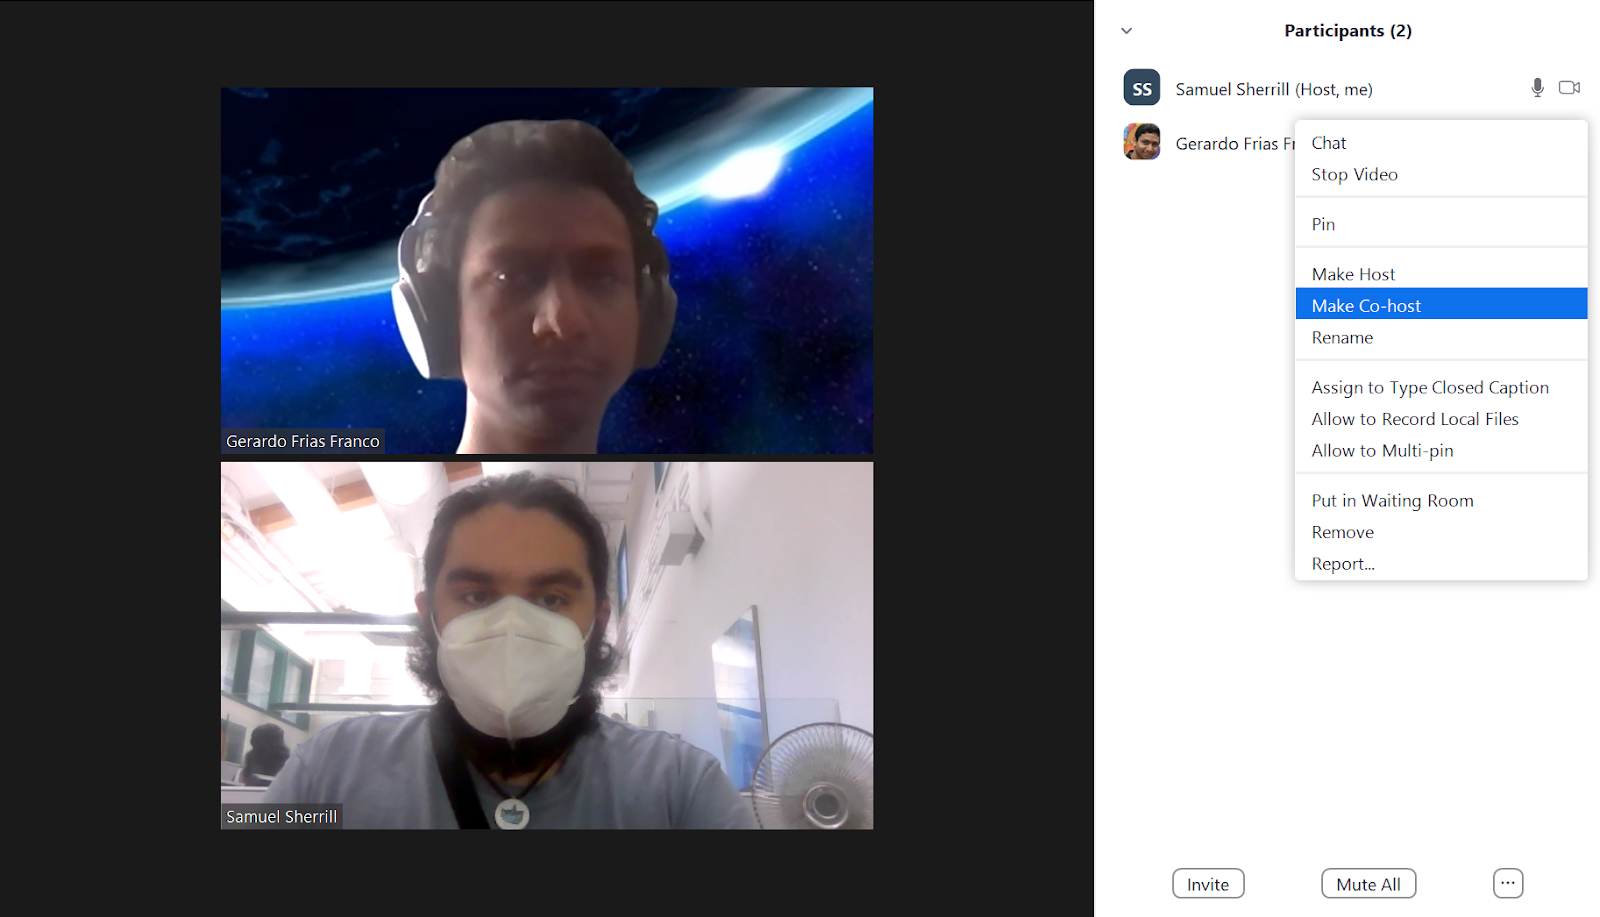
There are two ways that you can make a user a co-host.
- In the meeting, the host hovers over the user's video, clicks on the three dots and chooses Make Co-Host.
- Alternatively, the host can make another participant a co-host through the Participants window.
1. Click on Manage Participants in the meeting controls at the bottom of the Zoom window.

2. Hover over the name of the participant who is going to be a co-host, and choose More.
3. Click Make Co-Host.
Once a participant has been made a Co-host, they'll have access to the co-host controls. For more information see Enabling and Adding a Co-Host.
Enable Waiting Room
When hosting a large zoom meeting, enabling a waiting room allows you to control who can join a meeting and when.
Enabling the Waiting Room
- While scheduling a meeting, under Meeting Options select Enable waiting room
Admitting Participants
One by one:
- During the meeting click on Manage Participants at the bottom of the screen
- Click Admit next to the participant(s) you would like to join the meeting
All at once:
- During the meeting click on Manage Participants at the bottom of the screen
- Click Admit All in the top right corner of the window
Removing a Participant from the Waiting Room
- During the meeting click on Manage Participants at the bottom of the screen
- Click Remove next to the unwanted participant
Audio and Video Settings
1. Make sure the Zoom application window (small box) is open and selected as your primary window
3. Select audio or video tab
a. Under the Audio menu, you can select your audio input/output and the adjust the sound level
b. Under the Video menu, you can configure your webcam and adjust the display settings
4. You can also configure your audio and video settings during a conference call on the bottom left corner of the menu by clicking the pull-up tab

Audio by Phone
- Select pull-up tab by mic icon (see above)
- Click Leave Computer Audio
- Select Join Audio and click the Phone Call tab
- Dial one of the numbers provided
- Enter your meeting ID, followed by #
- Enter your participant ID, followed by #
Mute/Unmute
You can mute and unmute yourself by clicking on the microphone icon or by using push to talk.
Or use the following shortcuts:
For PC:
- Alt + A : Mute or Unmute
For Mac:
- Shift + Command + A: Mute or Unmute
For telephone:
- *6 : Mute or Unmute

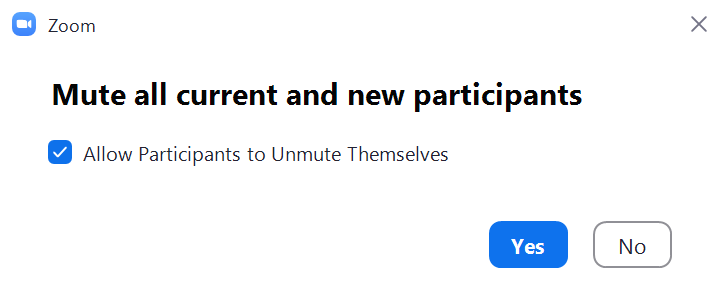
Mute All/Unmute All
You can mute all participants that are already in the meeting as well as new participants joining the meeting.
1. Select Manage Participants
2. Select Mute All

3. You will be prompted to Allow participants to unmute themselves. Clicking Continue will mute all current and new participants. You may unclick the check box if you do not want participants to be able to unmute themselves (you are still able to unmute them).
Full Screen
Making your zoom window full screen is the recommended for the best viewing experience.
- Once in a zoom meeting, click on View in the top right corner of the screen. This will open a drop-down menu. Click Fullscreen in that menu.

- You can exit full screen by click Exit Full Screen in the same location or by pressing the esc key on your keyboard.
Record Zoom Meeting
Creating Polls
1. Go to your profile and click Meeting Settings
2. Enable Polling
3. Schedule a meeting (See Host Zoom Meeting)
4. Once created, under Manage “My Meeting” scroll to the bottom to Poll and click Add
a. Adding Poll During Meeting
i. Click Polling on the bottom menu
ii. Click Add A Question and click Save once entered
5. Select Start this Meeting when you’re ready to start your conference
6. Click Polling on the bottom menu
7. Click Launch Poll

Screen Sharing in Zoom Meeting
a. Must be on PC or Mac
3. You will be given the option to enable a single user to screen share at a time or allow multiple users to screen share simultaneously
a. These options can be further configured under Advanced Sharing Options in the pull-up tab next to the Share Screen button
4. Select which opened file you want your participants to control and select Share Screen again
a. Sharing iPad/iPhone Screen
i. Select iPad/iPhone Screen or iPhone/iPad via Cable
ii. If prompted, choose to install the plug-in
iii. Follow the instructions to connect your iOS device
iv. On phone/ipad tap Screen Mirroring in control center and choose Zoom-your computer name
- To view the Participants and Chat windows while sharing your screen, scroll to the top of the Zoom app window and you should see the Participant and Chat buttons on the Options bar. If one is not visible, clicking the More button should show the missing button in a dropdown.
Remote Control Computer Screen
a. Must be on PC or Mac
2. Select which opened file you want your participants to control and select Share Screen again
a. Participants viewing someone else’s screen can also click Request remote control right under Options

b. iPad: Touch and move the "Mouse icon" or tap the "Keyboard icon" to type.
Regaining Control
- Click anywhere on your screen
Leaving Zoom Meeting
- Leave a meeting by selecting Quit Zoom under zoom.us or simply by closing the window
- Hosts will be given the option to “End Meeting for All” or “Leave Meeting”
Classroom-Specific Guidelines
Think Tank Meetings
(Request mac mini keyboard and mouse from IT helpdesk)
Set-up
1. Set-up the room (tables, chairs, etc)
a. Make sure tables and chairs are oriented towards the TV
b. NOTE: The webcam may be tested prior to starting a Zoom conference to ensure all individuals are in the field of view
2. Power on the TV using the button on the left side of the TV
3. Set input to the Mac mini by cycling through the sources using the button on the left side of the TV
4. Launch the zoom.us Application
5. Select one of the following options after signing in: 1) Start with Video, 2) Start without Video, 3) Join, 4) Schedule, 5) Share Screen
a. Click Join Audio Conference by Computer to enable audio or disable audio by closing the pop-up window
Using the Conference Phone for audio
- The best option for audio in the Think Tank when using the webcam to display the room is to use a conference phone (located in the drawer of the cabinet in the Think Tank)
Audio by Phone
- Select pull-up tab by mic icon (see above)
- Click Leave Computer Audio
- Select Join Audio and click the Phone Call tab
- Dial one of the numbers provided
- Enter your meeting ID, followed by #
- Enter your participant ID, followed by #
Settings
1. Volume settings
a. May be adjusted on the TV or using the VIZIO remote
2. Audio settings
a. The TV has a built-in microphone, an external microphone is not needed, but these settings may be changed in preferences
3. Display settings
a. Zoom conference hosts have the option to display iOS and Android devices during a meeting
b. Screen sharing may be enabled by clicking Screen Share in the Zoom interface
i. You will be given the option to enable a single user to screen share at a time or allow multiple users to screen share simultaneously
ii. These options can be further configured under Advanced Sharing Options in the pull-up tab next to the Share Screen button
c. Dual monitors and fullscreen mode may be enabled under Preferences in the General tab
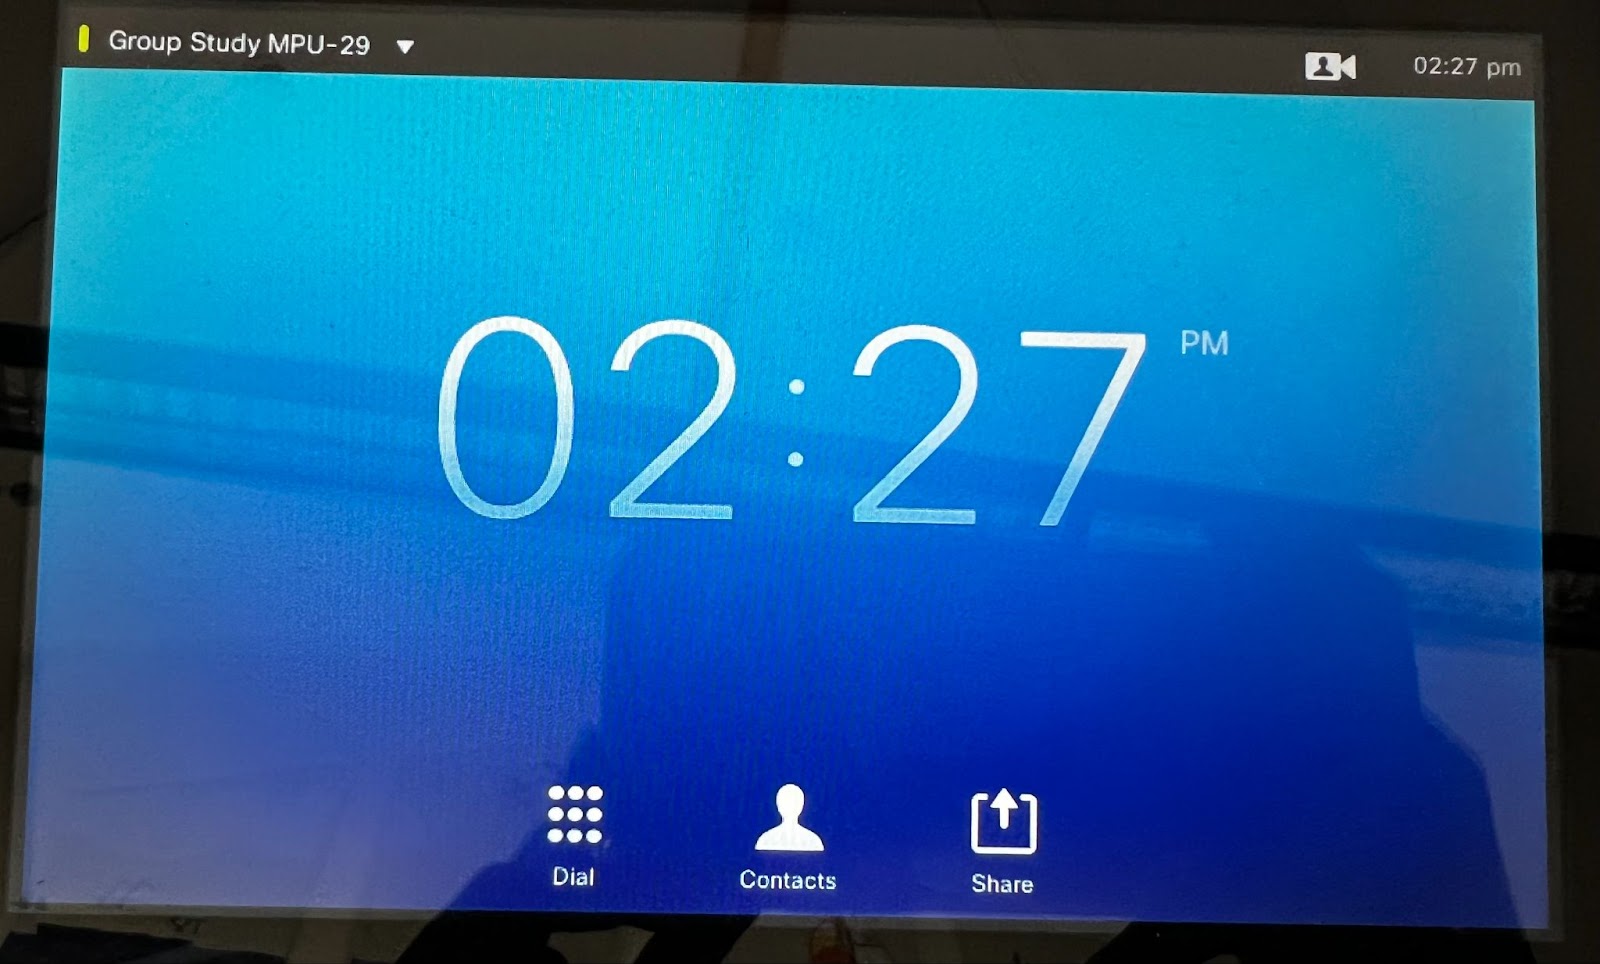
Mobile Presentation Unit (MPU)
Connect your computer to an MPU
- Connect the HDMI cable to the video port on your computer and wait for the MPU to wake up.
- Tap the “Share” button on the touch screen unit.
- Tap the orange “PC HDMI” button on the touch screen unit.
Your computer should now display on the MPU screen.
Join an MPU to a Video Conference using Zoom
1. Sign into zoom using SJSU or CSUMB username and password
2. Open zoom interface and click start with video
3. Click Invite → Invite a Room System (on the top right) → Call Out tab
4. Click on the SIP radio button and enter the SIP address for the MPU to which you wish to connect:
a. For the MPU in the group study, enter: MLMU29@SJSU.CALL.SL
b. For the MPU in the student conference room, enter: MLMU20@SJSU.CALL.SL
5. Zoom will dial the MPU and people in that room can answer the call and join the conference.
a. The screenshot below shows how inviting a room system looks:

How to host a video conference call using a MPU system
1. Sign into Zoom using SJSU or CSUMB username and password
2. Open Zoom interface and click Start with Video
3. Invite people to the conference call by clicking Invite → Invite by Email→ pick the email you want to use and send
4. Add the room system by clicking Invite → Invite a Room System (on the top right) → Call Out tab
a. The screenshot below shows how inviting a room system looks
5. After inviting everyone turn off your audio and video on your personal computer
6. The conference call should now be coming through the MPU system
Setting Up Zoom Room
Open Zoom
Select Call a Room
Enter the SIP: Found on MPU Device Setup (On the physical station)
Start a Zoom Meeting
Join with computer audio
Click Participants > Invite Participants

On the ribbon, choose the “Room Systems” option
Pairing Code
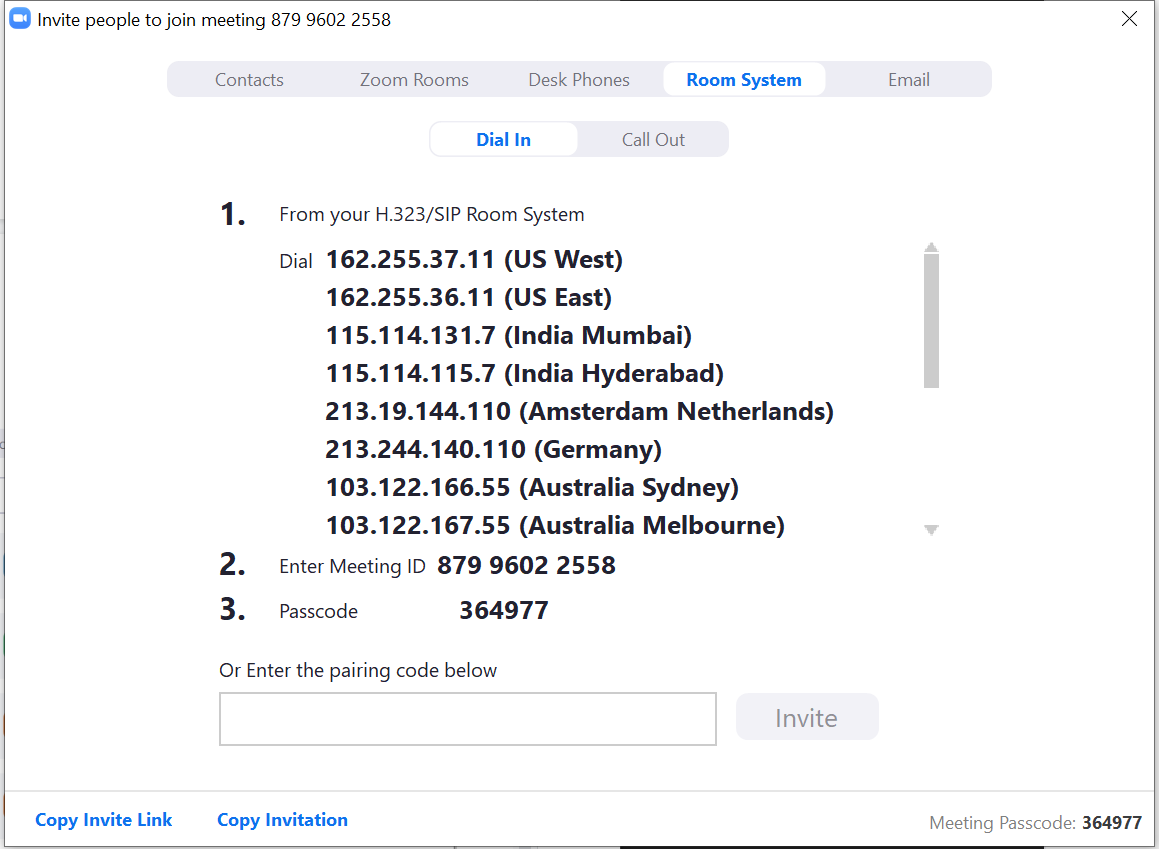
Under 1. in the dial in section, there will be numbers available based on region. Determine the number that is applicable (US West)
Dial that number on the MPU touch screen
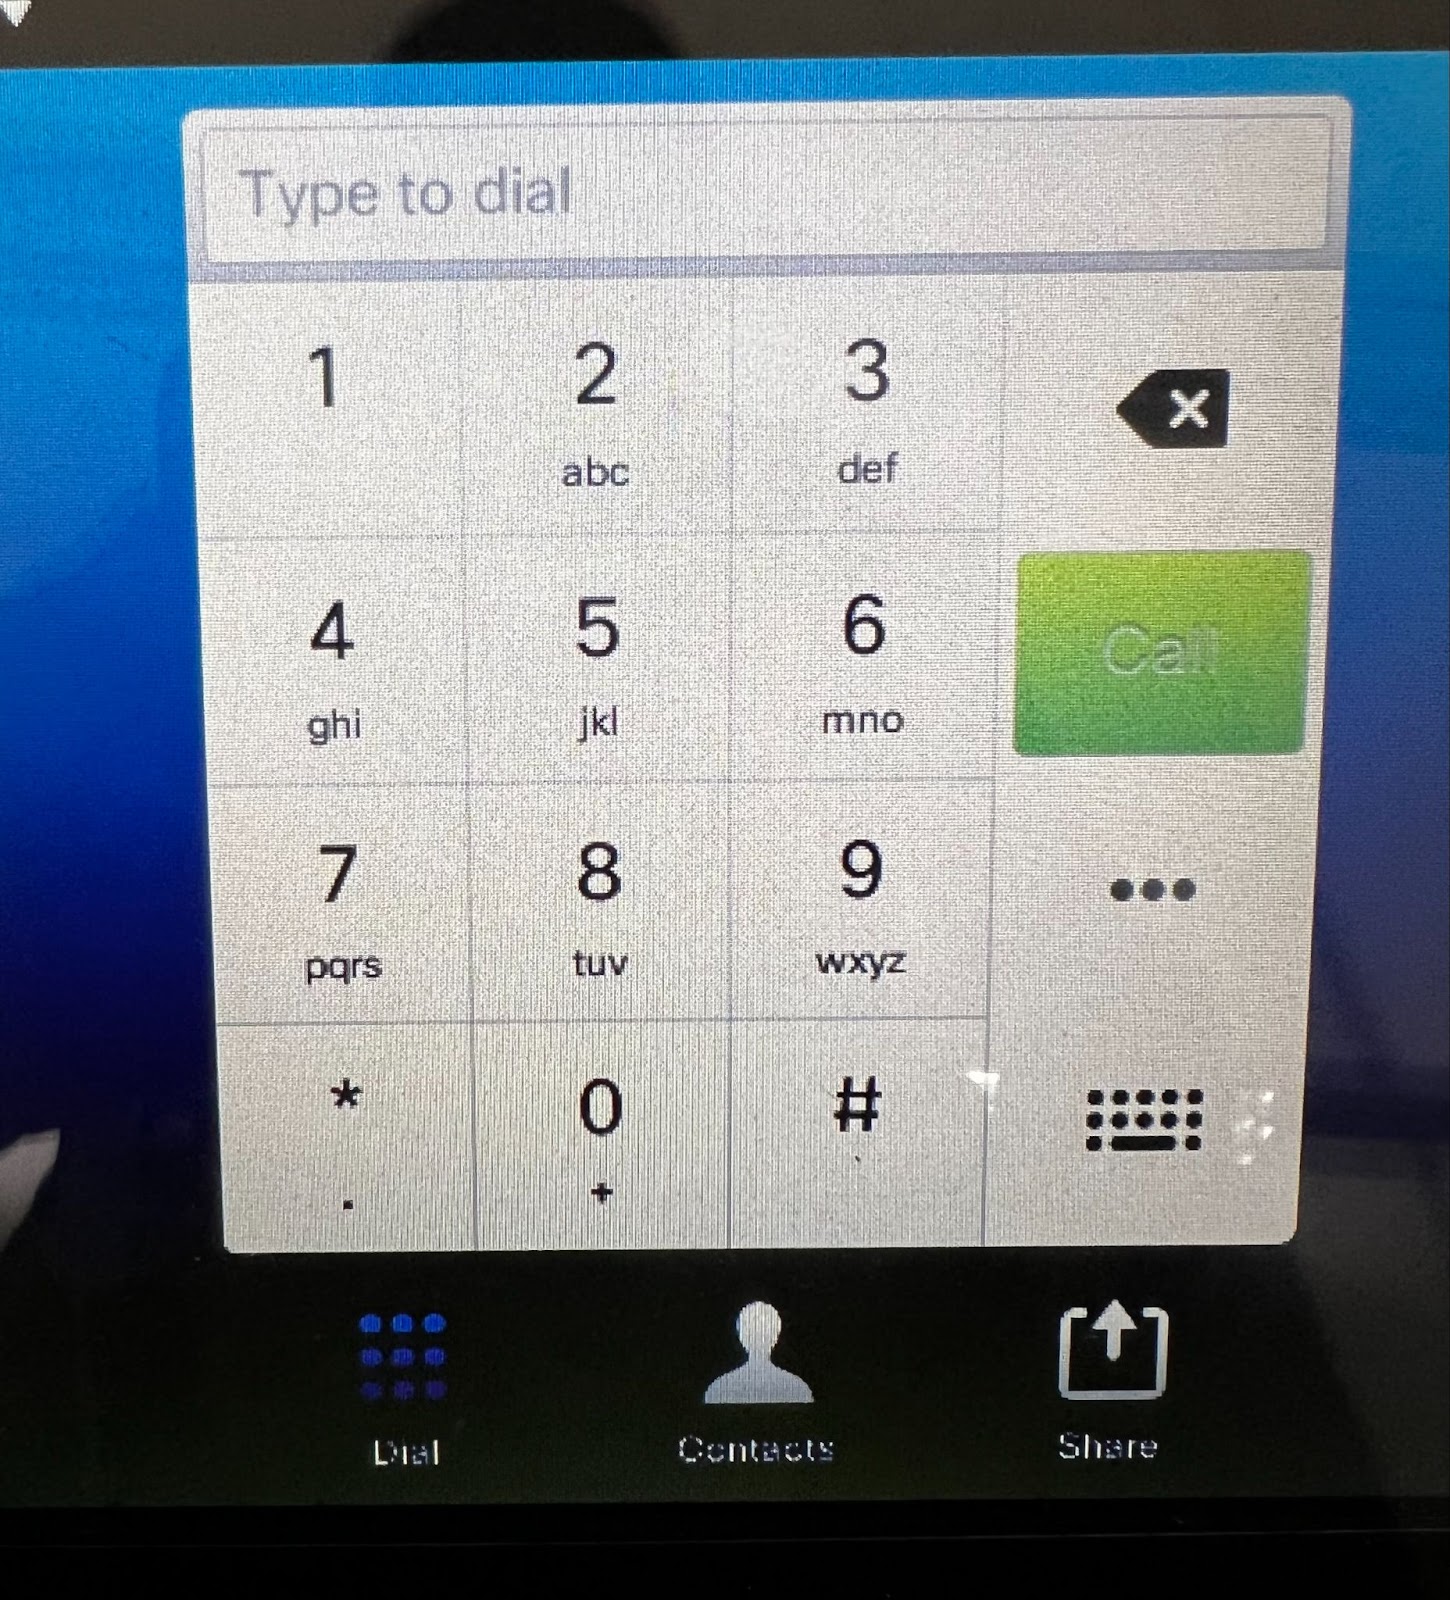
Zoom will ask user to input the Meeting ID # or display a pairing code (i.e BTBTS)

Enter the pairing code in the Zoom invite dial in window.
Select Invite
Dial-In
For the Dial-In option, the user can contact the Zoom from the MPU device.
Under 1. There will be numbers available based on region. Determine the number that is applicable (US West)
Dial that number in the MPU touch screen [As shown above]
Zoom will ask user to input the Meeting ID #. Type the Meeting ID using the touchpad and press the pound (Hashtag, # ) key to join [Meeting ID Can Be found at the top left of the Invite Window]
Zoom will ask the user to input the Meeting Password. Type the Meeting Password using the touchpad and press the pound (Hashtag, # ) key to join [Meeting Password Can Be found at the top left of the Invite Window]
User should now be in the meeting
Call-Out
For the Call-Out option, the user can use their personal device to telephone the MPU device.
Choose the Call-Out option > Choose SIP
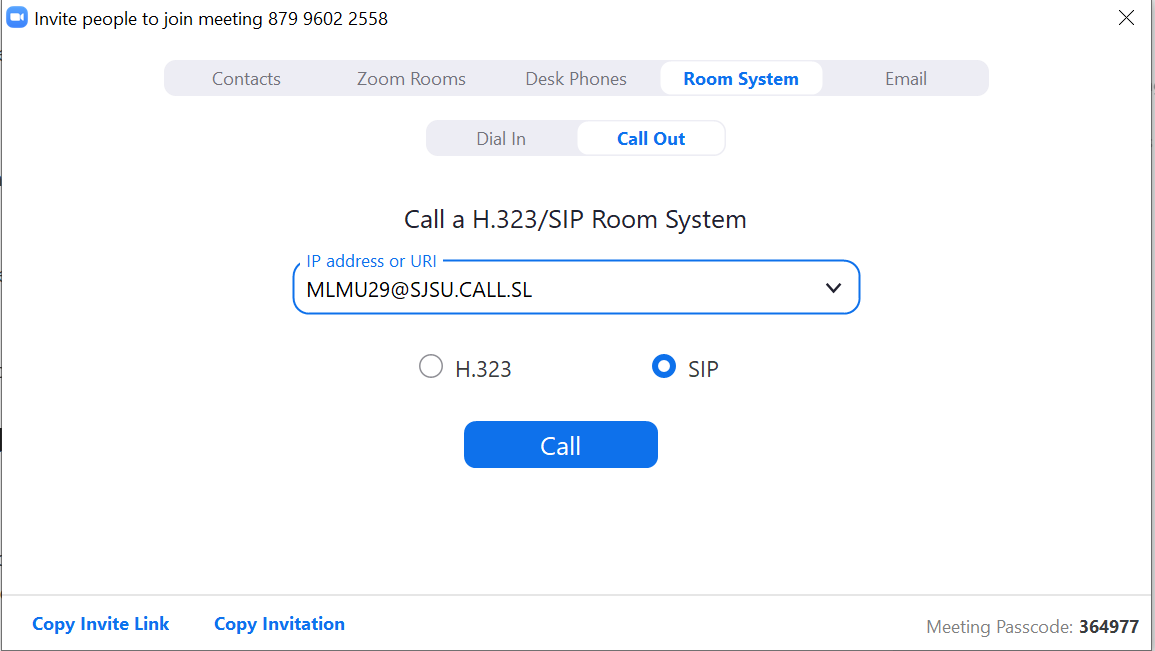
Enter the IP address or URL: Located on the MPU device setup > Call
The MPU should display an incoming call from Zoom+Meeting ID
Answer the call to connect your Zoom Room

Troubleshooting the MPU
If the MPU will not play sound, and the volume controls are not helping (possible solution to other issues).
Please contact the IT Help Desk Staff to request technical support. The Help Desk Techs will perform the following:
1. Try a hard reboot.
a. Unplug it and plug it back in.
b. Wait for it to boot and connect.
Zoom for Remote Teaching at MLML
How to host a Remote Class at MLML using Zoom:
For a more comprehensive guide for using Zoom, follow this link.
For Zoom Security Best Practices & Recommendations, follow this link.
What you will need:
-
Laptop - for hosting the Zoom meeting
- Download the Zoom App
- Mobile Phone (to sign in to Duo)
- Conference Phone (optional to enhance audio if in a group)
The setup procedure is as follows:
- Download the Zoom App
-
Go to https://sjsu.zoom.us/ and click the Sign In button

- Sign in and authenticate with Duo
-
Click Schedule a Meeting - fill in the information and choose the following options:

- Topic: Class # and Title
-
Fill in Date & Time of class
- Select Recurring Meeting > Weekly
- Select Recurring Meeting > Weekly
- Registration Required: Unchecked
- Require Meeting Password: Unchecked
- Video: Off for both
- Audio: Both
-
Meeting Options - Select the Following:
- Enable join before host
- Mute participants upon entry
- Record Meeting Automatically - In the Cloud
- Click the Save icon to save the settings.
-
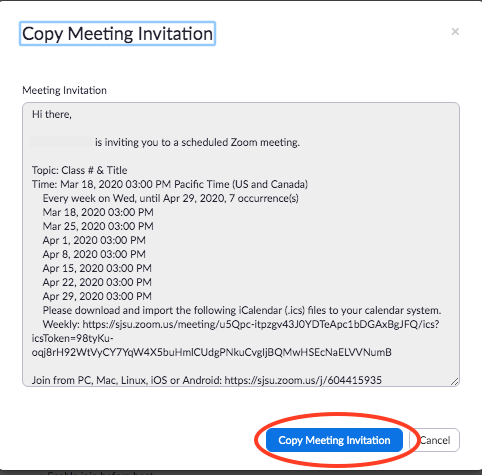
Click the Copy the invitation link, the info will be copied to your clipboard and you can send it to your meeting attendees via email.


-
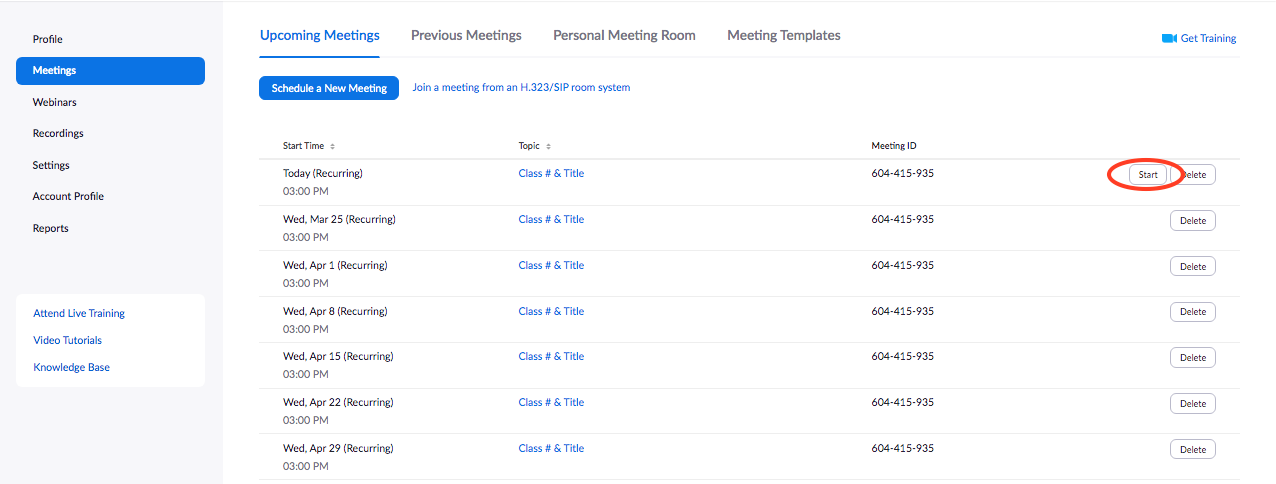
When you are ready to start the Zoom meeting:
- Go to https://sjsu.zoom.us/, sign-in, and click Meetings on the left
-
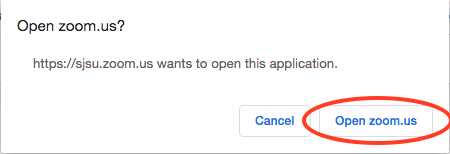
Click the Start Meeting button to start the Zoom meeting

- Click Open zoom.us on the Pop-Up

-
Three Audio Options for Zoom:
-
- Join with Computer Audio: if you are alone in an isolated setting (i.e., office, home)
- Join with Mobile Phone: if your computer audio is poor quality, call into the meeting with your mobile phone and use it as your mic - make sure to plug into power for long lectures
- Join with Conference Phone: if you are in a room with a group of people so everyone in the room can speak through the phone & hear outside participants. (Make sure the phone is positioned centrally in the room)
-
-
(Optional) If calling in with mobile/conference phone: Select the Phone Call tab.

-
-
- Dial Zoom # (1-646-876-9923) or one of the numbers given under Phone Call tab (dial 7 first if calling out of MLML phone)
-
Enter Meeting ID followed by #
-
- Can be found at top of Zoom Meeting browser or in the email Invite
-
- Enter a participant ID followed by #, or press # only to skip
-
-
-
Select Share Screen when you’re ready to show your slides to your class
- For more help on sharing screen, visit this link
- (Optional) Unmute the Conference Phone or participants
- Click Participants at bottom of Zoom Browser
- Click the microphone icon next to the conference phone #
- Be sure to review the Zoom Security Best Practices & Recommendations page.


Guide for Zoom Seminar Participants
Configure Zoom Prior to the Seminar
- Download the Zoom Client app ahead of time
- If you don’t anticipate asking questions, watch seminar via YouTube on our Live Stream Page
- Set your name in your Zoom portal and/or app
- Configure your Zoom Client app to have your video and mic turned off upon joining:
- Instructions:
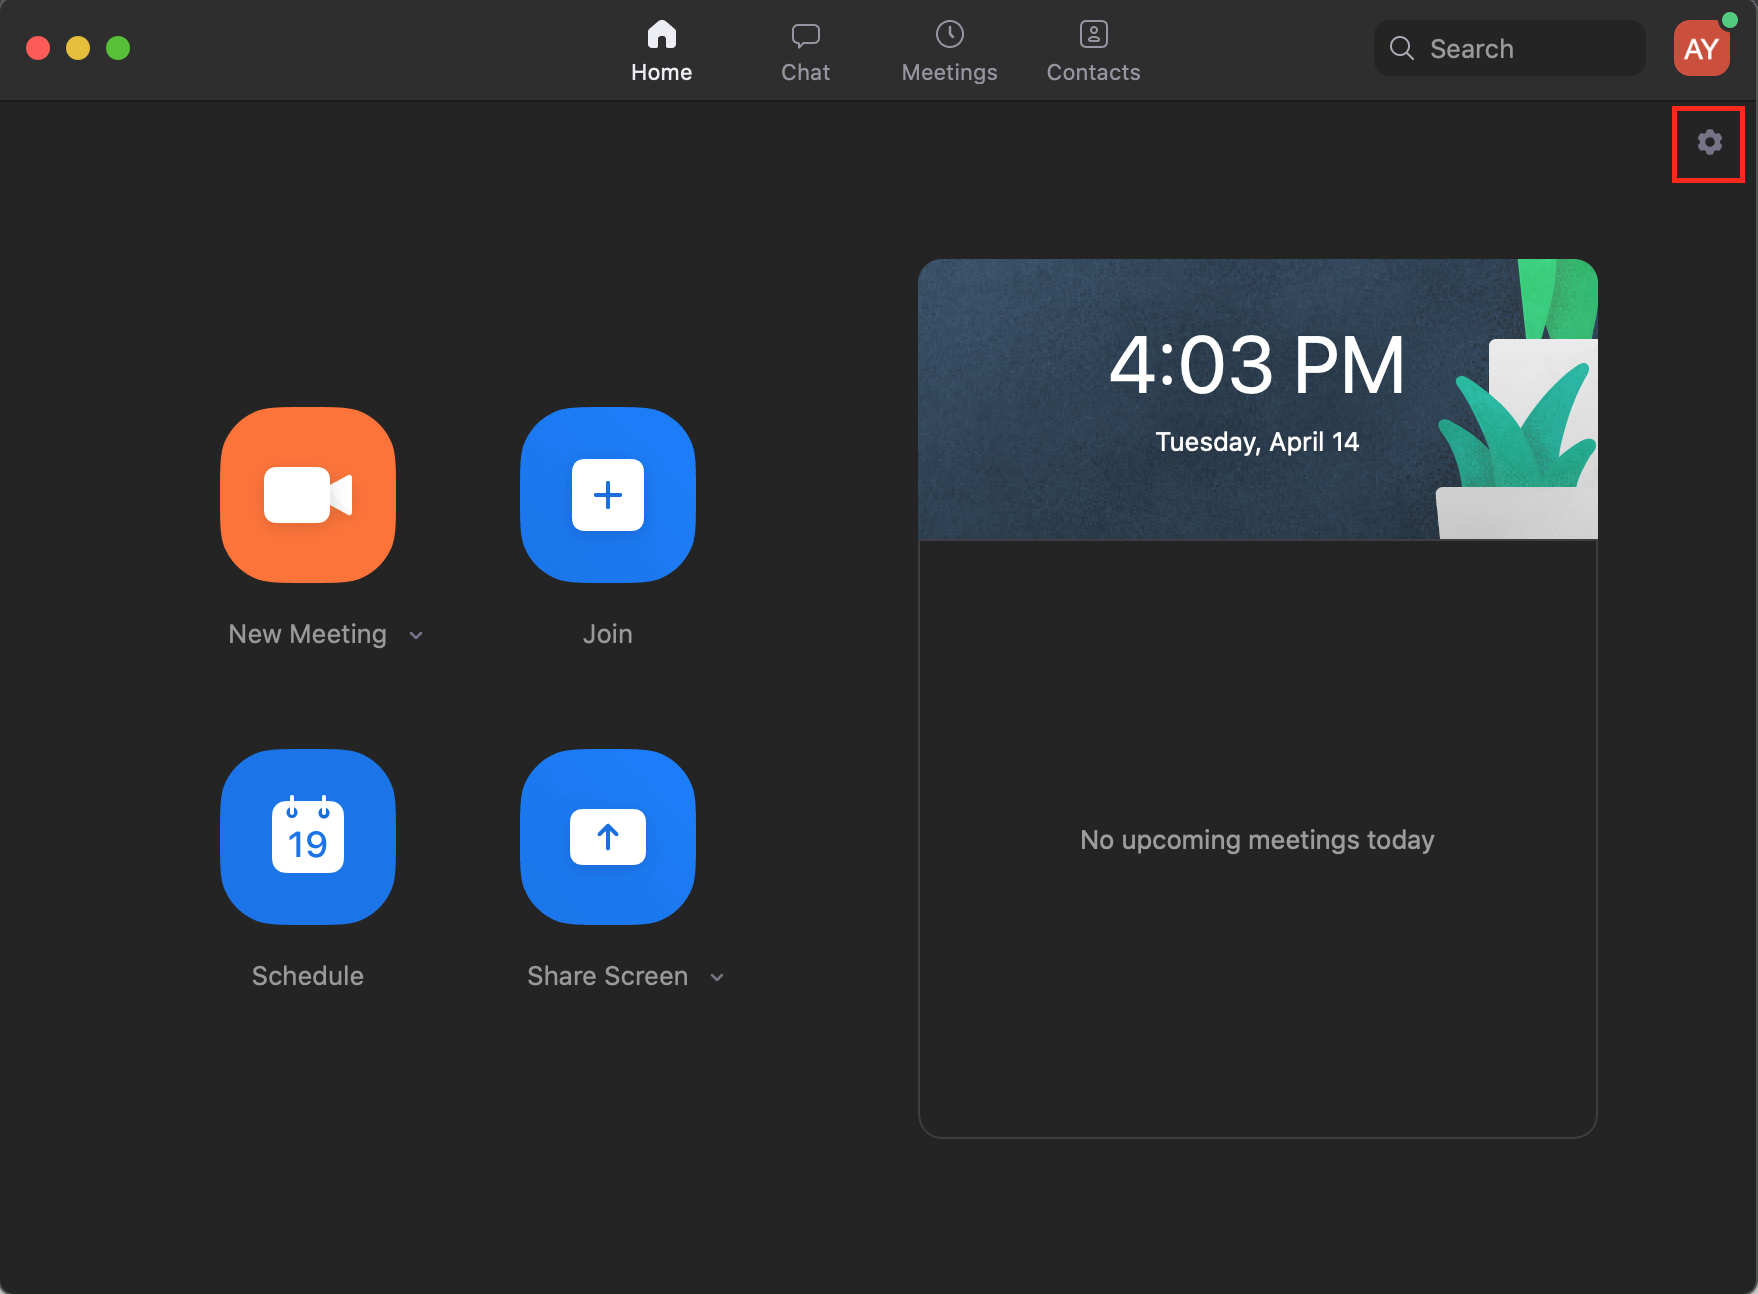
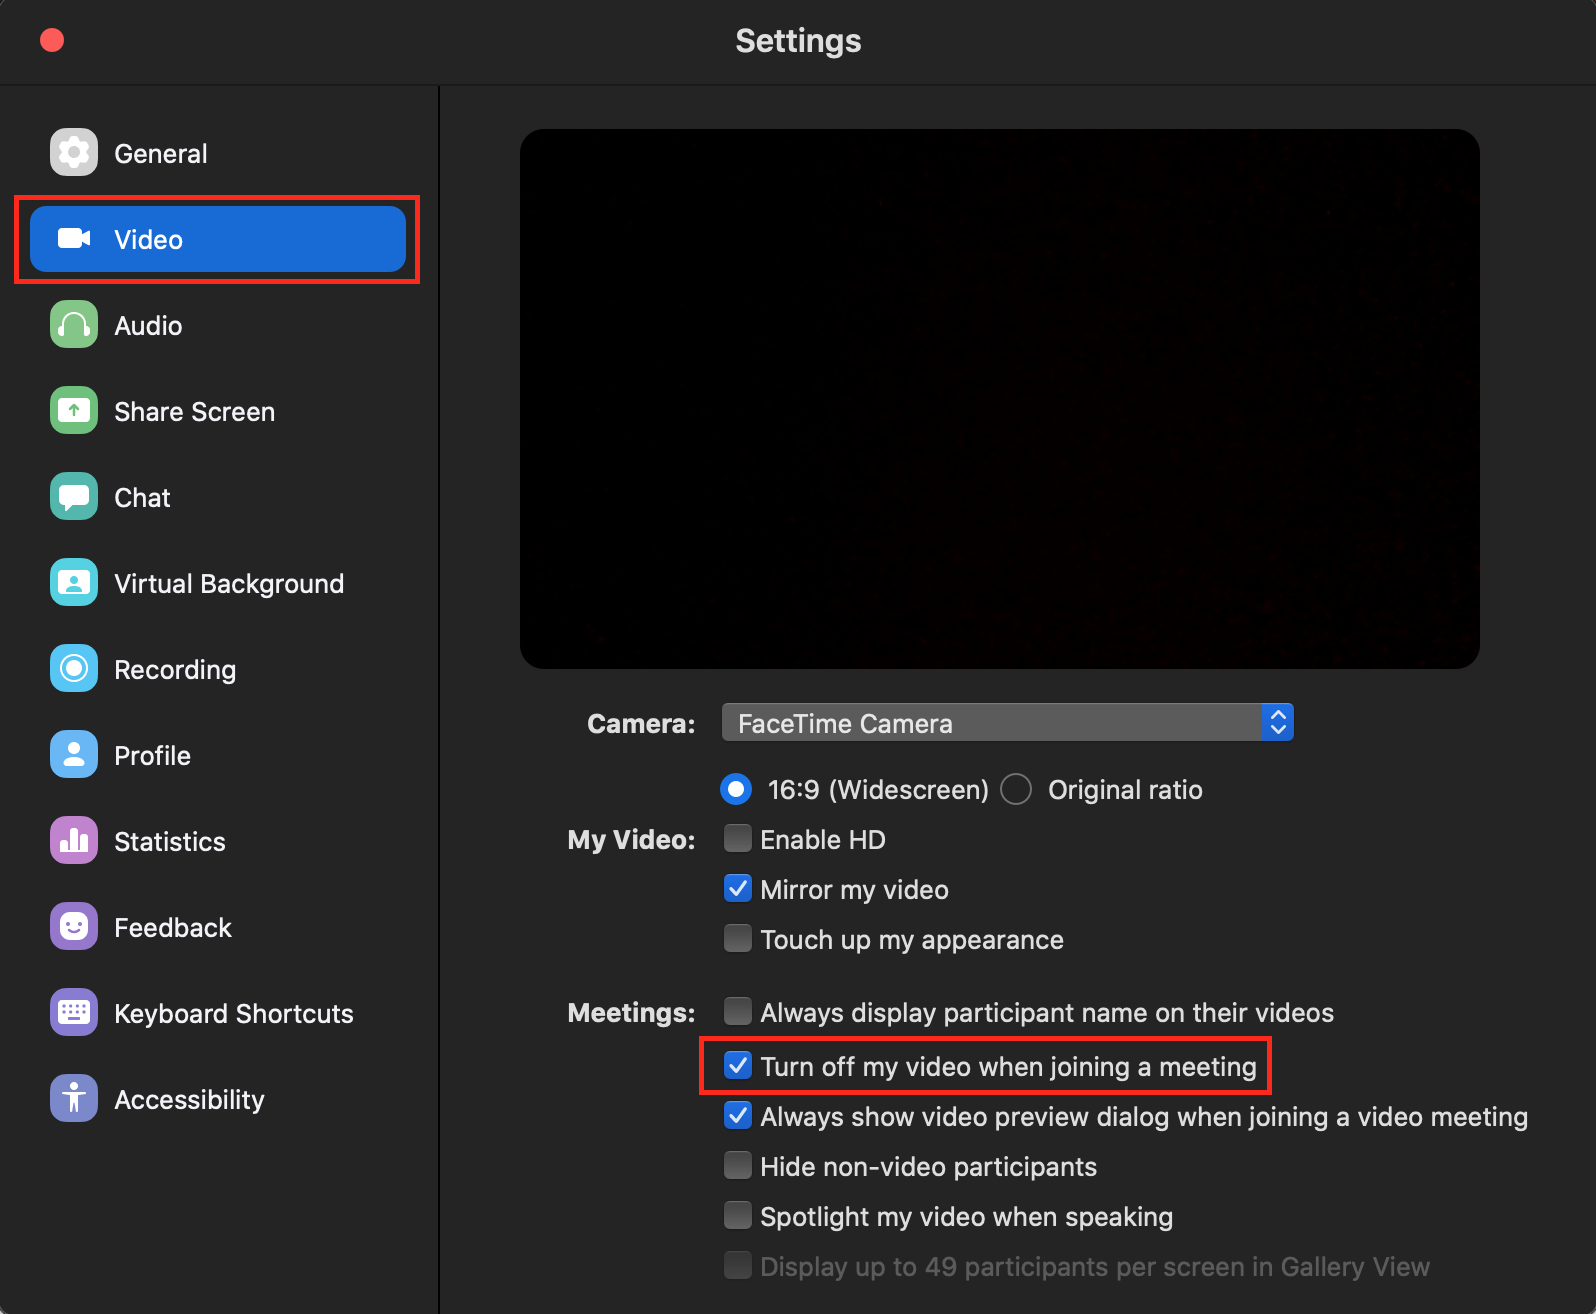
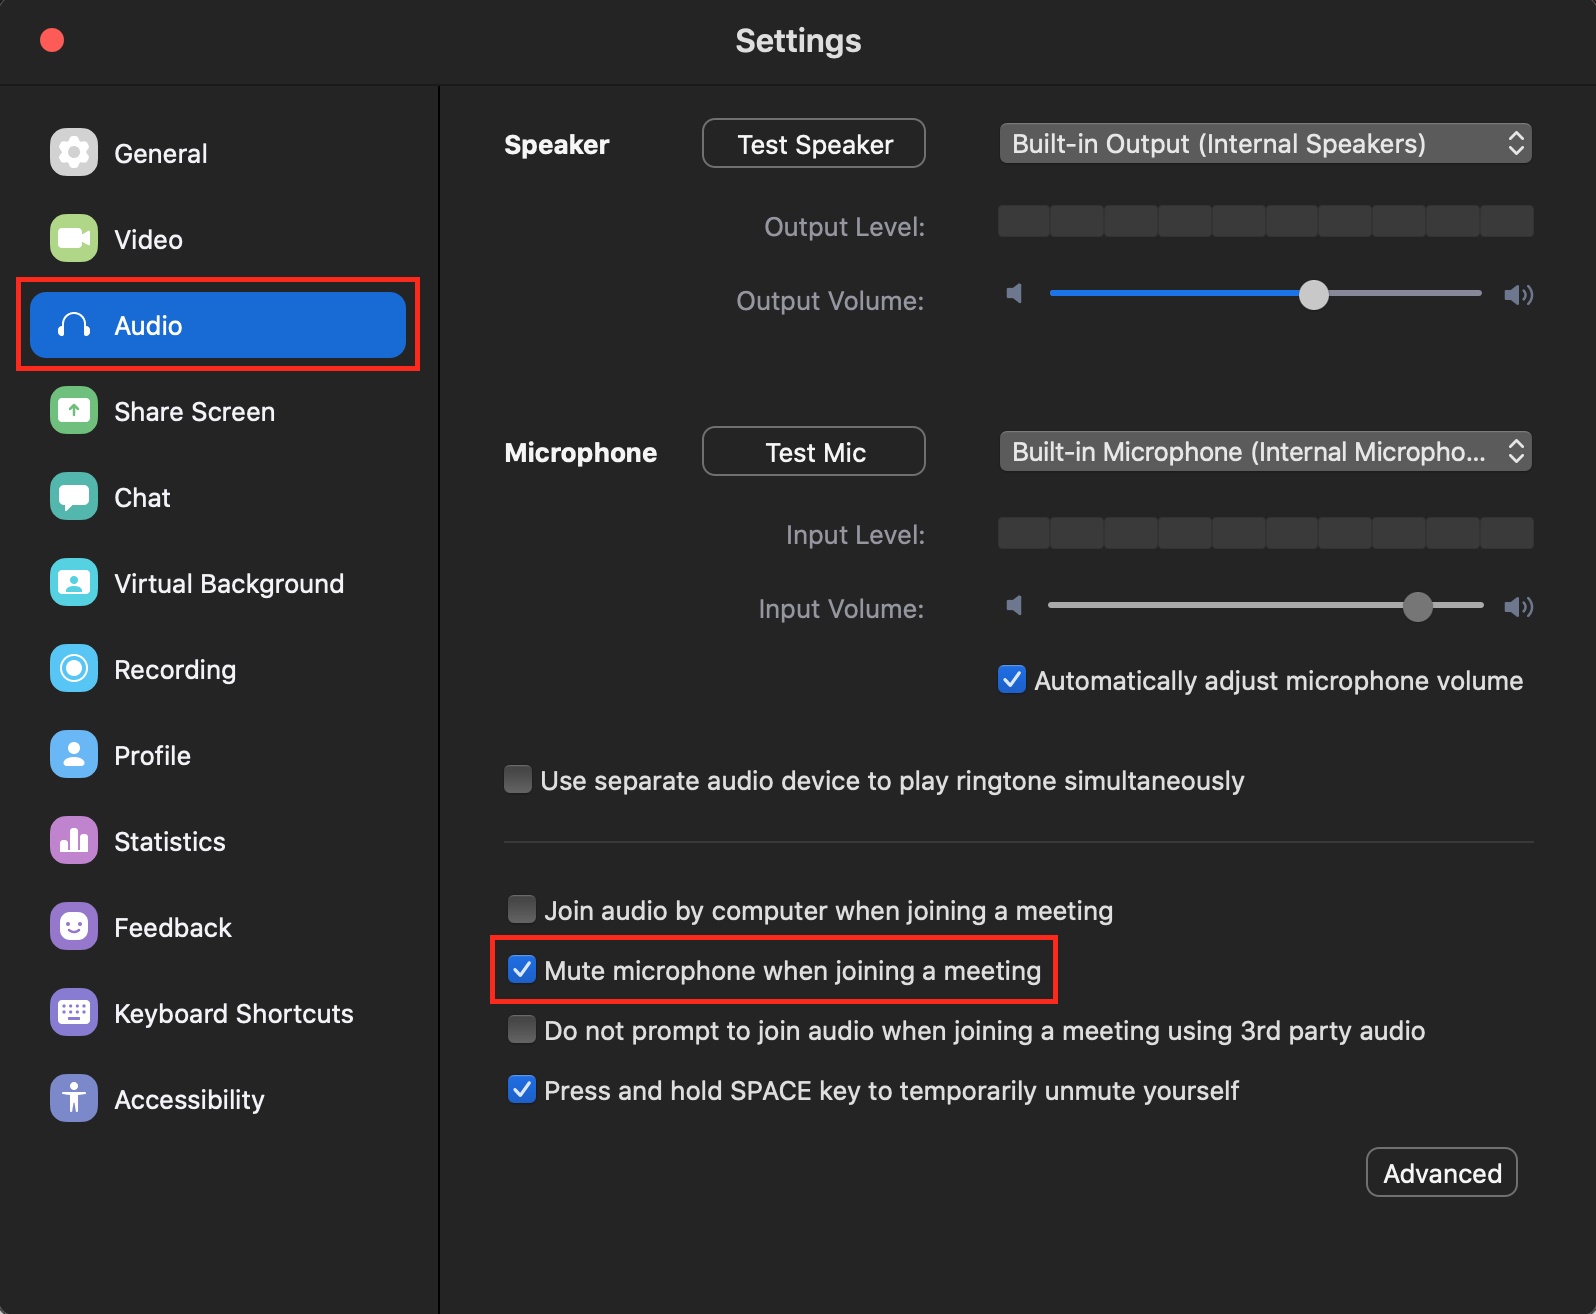
- Login to Zoom app
- Go to Settings

- Select the Video tab on the left > Turn off my video when joining meeting

- Select the Audio tab > Mute my mic when joining a meeting

Guidelines During the Seminar
- Join the seminar ~5 minutes early by clicking the Zoom link in the seminar announcement email
- Keep your mic muted and video off during the seminar talk
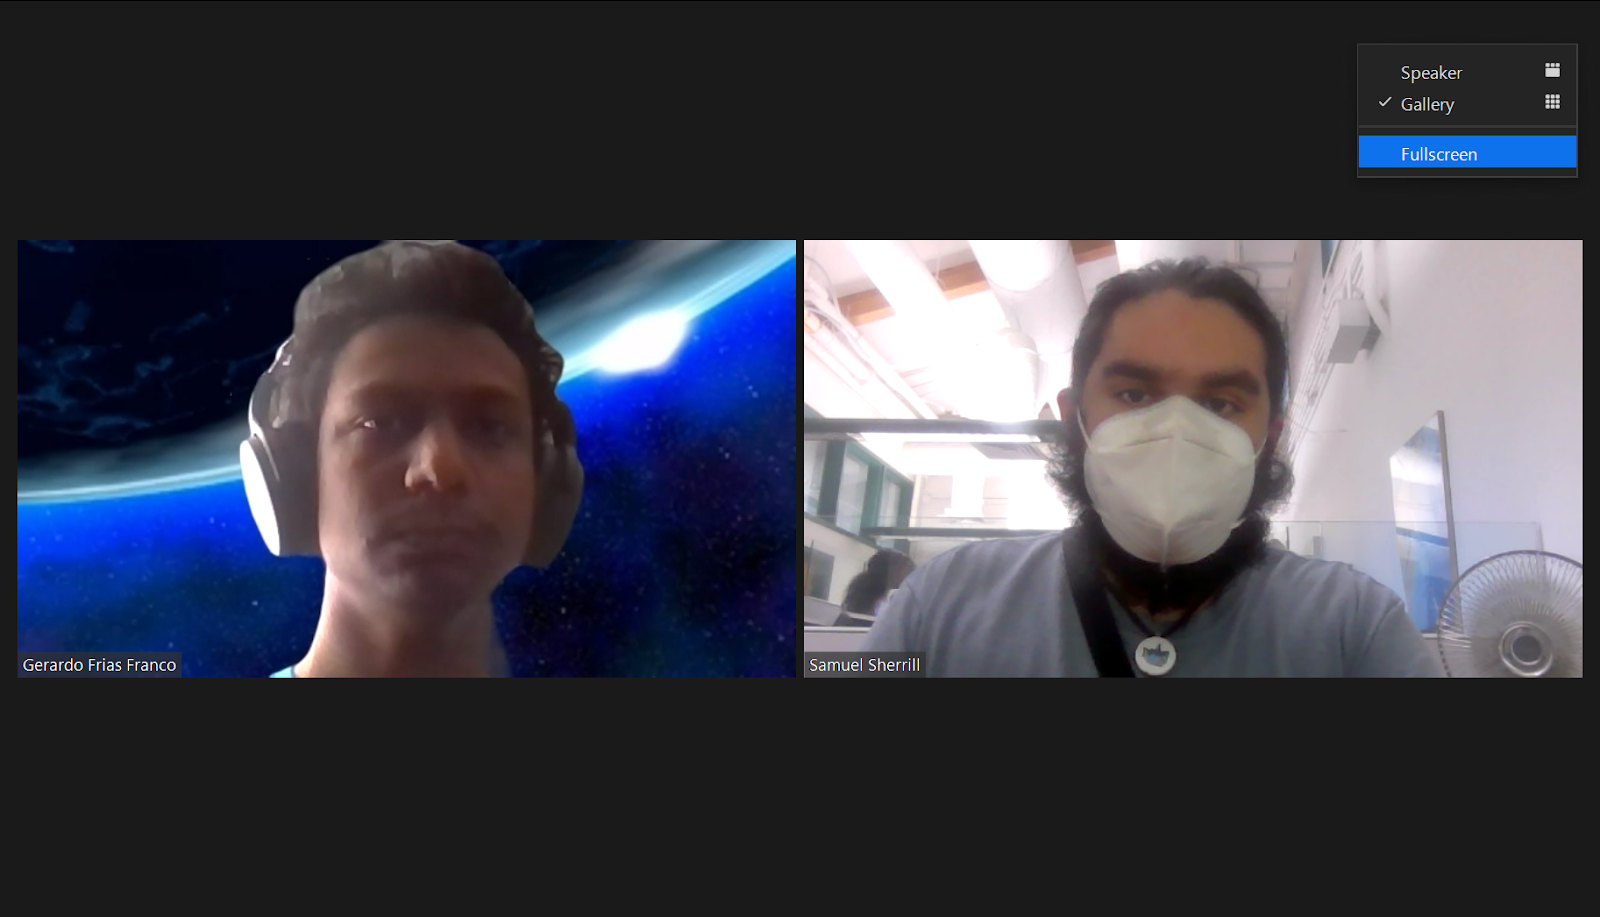
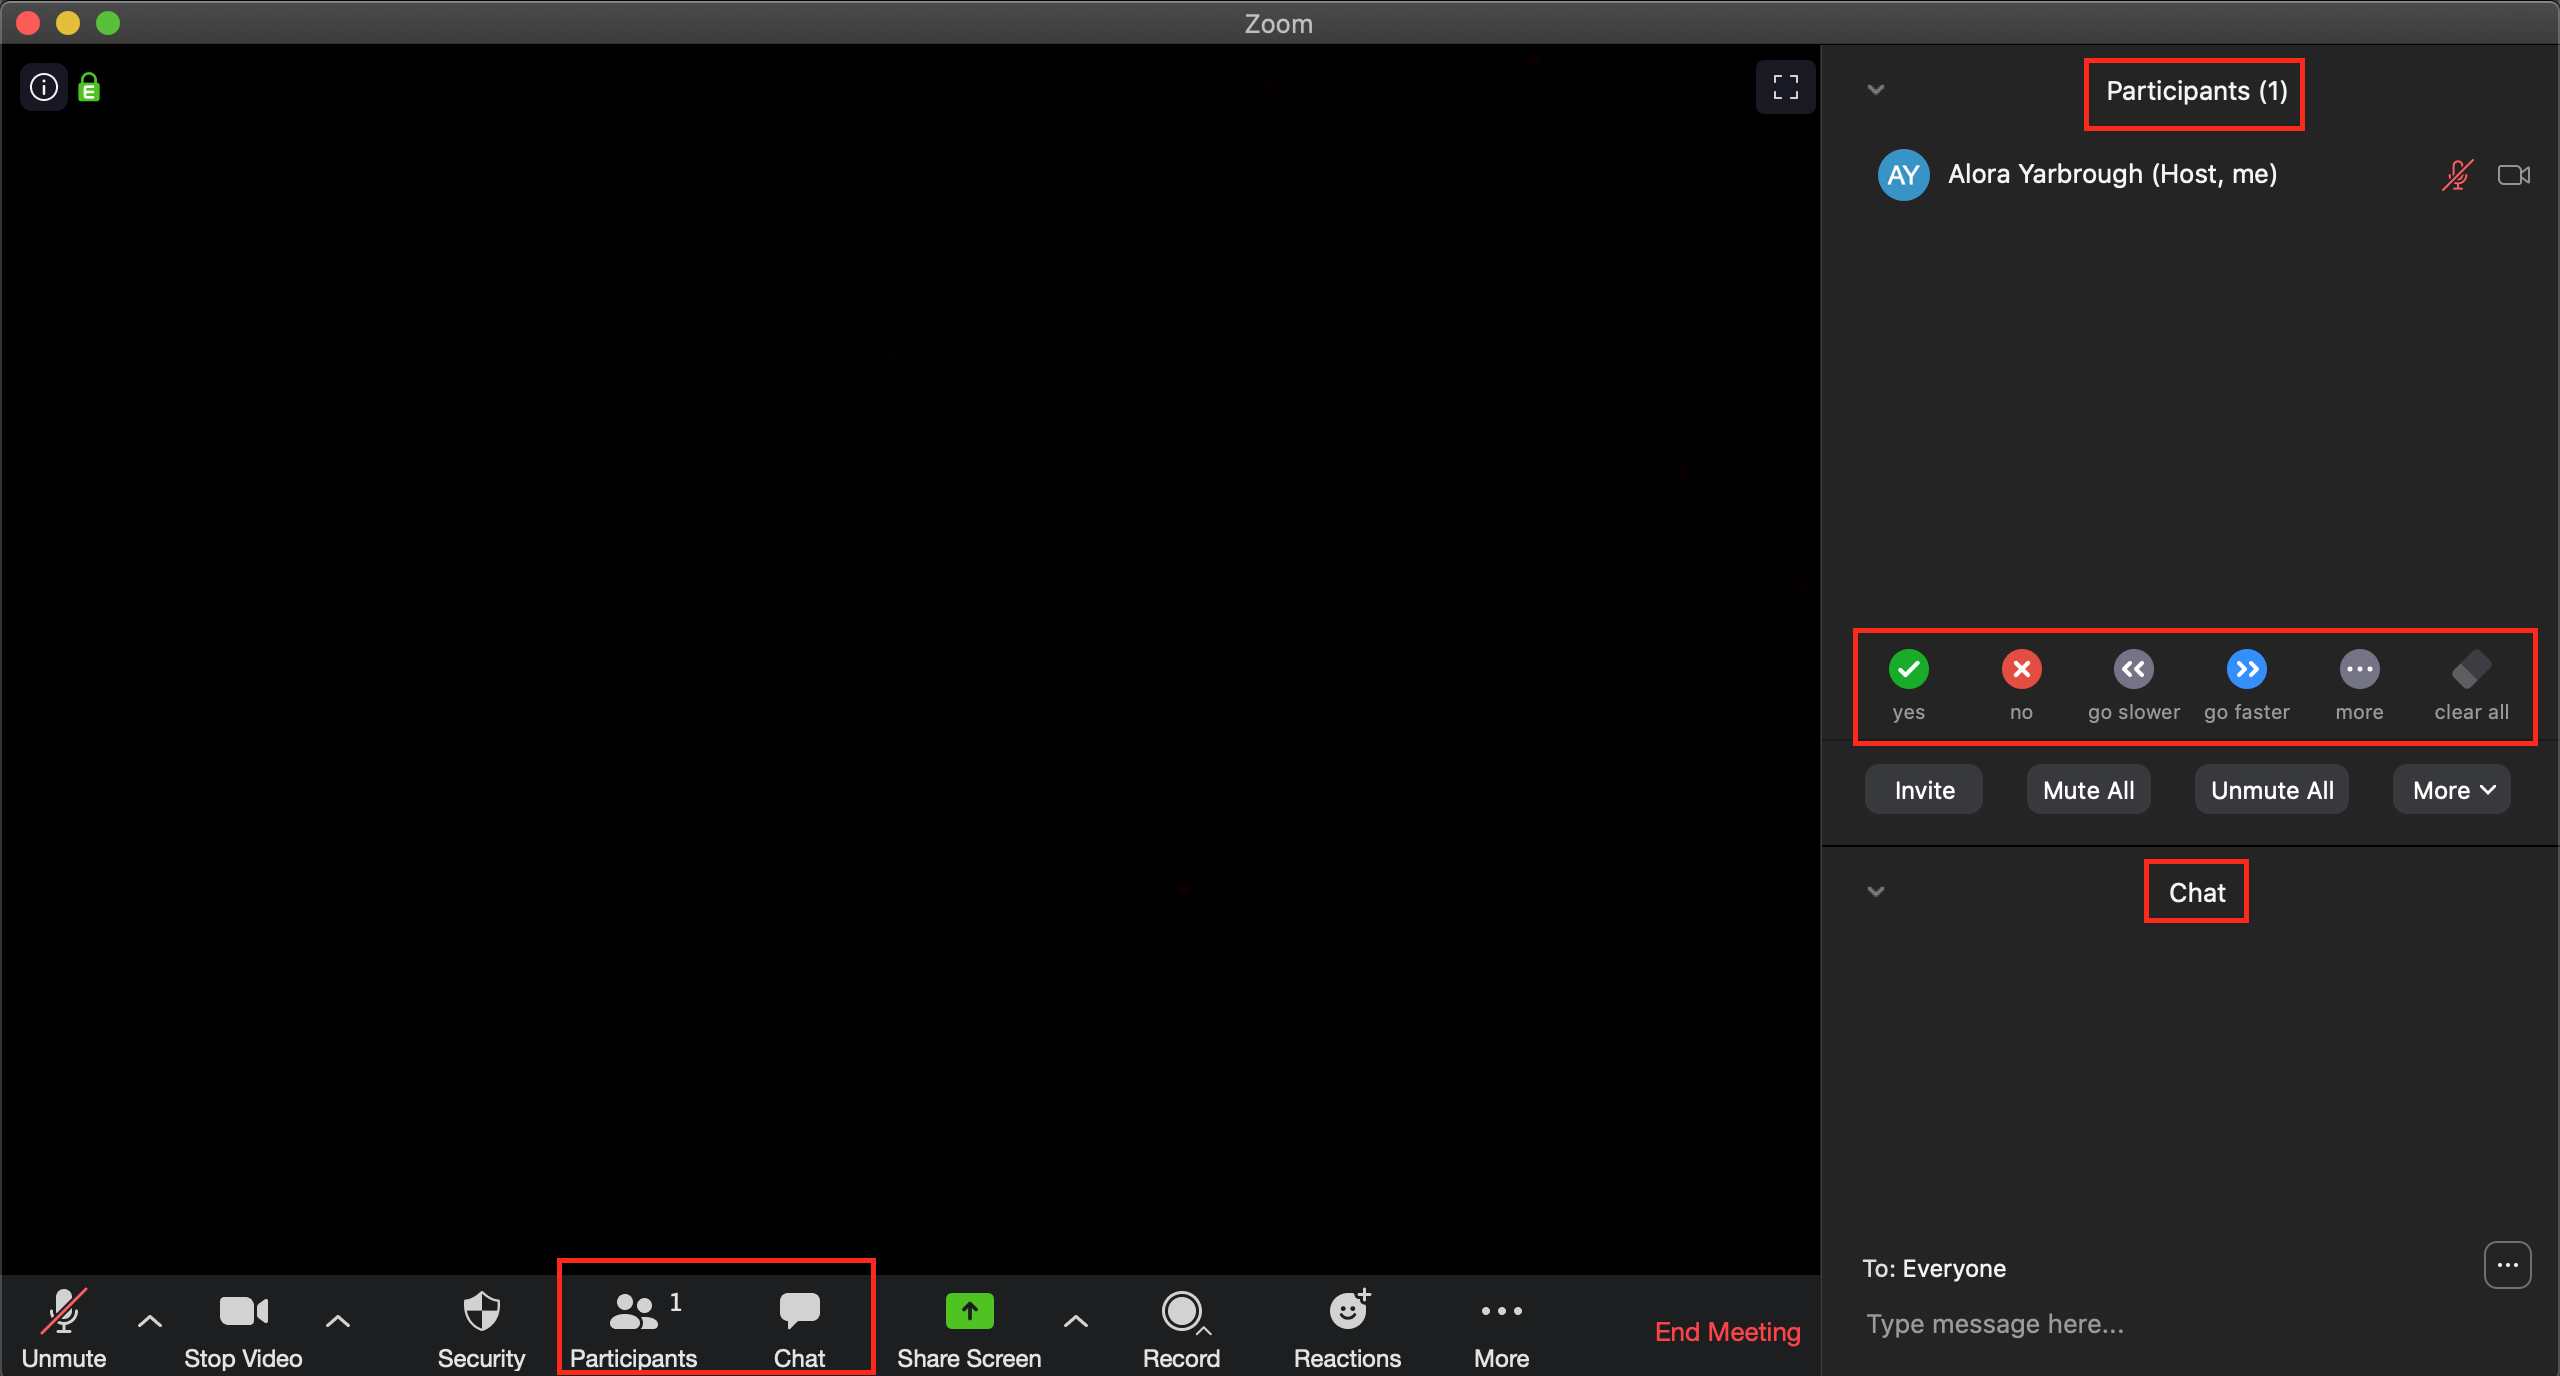
- Keep chat window and participant window up (see image below)
- You can click a participants name in Chat window or the 3 dots in the video/profile pic to chat with them
- Participant window has useful features to communicate without unmuting:
-
Raise Hand - use if you want to ask question at end
(or you can chat your question) - Applaud - use to thank speaker at end of talk
- Like/Dislike
- Slow Down/Speed Up
- Yes/No
- Need a Break

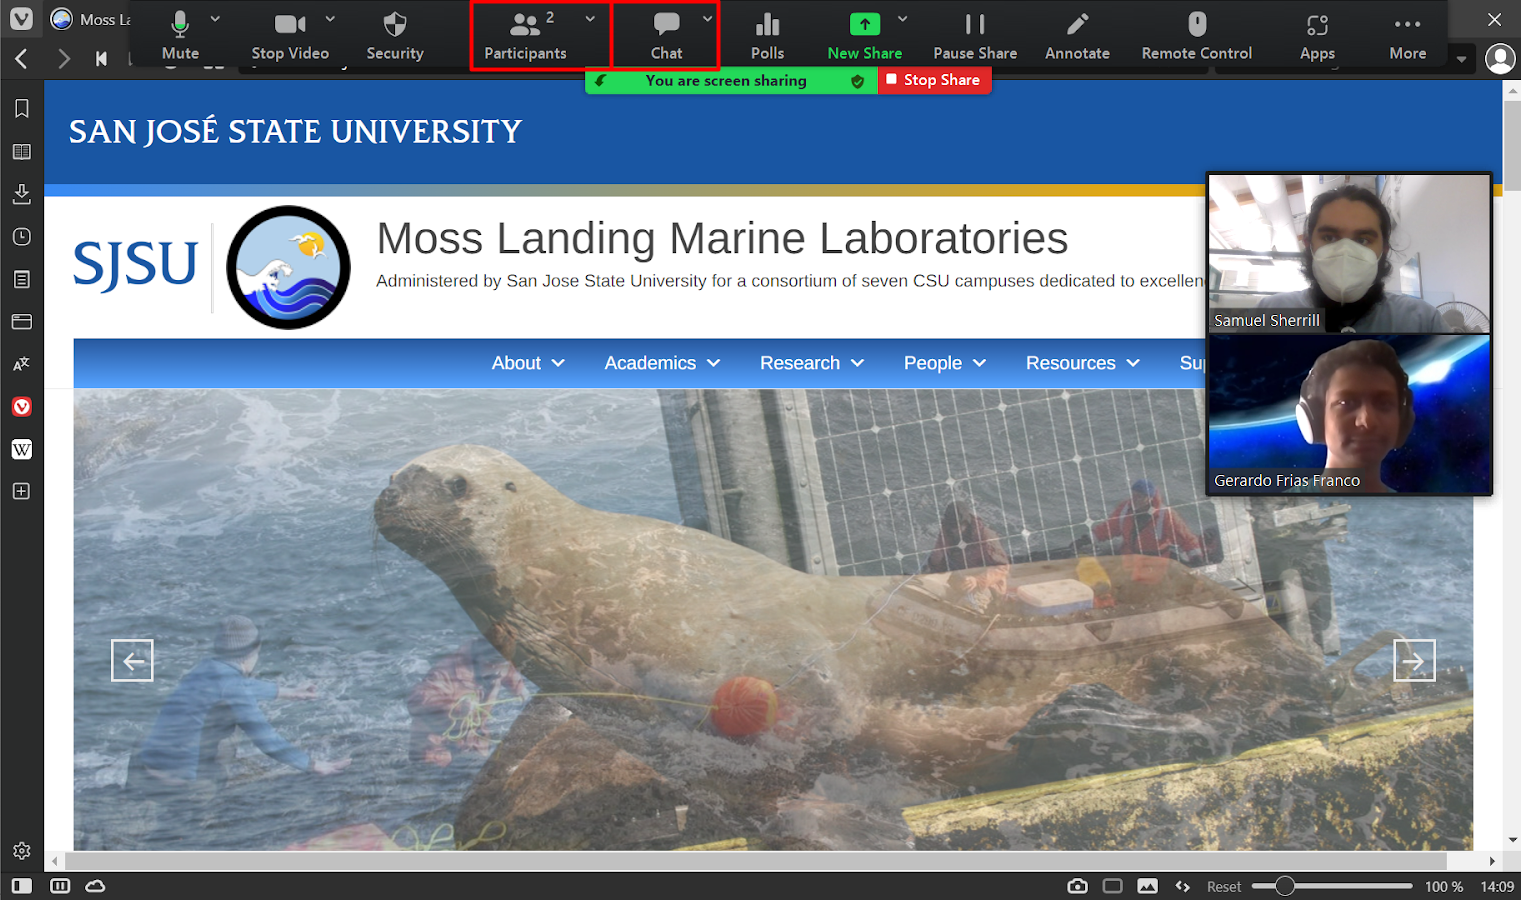
- If you need to view the Participants and Chat window while sharing your screen, navigate to the top of your Zoom app and you'll find the Options Bar. The "Manage Participants" option will be on the bar and the Chat option you'll find in the "More" option on the bar:

Zoom Security Best Practices & Recommendations
Do's and Don'ts at a Glance
Scheduling: The Do's |
Hosting: The Do's |
|
General Security: The Don'ts
|
Hosting: The Don’ts
|
Keep Zoom Up-to-Date
- Windows: Open the zoom app > sign in > click your initials in the top-right corner > click "Check for Updates"
- macOS: Open the zoom app > click the zoom.us menu > click "Check for Updates..."
Security Recommendations
General Security:
Account Security Settings:
- Sign-in to Zoom > Settings (left-side menu panel)
- Enable Personal Meeting ID - OFF
- Require a password when scheduling new meetings - ON
- Require a password for instant messages - ON
- Embed password in invite link for one-click join - OFF
- Require password for participants joining by phone - ON
- Mute participants upon entry - ON
- Screen sharing- ON
- Who can share - Host Only
Best Practices & Tips
- Select “Participants” at bottom of Zoom browser to view & manage participants
- Select “Chat” at bottom of Zoom browser to open chat window
- Click a participants name in the Chat window or the 3 dots in the video/profile pic to chat with them
- Tips for Hosts & Co-Hosts: Keep Participants & Chat windows open during entire meeting
- Set your name in your Zoom portal and/or app
- Let your class know that the meeting is being recorded
- Plug your phone into power when using it to record video on Camtasia or Zoom
-
When you share your screen, you can select to just share a web browser or app instead of your entire desktop
- You can select Whiteboard under Share Screen to illustrate points
-
Hide non-video participants
- Hover over participants thumbnail at top of Zoom Browser
- Select the three dots
- Select “Hide non-video participants”
- If using a conference phone for audio, be sure to mute the other computers/TVs in room that are in the meeting
-
Large Meeting Tips:
-
- Wait to admit participants until the meeting starts
- Participants with raised hands will rise to the top of the recipient list
- Assign multiple Co-Hosts to help moderate a large meeting
- Pause the recording until all participants are in the meeting and the meeting starts
-
- When sharing your screen, you can view the Participants and Chat windows by scrolling to the top of your Zoom app and clicking the Participants on the Options Bar or the Chat button in the More section:
Phone Alternatives: Zoom and Google Hangout
Zoom
Zoom is a video conferencing application available to CSUMB and SJSU affiliates (students, faculty, staff, etc.) Instructions for setting up Zoom may be found here. Users are able to host or join conference calls, video conference call, and share their screen (when having multiple displays, the user can pick which screen[s] to share).
Here’s a link to SJSU's Zoom website: https://sjsu.zoom.us/ (Login with your SJSUID)
Here’s link to CSUMB’s Zoom website: https://csumb.zoom.us/
The Group Study (Rm 103) and the Student Conference Room (Rm 414) have Mobile Presentation Units (MPUs). These units can be used to share your computer screen (like the Think Tank and Dry Classroom), or they can be used for video conferencing using Zoom. They are essentially TVs with a Cisco video conferencing system attached.
If you would like to use one of the units for a video conference, please indicate so on the appropriate reservation request form.
Google Hangouts
Google Hangouts is an easy way to video chat and hold meetings with up to 50 people. The service may be accessed online through the Gmail, Google+ websites, or mobile applications.
For more information and help visit G Suite Hangouts.
Adding the Zoom Chrome Extension for Scheduling Zoom Meetings via Calendar
This page will teach you how to add the Zoom extension to your Google Chrome browser. The Zoom Scheduler Chrome Extension allows participants to schedule Zoom meetings directly from Google Calendar. Using the extension, you can start an instant meeting or schedule a future meeting. The meeting join link and details are sent via a Google Calendar invitation so the attendee can join with a single-click from their calendar.
Requirements:
- Google Chrome
- Zoom Chrome extension from the Google Chrome Web Store
- Zoom account with Google, work email and password, or Single Sign On (SSO) login
- Using Google Calendar to schedule meetings
How to Install the Extension:
- Before you can schedule meetings using the Chrome extension or directly in Google Calendar, you need to install the Zoom Scheduler extension from the Chrome Web Store. Click Add to Chrome in the upper right of the extension window.
How to Navigate the Extension:
- The Zoom Chrome extension will install an icon next to your Chrome address bar. If you click the Zoom button, the Chrome extension will open.
- Sign in to your Zoom Account.
- Once signed in, you will have additional options in the Chrome Extension:
- Schedule a Meeting: Click Schedule a Meeting to open up a new event on Google Calendar.
- Start a Meeting: Hover over Start a Meeting to choose to start with video or start without video. Learn more about instant meetings.
- Name/email address: Click on your name or email address to open your Zoom profile page.
- Gear icon: Click on the Gear icon to open the Zoom meeting settings.
How to Schedule a Zoom Meeting Using the Calendar Extension:
- Create a new calendar event or edit an existing calendar event.
- Open the additional options for the event.
- For a new calendar event, click More Options.
- For an existing calendar event, click the Pencil icon.
- Click Make it a Zoom Meeting.
- This will create a Zoom meeting and populate the meeting details in the description.
- Click Save.
- **Note: The settings you have saved in your Zoom account for your meetings will automatically be applied to any meetings scheduled through the extension (waiting room, video/audio preferences, etc.)