# Communications Software & Zoom
# Zoom: Video Conferencing at MLML
| **[Join a Zoom Meeting](https://kb.mlml.sjsu.edu/books/software/page/zoom#bkmrk-join-zoom-meeting)** | **[Screen Sharing in Zoom Meeting](https://kb.mlml.sjsu.edu/books/software/page/zoom#bkmrk-screen-sharing-in-zo)** |
| **[Start a Zoom Meeting](#bkmrk-start-a-zoom-meeting)**
| **[Remote Control Computer Screen](https://kb.mlml.sjsu.edu/books/software/page/zoom#bkmrk-remote-control-compu)** |
| **[Enabling and Adding a Co-Host for Room Moderation](https://kb.mlml.sjsu.edu/books/software/page/zoom#bkmrk-enabling-and-adding-)** | **[Leaving Zoom Meeting](https://kb.mlml.sjsu.edu/books/software/page/zoom#bkmrk-leaving-zoom-meeting)**
|
| **[Audio and Video Settings](https://kb.mlml.sjsu.edu/books/software/page/zoom#bkmrk-audio-and-video-sett)** | **[Classroom-Specific Guidelines](https://kb.mlml.sjsu.edu/books/software/page/zoom#bkmrk-classroom-specific-g)**
|
| **[Record Zoom Meeting](https://kb.mlml.sjsu.edu/books/software/page/zoom#bkmrk-record-zoom-meeting)** | **[Think Tank Meetings](https://kb.mlml.sjsu.edu/books/software/page/zoom#bkmrk-think-tank-meetings)** |
| **[Creating Polls](https://kb.mlml.sjsu.edu/books/software/page/zoom#bkmrk-creating-polls)** | **[Mobile Presentation Unit (MPU)](https://kb.mlml.sjsu.edu/books/software/page/zoom#bkmrk-mobile-presentation-)** |
**To learn how to teach remotely at MLML using Zoom, follow [this link](https://kb.mlml.sjsu.edu/books/collaboration-communication-tools/page/zoom-for-remote-teaching-at-mlml).**
| ### Quick Tips:
Zoom is a video conferencing application available to CSUMB and SJSU affiliates (students, faculty, staff, etc.) Users are able to host or join conference calls, video conference call, and share their screen.
- SJSU's Zoom website: [https://sjsu.zoom.us/](https://sjsu.zoom.us/) (Login with your SJSUID)
- CSUMB’s Zoom website: [https://csumb.zoom.us/](https://csumb.zoom.us/) (Login with your OtterID)
**Keep Zoom meetings secure:**
- **DO NOT** share meeting URLs with anyone who is not a part of the meeting
- **Keep meeting passwords on** and set a simple password
- Add waiting room so you can review what participants are trying to join
- Once all attendees have joined, **lock your session** ([How-To Guide here](https://blog.zoom.us/wordpress/2014/06/03/spotlight-security/))
- Use "Only authenticated users can join" setting for meetings attended by people only from MLML/SJSU
- Set your name in your Zoom portal and/or app
- For more information:
- **MLML's [Zoom Security Best Practices & Recommendations](https://kb.mlml.sjsu.edu/books/collaboration-communication-tools/page/zoom-security-best-practices-recommendations)**
- SJSU's [Securing Zoom Meetings page. ](http://www.sjsu.edu/it/security/safe-computing/zoom-meetings.php)
|
| ##### Make sure your name on Zoom is your name in real life!
Your displayed name in Zoom meetings should read as your first name followed by your last name (i.e., "Jane Doe")
**How to change your display name on Zoom:**
- Visit [Zoom's website](https://zoom.us) and log in with your credentials from your home campus
- Click "profile" on the left side of the screen
- Click the first "edit" button on the top right of the screen (to the right of your name and profile picture)
- In the "display name" field, put your name is as "First Last"
- Please do not use initials, nicknames, or abbreviations
|
| ##### If you use Chrome as your primary web browser, try downloading the [Zoom extension for Chrome ](https://chrome.google.com/webstore/detail/zoom-scheduler/kgjfgplpablkjnlkjmjdecgdpfankdle?hl=en-US)
- This will make it much easier for you to schedule meetings, send out invitations, and keep track of your upcoming meetings
|
### Join a Zoom Meeting
#### By Computer
1. Download and install the [Zoom App](https://zoom.us/support/download).
2. Click the Join URL in a Zoom invitation
- or -
Navigate to Zoom:
- SJSU's Zoom website: [https://sjsu.zoom.us/](https://sjsu.zoom.us/) (Login with your SJSUID)
- CSUMB’s Zoom website: [https://csumb.zoom.us/](https://csumb.zoom.us/) (Login with your OtterID)
3. Select “Join a Meeting”
4. Enter the Meeting ID number (your meeting ID is a 9, 10, or 11-digit number) or Personal Link Name
- Find Meeting ID in email invite or...
- Hosts or current participants can find Meeting ID at top of Zoom browser.
1. Dial an in-country number found at [https://zoom.us/zoomconference](https://zoom.us/zoomconference) or provided by host
- For calls in the US use this phone number: **+1 646-876-9923**
- **If calling in with MLML conference phone dial 7 first.**
2. **Enter the Meeting ID followed by # (your meeting ID is a 9, 10, or 11-digit number) or Personal Link Name**
- Find Meeting ID in email invite or...
- Hosts or current participants can find Meeting ID at top of Zoom browser.
3. Enter your participant ID, followed by # (Press # only to skip)
- To enter your participant ID once you are in the meeting, enter #Participant ID# on your phone
[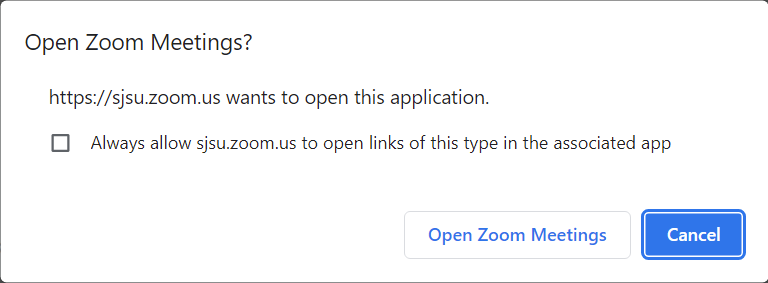](https://kb.mlml.sjsu.edu/uploads/images/gallery/2022-08/01.png)
**To make a meeting easier to join for your group, try embedding the password into the invitation with these steps:**
1. Open up Zoom in your internet browser and sign in to your account
2. Go to the "settings" tab on the left hand side [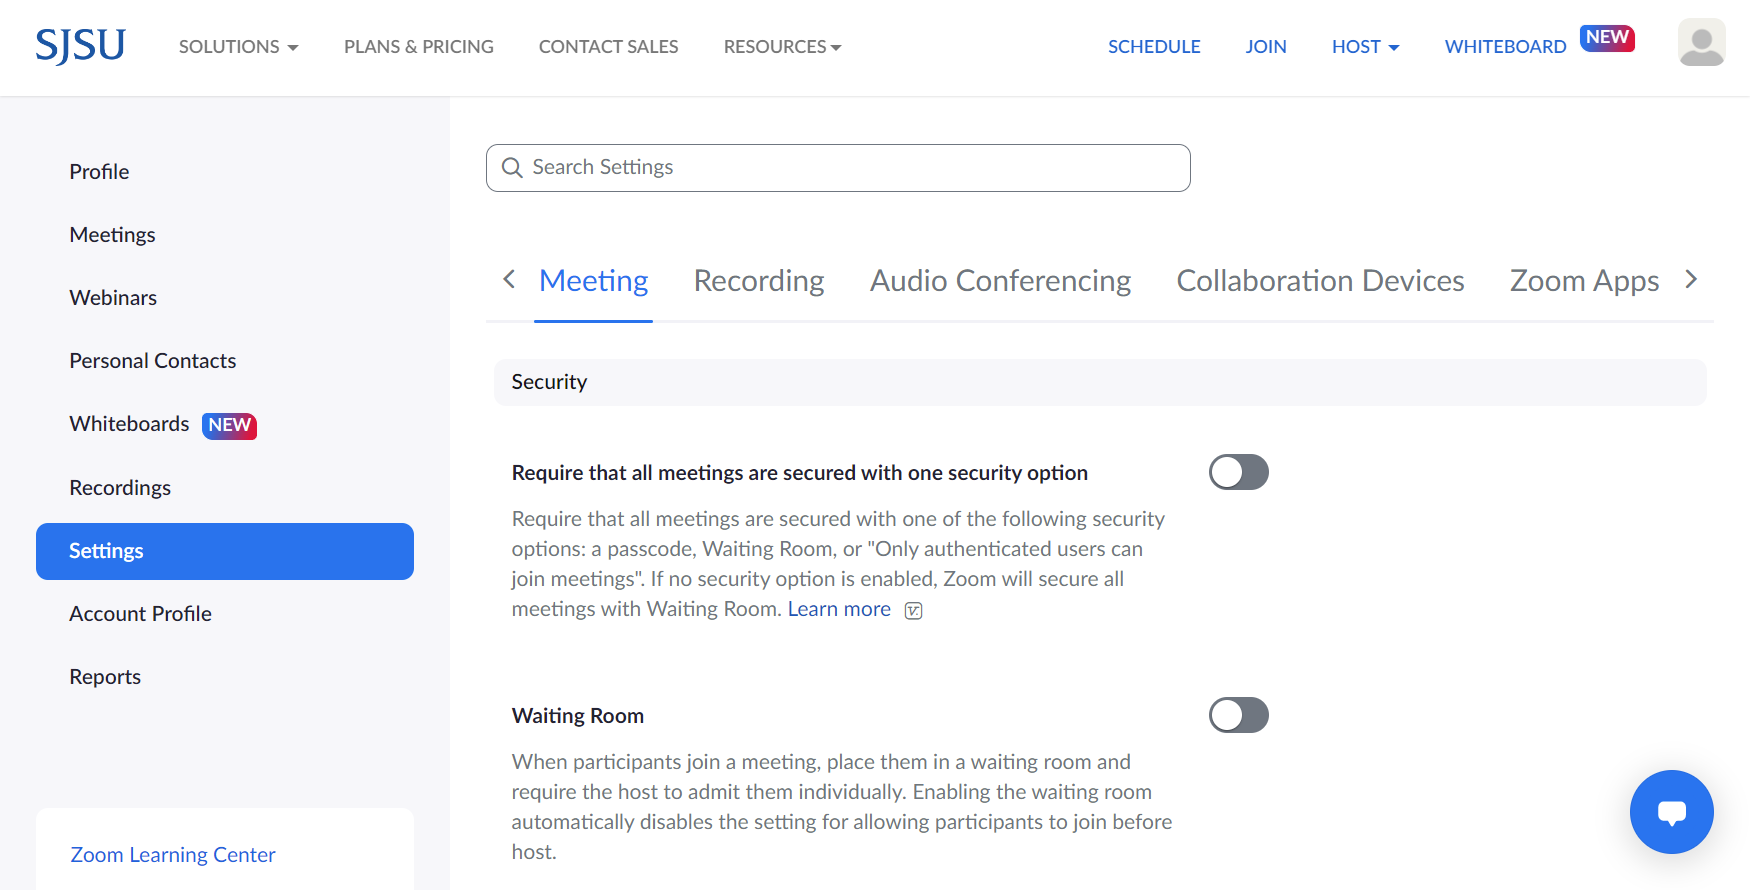](https://kb.mlml.sjsu.edu/uploads/images/gallery/2022-08/02.png)
3. Under the "meeting" settings, go to the "security" subsection
4. Check the box next to "embed passcode in invite link for one-click join"[](https://kb.mlml.sjsu.edu/uploads/images/gallery/2020-09-Sep/Screen-Shot-2020-09-28-at-1.04.12-PM.png)
[](https://kb.mlml.sjsu.edu/uploads/images/gallery/2022-08/04.PNG)
[](https://kb.mlml.sjsu.edu/uploads/images/gallery/2022-08/04.PNG)
[](https://kb.mlml.sjsu.edu/uploads/images/gallery/2022-08/04.PNG)
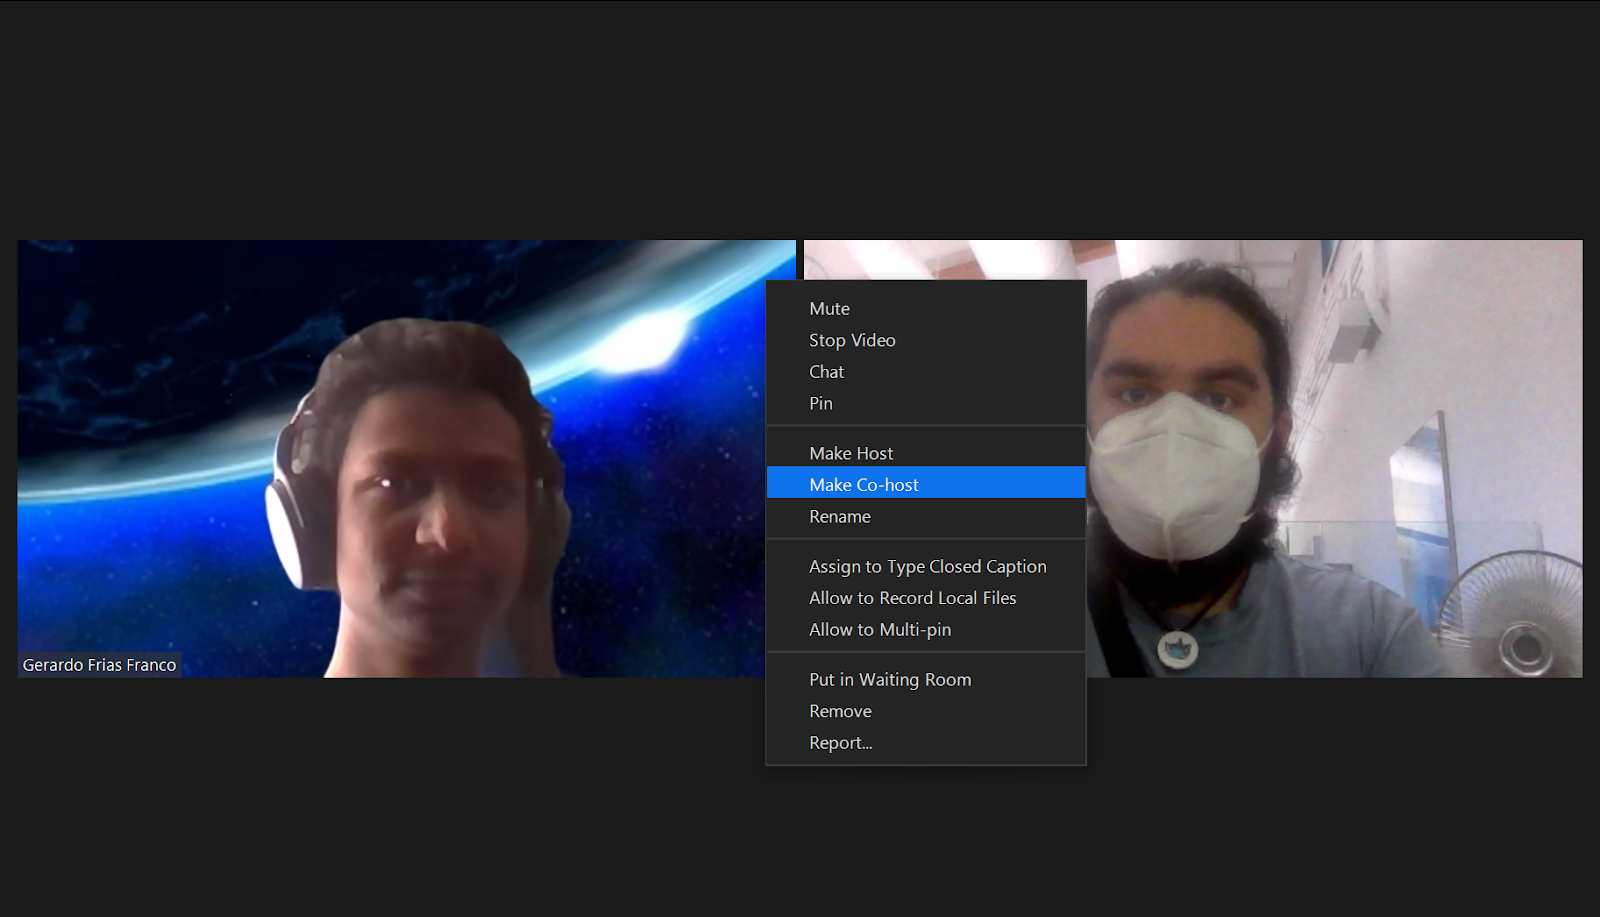
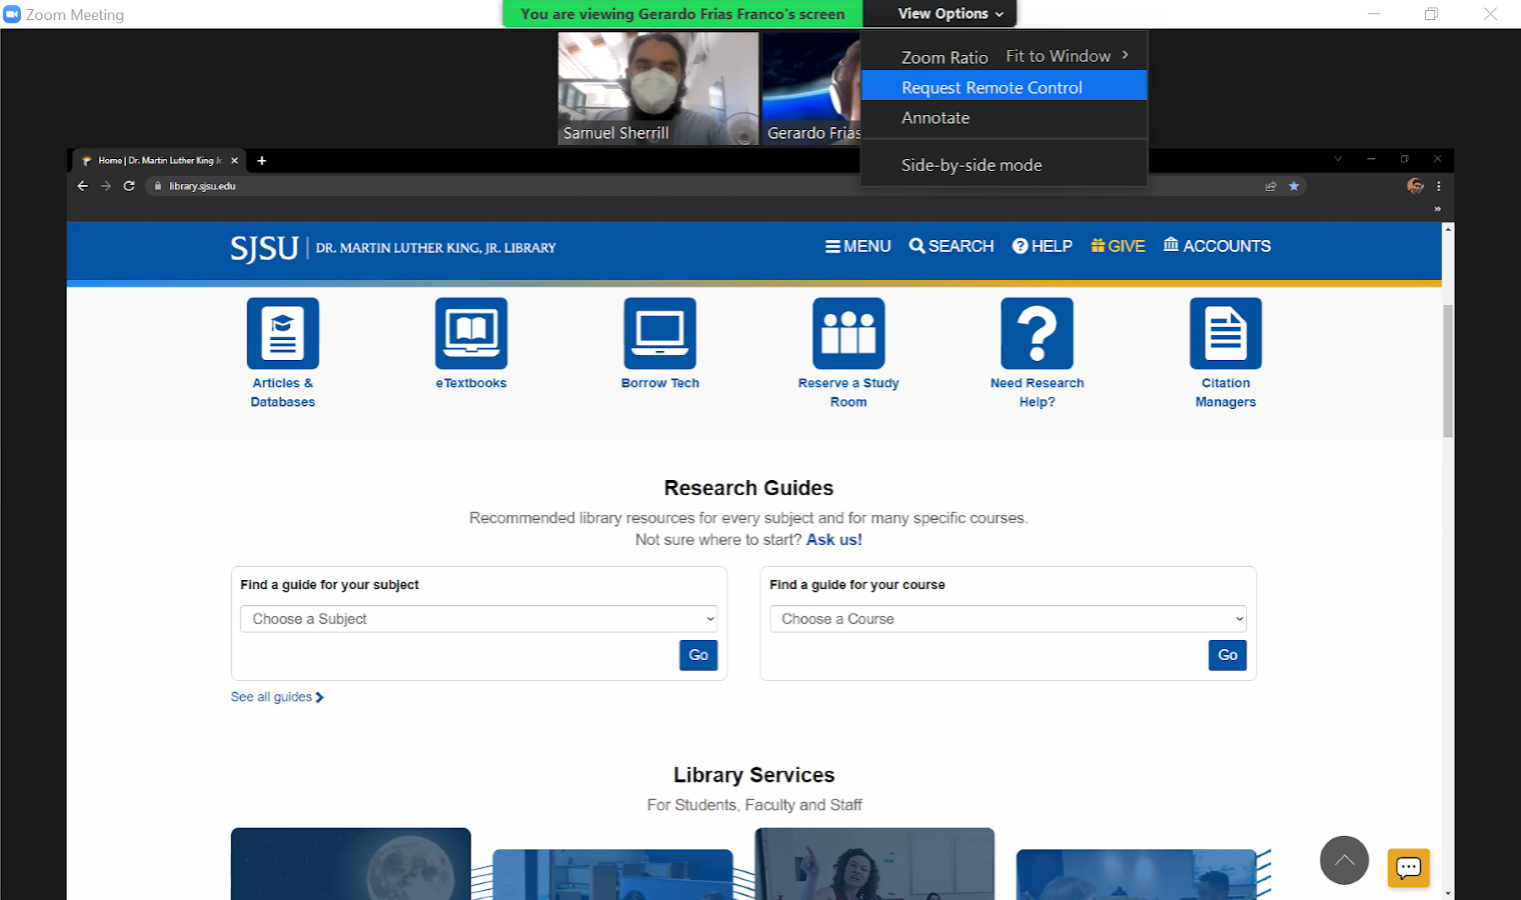
- In the meeting, the host hovers over the user's video, clicks on the three dots and chooses Make Co-Host.
[](https://kb.mlml.sjsu.edu/uploads/images/gallery/2022-08/5.png)
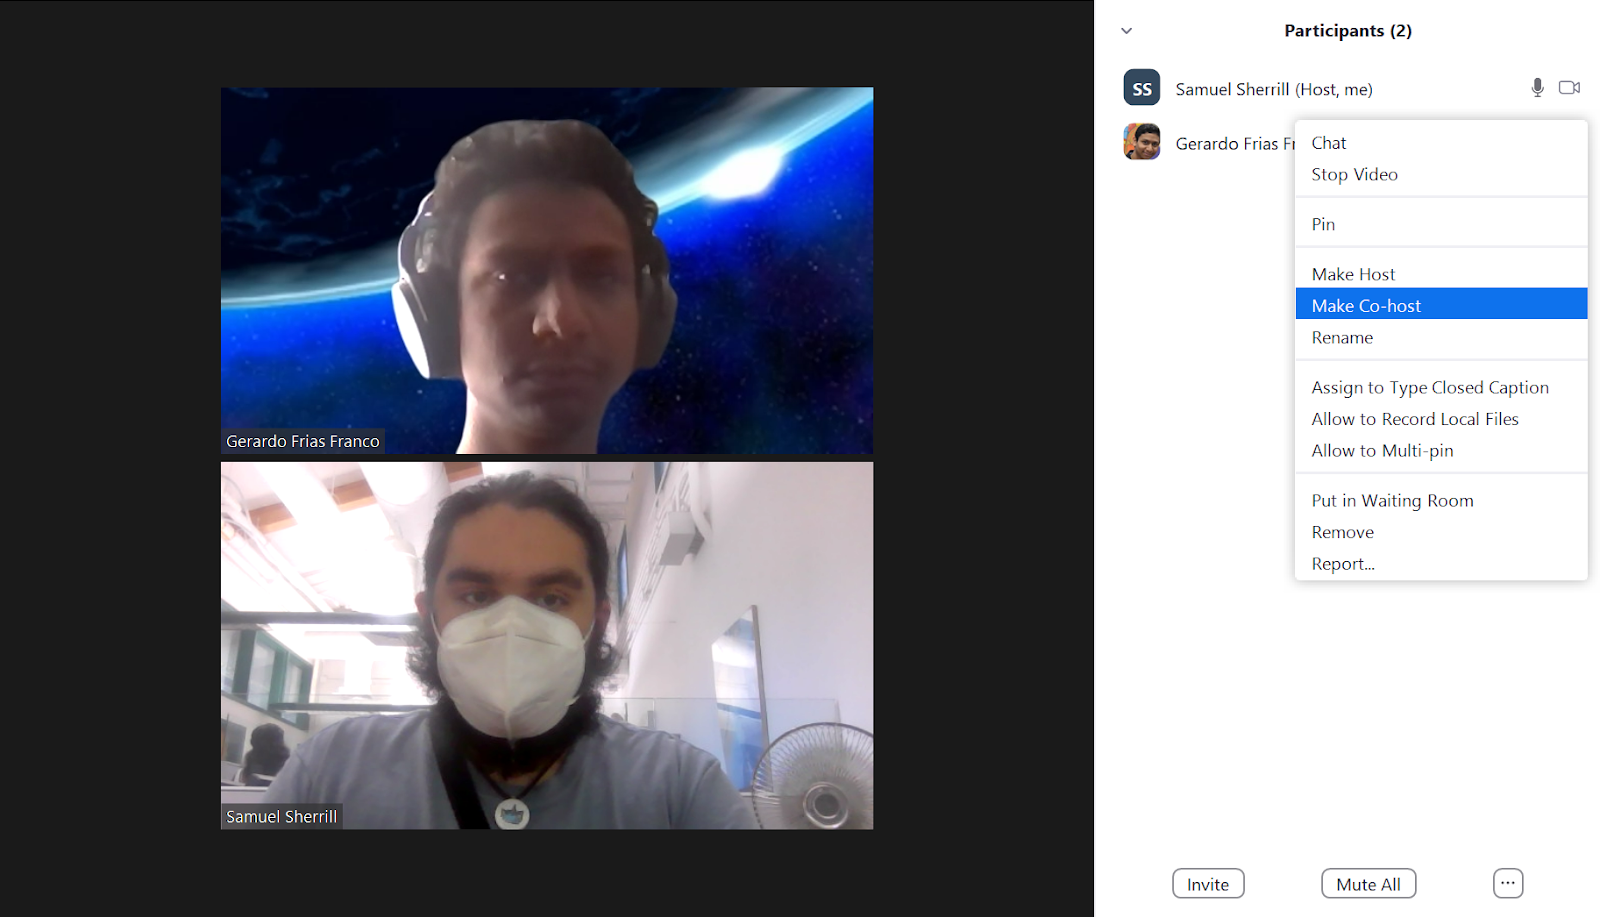
- Alternatively, the host can make another participant a co-host through the Participants window.
[](https://kb.mlml.sjsu.edu/uploads/images/gallery/2022-08/6.PNG)
[](https://kb.mlml.sjsu.edu/uploads/images/gallery/2022-08/7.png)
[](https://kb.mlml.sjsu.edu/uploads/images/gallery/2022-08/8.PNG)
1. Select pull-up tab by mic icon (see above)
2. Click **Leave Computer Audio**
3. Select **Join Audio** and click the **Phone Call** tab
4. Dial one of the numbers provided
5. Enter your meeting ID, followed by #
6. Enter your participant ID, followed by #
- Alt + A : Mute or Unmute
- Shift + Command + A: Mute or Unmute
[](https://kb.mlml.sjsu.edu/uploads/images/gallery/2022-08/9.png)
[](https://kb.mlml.sjsu.edu/uploads/images/gallery/2022-08/6.PNG)
[](https://kb.mlml.sjsu.edu/uploads/images/gallery/2022-08/uJF11.PNG)
[](https://kb.mlml.sjsu.edu/uploads/images/gallery/2022-08/12.PNG)
[](https://kb.mlml.sjsu.edu/uploads/images/gallery/2022-08/16.png)
[](https://kb.mlml.sjsu.edu/uploads/images/gallery/2022-08/17.PNG)
[](https://kb.mlml.sjsu.edu/uploads/images/gallery/2022-08/19.png)
[](https://mlml.sjsu.edu/itech/wp-content/uploads/sites/50/2018/11/image17.png)
1. Click anywhere on your screen
---
1. Leave a meeting by selecting **Quit Zoom** under zoom.us or simply by closing the window
2. Hosts will be given the option to “End Meeting for All” or “Leave Meeting”
1. Connect the HDMI cable to the video port on your computer and wait for the MPU to wake up.
2. Tap the “Share” button on the touch screen unit.
3. Tap the orange “PC HDMI” button on the touch screen unit.
Your computer should now display on the MPU screen.
[](https://kb.mlml.sjsu.edu/uploads/images/gallery/2019-05-May/Screen-Shot-2019-05-10-at-1.05.07-PM.png)
[](https://kb.mlml.sjsu.edu/uploads/images/gallery/2019-05-May/Screen-Shot-2019-05-10-at-1.05.07-PM.png)
| ##### **Scheduling: The Do's**
| ##### **Hosting: The Do's**
|
| - DO keep meeting passwords on
- DO use automatically-generated meeting IDs
- DO keep meeting links private for private meetings
- DO control who you distribute classroom meeting links to
- DO verify your Google Calendar sharing settings
- DO set your meeting to mute people on entry
- DO enable registration for a public meeting or event
- DO enable the waiting room for a public event or a large class
---
##### **General Security: The Don'ts**
---
- DO NOT share meeting URLs with anyone who is not a part of the meeting
- DO NOT share meeting URLs on social media
- DO NOT post meeting URLs on public calendars
| - DO use your waiting room to welcome attendees if you have enabled it
- DO disable annotation in your meeting
- DO consider locking your meeting or class after everyone has joined
- DO become familiar with the security options on the toolbar
- DO use the “On hold” and “Remove” features when necessary
- - - - - - - - - - -
---
##### **Hosting: The Don’ts**
---
- DON'T use your Zoom Personal Meeting ID (PMI)
- DON’T host alone if you’re running a large meeting or class
- DON’T enable Screen Sharing unless necessary
|
### **Keep Zoom Up-to-Date**
- **Windows:** Open the zoom app > sign in > click your initials in the top-right corner > click "Check for Updates"
- **macOS:** Open the zoom app > click the zoom.us menu > click "Check for Updates..."
---
### **Security Recommendations**
##### General Security:
- **DO NOT** share meeting URLs with anyone who is not a part of the meeting
- DO NOT share meeting URLs on social media
- DO NOT post meeting URLs on public calendars
- **Keep meeting passwords on** and set a simple password
- [Add waiting room](https://kb.mlml.sjsu.edu/link/47#bkmrk-enable-waiting-room) so you can review what participants are trying to join
- Once all attendees have joined, **lock your session** ([How-To Guide here](https://blog.zoom.us/wordpress/2014/06/03/spotlight-security/))
- Use "Only authenticated users can join" setting for meetings attended by people only from MLML/SJSU
- For more information, visit SJSU's [Securing Zoom Meetings page.](http://www.sjsu.edu/it/security/safe-computing/zoom-meetings.php)
##### Account Security Settings:
- Sign-in to Zoom > Settings (left-side menu panel)
- Enable Personal Meeting ID - **OFF**
- Require a password when scheduling new meetings - **ON**
- Require a password for instant messages - **ON**
- Embed password in invite link for one-click join - **OFF**
- Require password for participants joining by phone - **ON**
- Mute participants upon entry - **ON**
- Screen sharing- **ON**
- Who can share - **Host Only**
---
### **Best Practices & Tips**
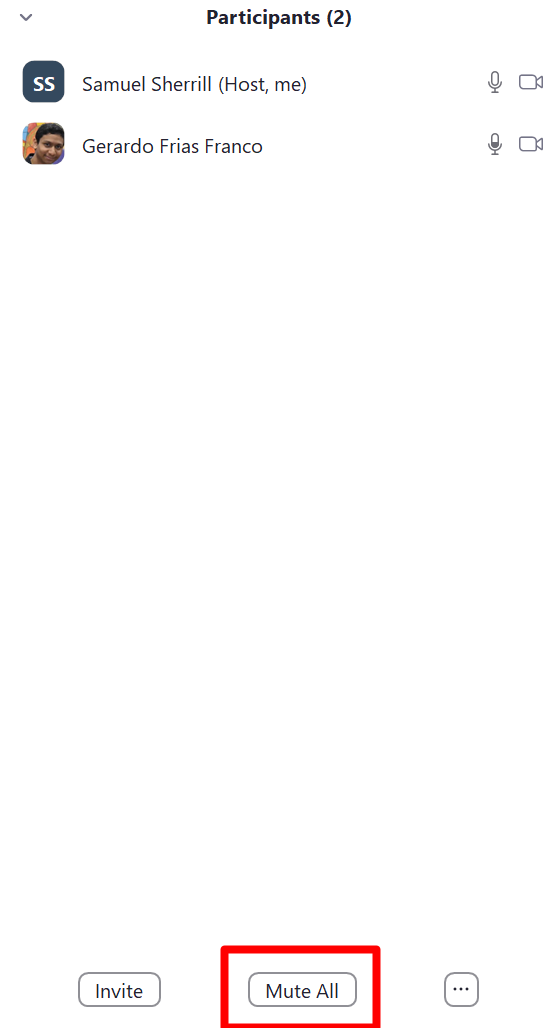
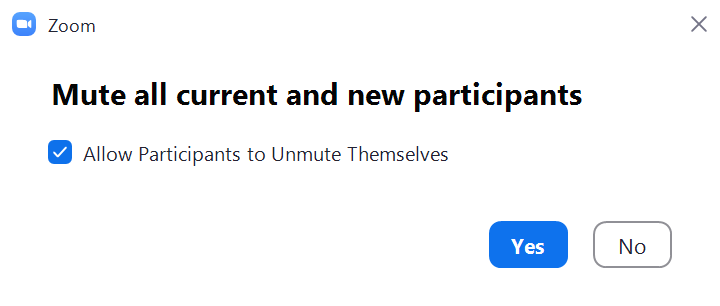
- Select “**Participants**” at bottom of Zoom browser to view & manage participants
- Select “**Chat**” at bottom of Zoom browser to open chat window
- Click a participants name in the Chat window or the 3 dots in the video/profile pic to chat with them
- Tips for Hosts & Co-Hosts: Keep Participants & Chat windows open during entire meeting
- Set your name in your Zoom portal and/or app
- Let your class know that the meeting is being recorded
- Plug your phone into power when using it to record video on Camtasia or Zoom
- When you share your screen, you can select to just share a web browser or app instead of your entire desktop
- You can [select Whiteboard under Share Screen](https://support.zoom.us/hc/en-us/articles/205677665-Sharing-a-whiteboard) to illustrate points
- **Hide non-video participants**
- Hover over participants thumbnail at top of Zoom Browser
- Select the three dots
- Select “Hide non-video participants”
- If using a conference phone for audio, be sure to mute the other computers/TVs in room that are in the meeting
- **Large Meeting Tips**:
- - Wait to admit participants until the meeting starts
- Participants with raised hands will rise to the top of the recipient list
- Assign multiple Co-Hosts to help moderate a large meeting
- Pause the recording until all participants are in the meeting and the meeting starts
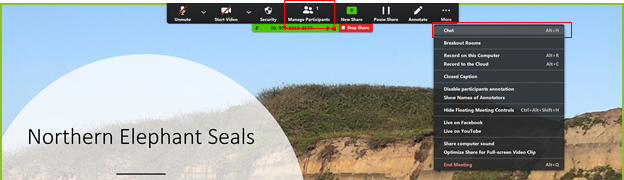
- **When sharing your screen, you can view the Participants and Chat windows** by scrolling to the top of your Zoom app and clicking the Participants on the Options Bar or the Chat button in the More section:
# Phone Alternatives: Zoom and Google Hangout
#
### Zoom
---
Zoom is a video conferencing application available to CSUMB and SJSU affiliates (students, faculty, staff, etc.) Instructions for setting up Zoom may be found [here](https://kb.mlml.sjsu.edu/books/software/page/zoom). Users are able to host or join conference calls, video conference call, and share their screen (when having multiple displays, the user can pick which screen\[s\] to share).
Here’s a link to SJSU's Zoom website: [https://sjsu.zoom.us/](https://sjsu.zoom.us/) (Login with your SJSUID)
Here’s link to CSUMB’s Zoom website: [https://csumb.zoom.us/](https://csumb.zoom.us/)
The Group Study (Rm 103) and the Student Conference Room (Rm 414) have Mobile Presentation Units (MPUs). These units can be used to share your computer screen (like the Think Tank and Dry Classroom), or they can be used for video conferencing using Zoom. They are essentially TVs with a Cisco video conferencing system attached.
If you would like to use one of the units for a video conference, please indicate so on the appropriate [reservation request form](https://mlml.sjsu.edu/intranet/reservation-request-agreement/).
###
### Google Hangouts
---
Google Hangouts is an easy way to video chat and hold meetings with up to 50 people. The service may be accessed online through the Gmail, Google+ websites, or mobile applications.
For more information and help visit [G Suite Hangouts](https://gsuite.google.com/learning-center/products/meet/get-started/#!/).
# Adding the Zoom Chrome Extension for Scheduling Zoom Meetings via Calendar
#### This page will teach you how to add the Zoom extension to your Google Chrome browser. The Zoom Scheduler Chrome Extension allows participants to schedule Zoom meetings directly from Google Calendar. Using the extension, you can start an instant meeting or schedule a future meeting. The meeting join link and details are sent via a Google Calendar invitation so the attendee can join with a single-click from their calendar.
##### Requirements:
- [Google Chrome](https://www.google.com/chrome/browser/)
- [Zoom Chrome extension](https://chrome.google.com/webstore/detail/zoom/kgjfgplpablkjnlkjmjdecgdpfankdle?hl=en) from the Google Chrome Web Store
- Zoom account with Google, work email and password, or Single Sign On (SSO) login
- Using Google Calendar to schedule meetings
##### How to Install the Extension:
- Before you can schedule meetings using the Chrome extension or directly in Google Calendar, you need to install the **Zoom Scheduler** extension from the [Chrome Web Store](https://chrome.google.com/webstore/detail/zoom/kgjfgplpablkjnlkjmjdecgdpfankdle?hl=en-US). Click **Add to Chrome** in the upper right of the extension window.
##### How to Navigate the Extension:
- The Zoom Chrome extension will install an icon next to your Chrome address bar. If you click the Zoom button, the Chrome extension will open.
- Sign in to your Zoom Account.
- Once signed in, you will have additional options in the Chrome Extension:
- **Schedule a Meeting**: Click Schedule a Meeting to open up a new event on Google Calendar.
- **Start a Meeting**: Hover over Start a Meeting to choose to start with video or start without video. [Learn more about instant meetings.](https://support.zoom.us/hc/en-us/articles/201362533-Meet-Now-vs-Scheduled-Meetings)
- **Name/email address:** Click on your name or email address to open your Zoom profile page.
- **Gear icon**: Click on the Gear icon to open the Zoom meeting settings.
##### How to Schedule a Zoom Meeting Using the Calendar Extension:
- Create a new calendar event or edit an existing calendar event.
- Open the additional options for the event.
- For a new calendar event, click **More Options**.
- For an existing calendar event, click the Pencil icon.
- Click **Make it a Zoom Meeting**.
- This will create a Zoom meeting and populate the meeting details in the description.
- Click **Save**.
- \*\*Note: The settings you have saved in your Zoom account for your meetings will automatically be applied to any meetings scheduled through the extension (waiting room, video/audio preferences, etc.)