Printing, Print, Printers, Scanning, Copiers
Information about MLML's Printers and Scanners
- How to Install a Network Printer
- Create a Scan to Email Account on the Konica Minolta Copiers
- Scan a Document Using the Konica Minolta Copiers
- MLML Network Printer DNS Names
- Installing Admin/Library Konica Minolta Copiers (Windows)
- Installing Admin/Library Konica Minolta Copiers (macOS)
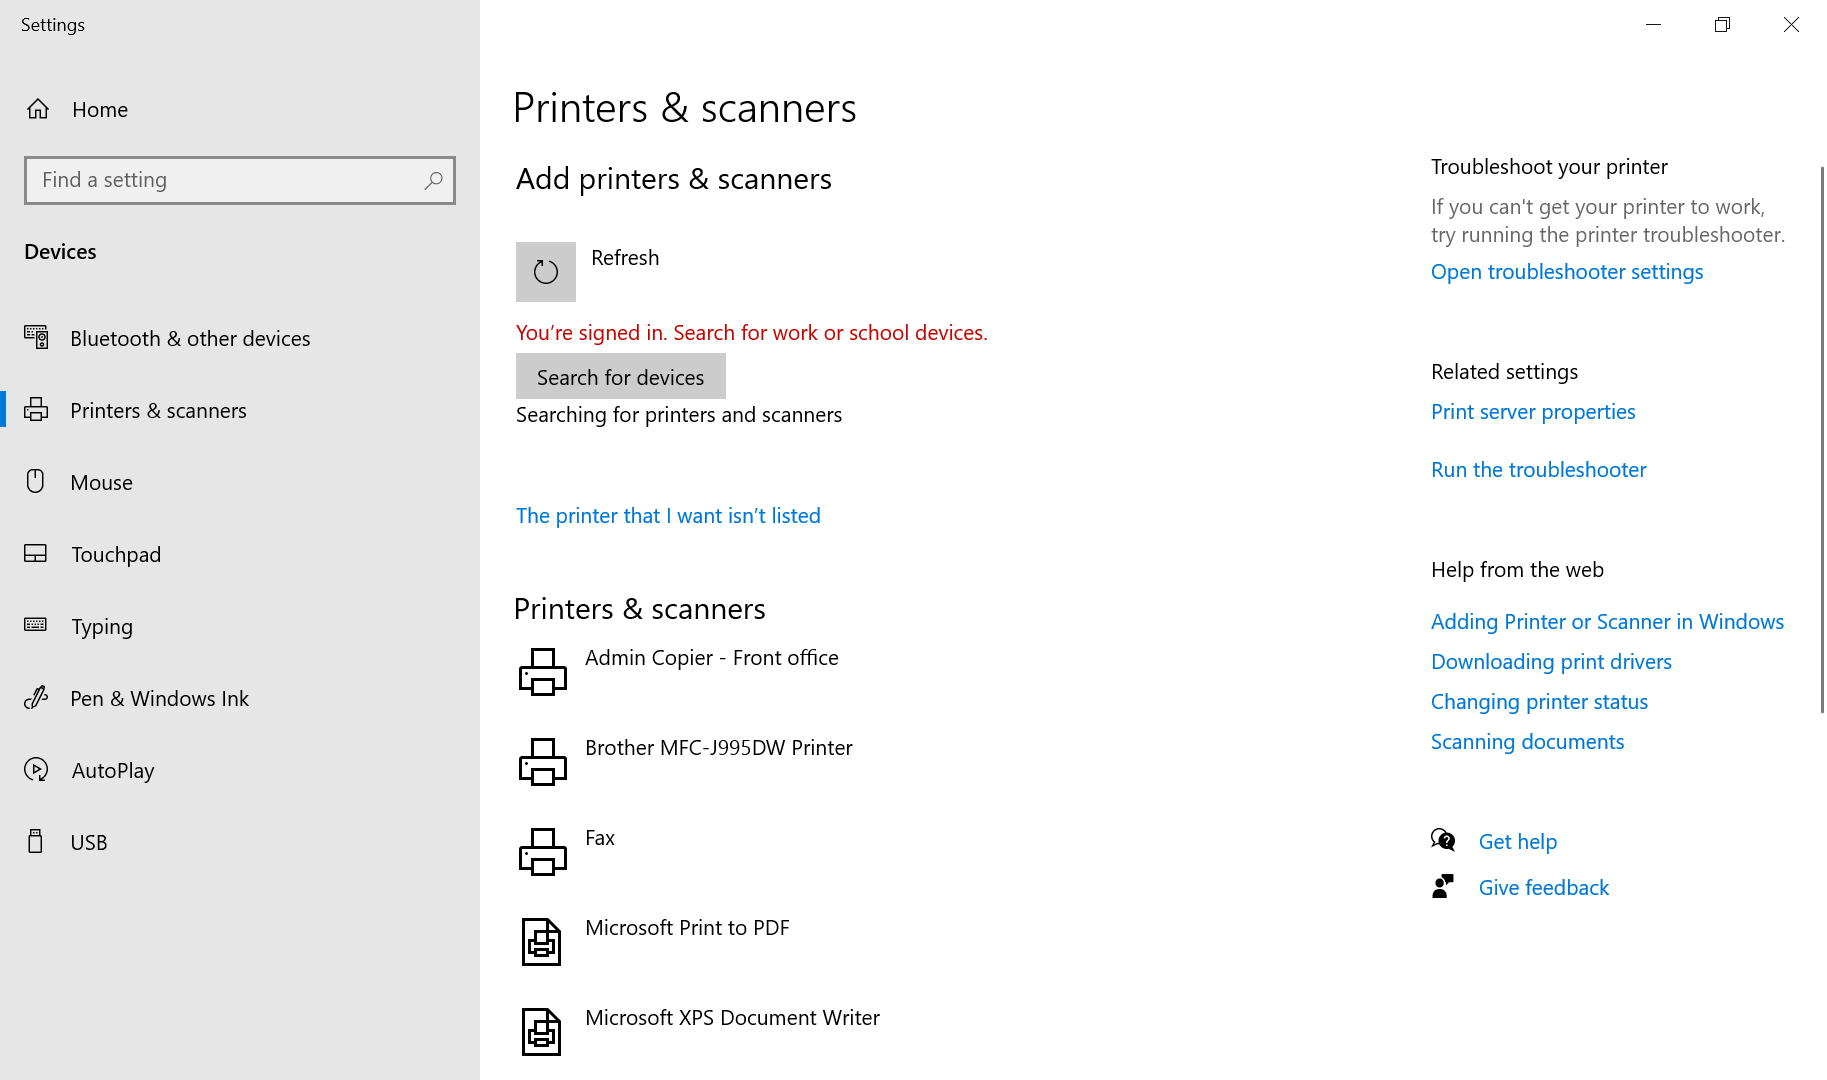
How to Install a Network Printer
The Admin Printer and Library Printer are now being deployed automatically to managed devices through both Jamf Apple MDM and Intune Windows MDM. If your computer is properly enrolled, the printer drivers and printer setup should install quietly in the background with no action needed from you. (For all other printers, proceed with the manual installation guide below)
MLML Admin and Library Printers on a MacOS
MLML Admin and Library printers should normally be installed automatically on managed Mac computers. If your printer is missing or you are unable to print, you can install the printer manually using the Self Service app. (Managed devices ONLY)
Available Printers
The following printers are available through Self Service:
- MLM Library Printer - mlm-library-printer.sjsu.edu
- MLM Admin Printer - mlm-admin-printer.sjsu.edu
Both printers use the Konica Minolta bizhub C550i driver.
Install a Printer from Self Service
1. Open the Self Service app on your Mac
- You can find it in the Applications folder.
- You can also search for it using Spotlight by pressing Command + Space and typing Self Service.
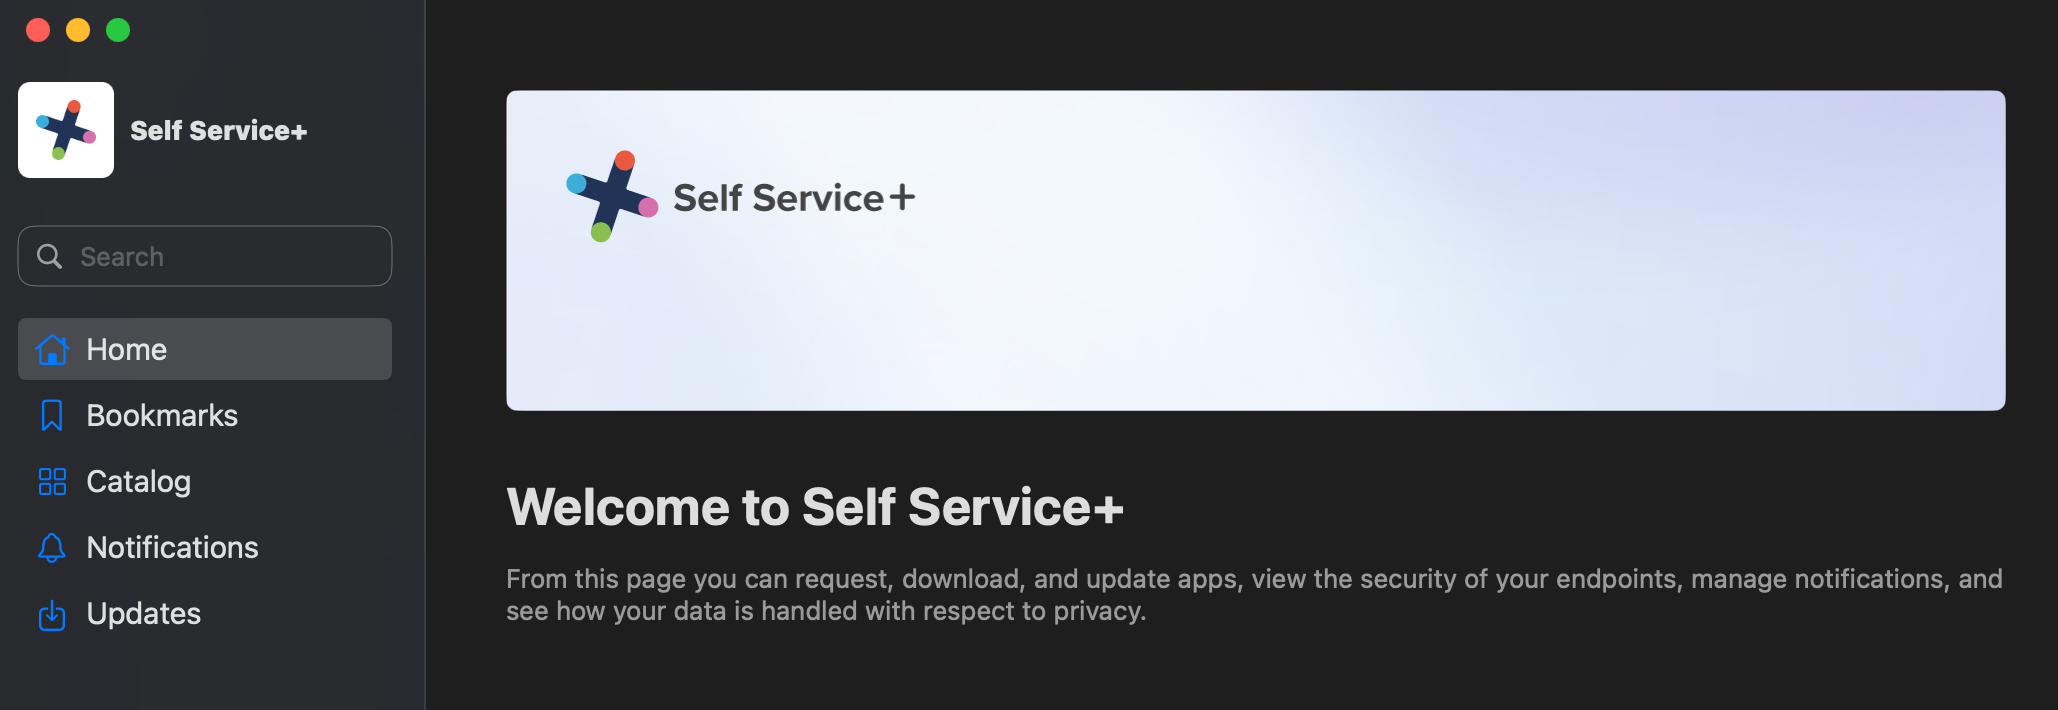
2. In Self Service, under Catalog look for the Printers.
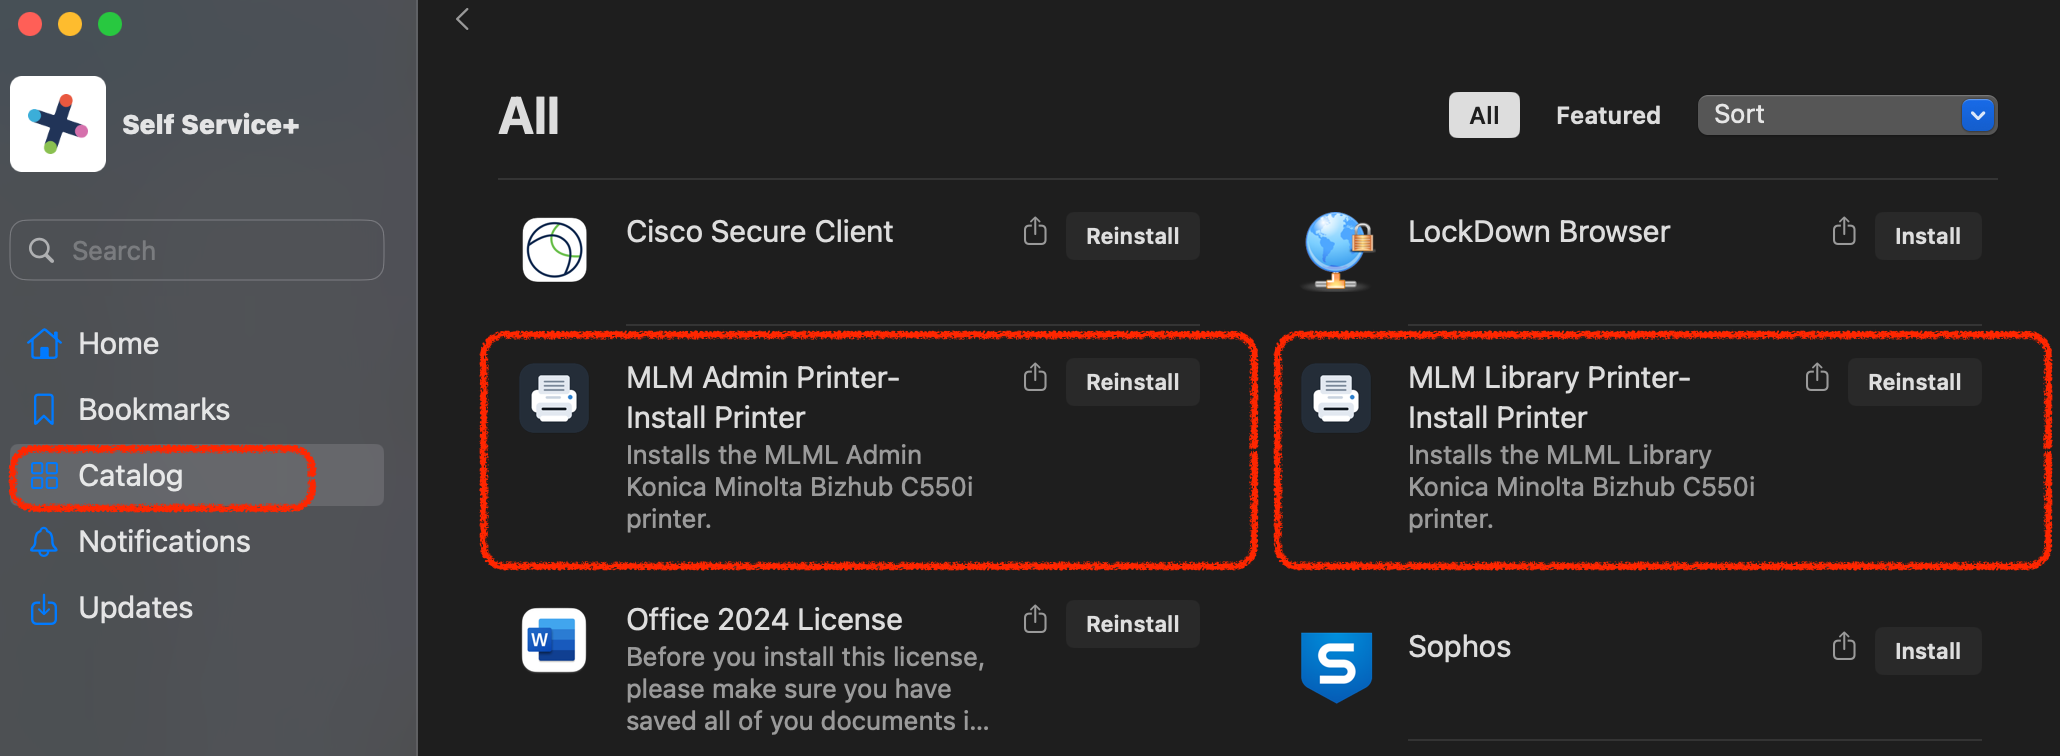
3. Select the printer you need:
-
- Install MLM Library Printer
- Install MLM Admin Printer
- Click Install
4. Wait for the installation to complete. This may take a few minutes.
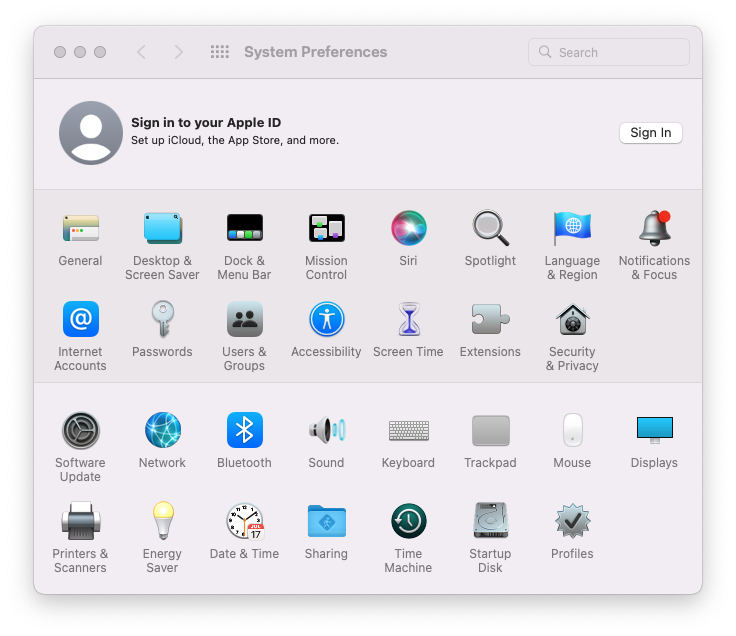
5. After the install finishes, go to:
System Settings > Printers & Scanners
6. Confirm the printer appears in your printer list.
MLML Admin and Library Printers on a Windows
For Windows devices enrolled in Intune, the printer driver and printers are mapped automatically.
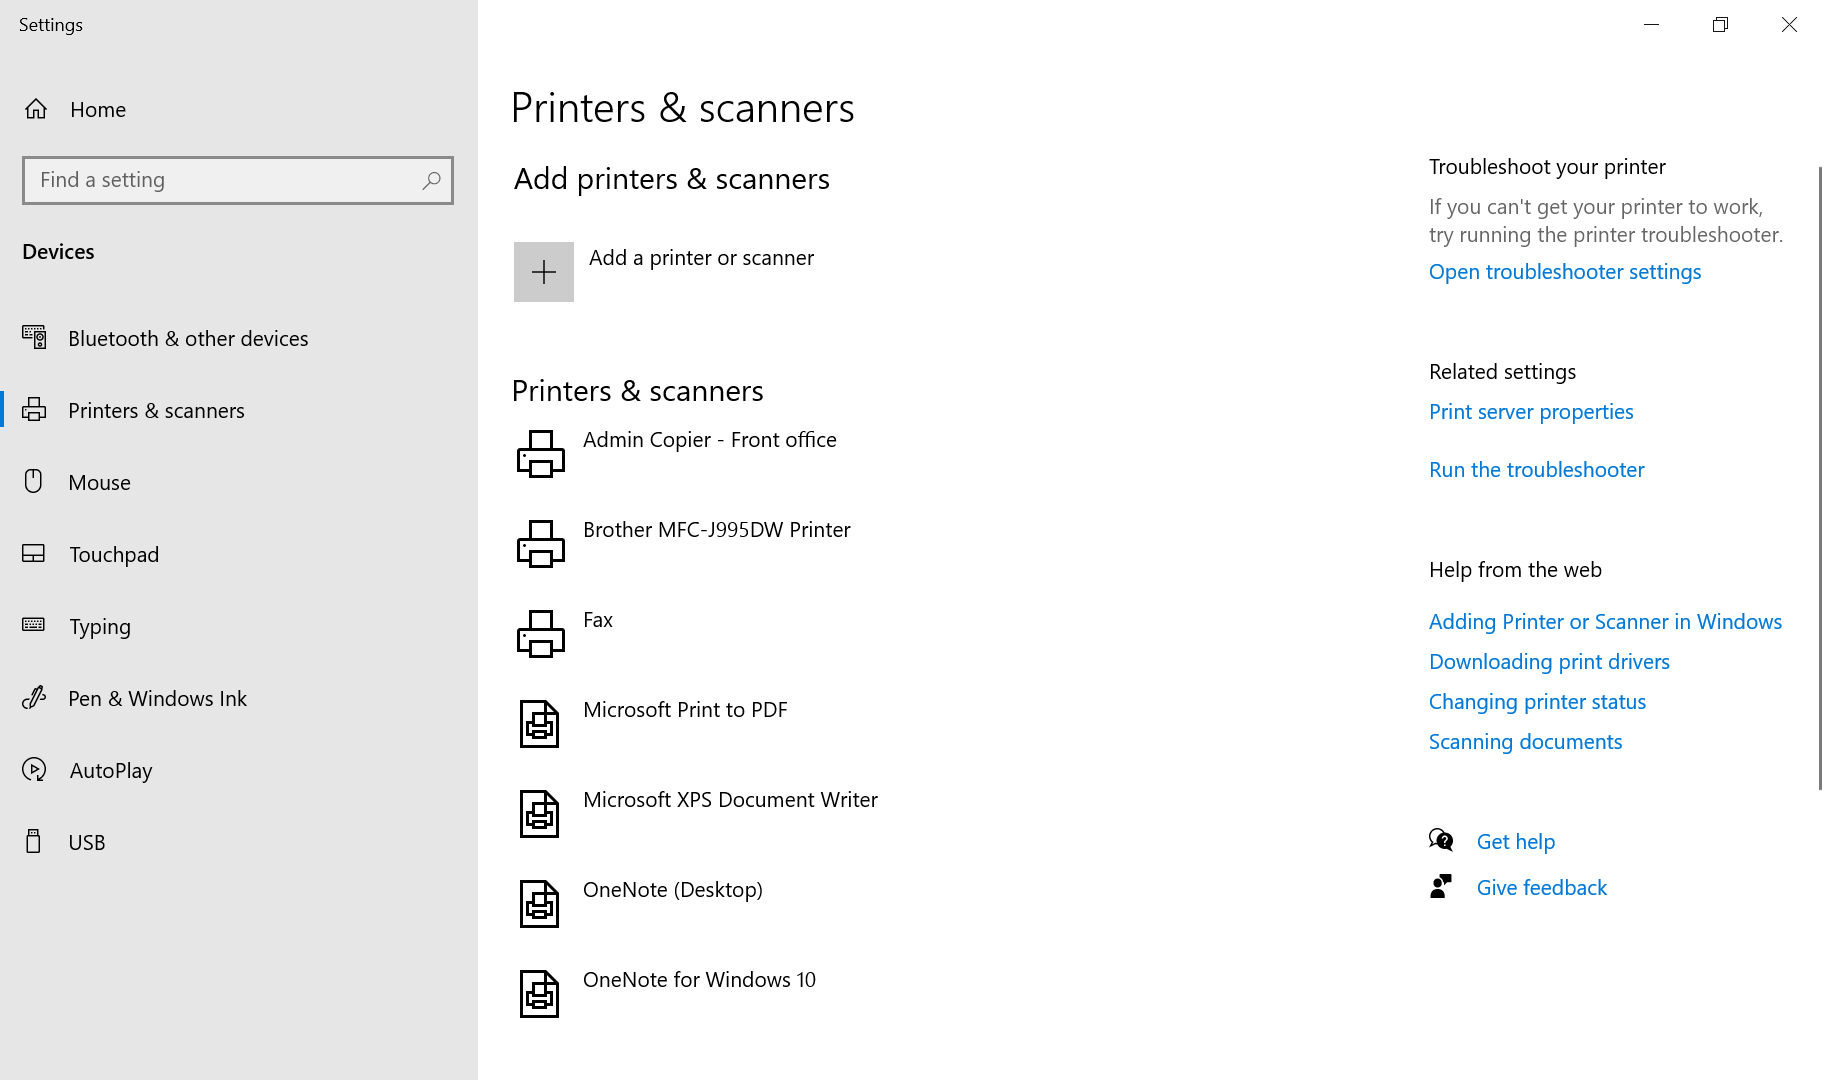
The printers should appear under Settings > Bluetooth & devices > Printers & scanners. If they do not show up, open the Company Portal app and sync your device.
1. Find the Company Portal app.
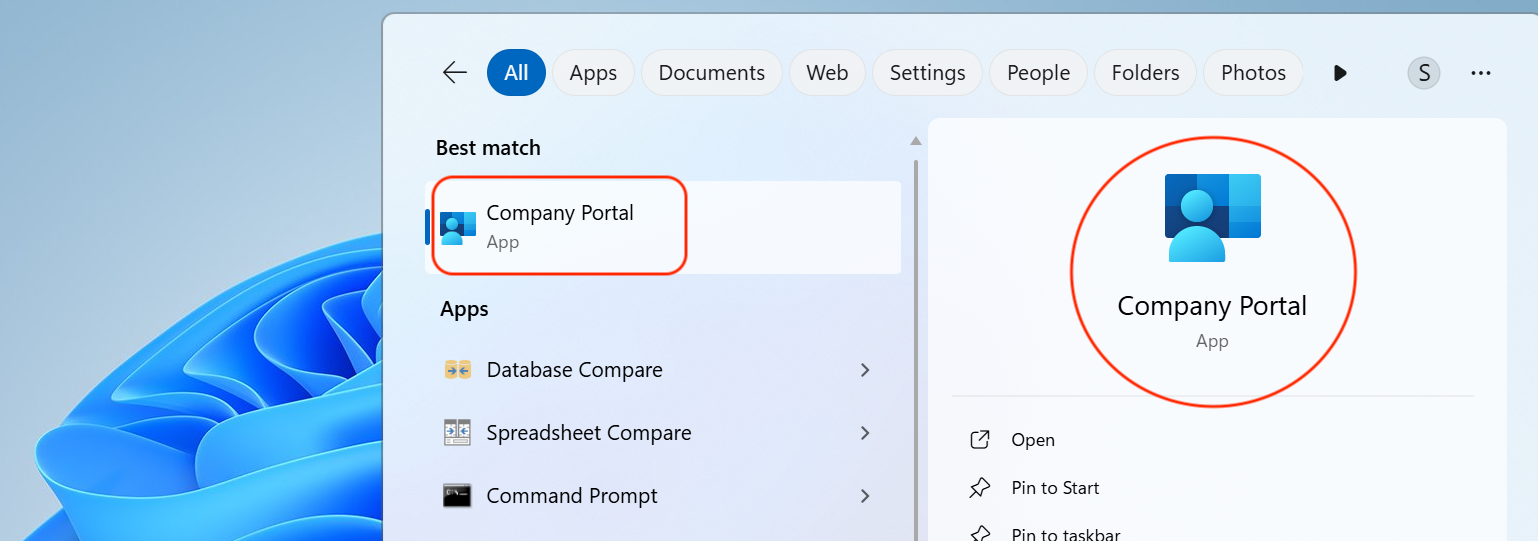
2. Click on the Settings wheel and select Sync machine with MDM.

3. Wait for the installation to complete. The printers will be mapped automatically.
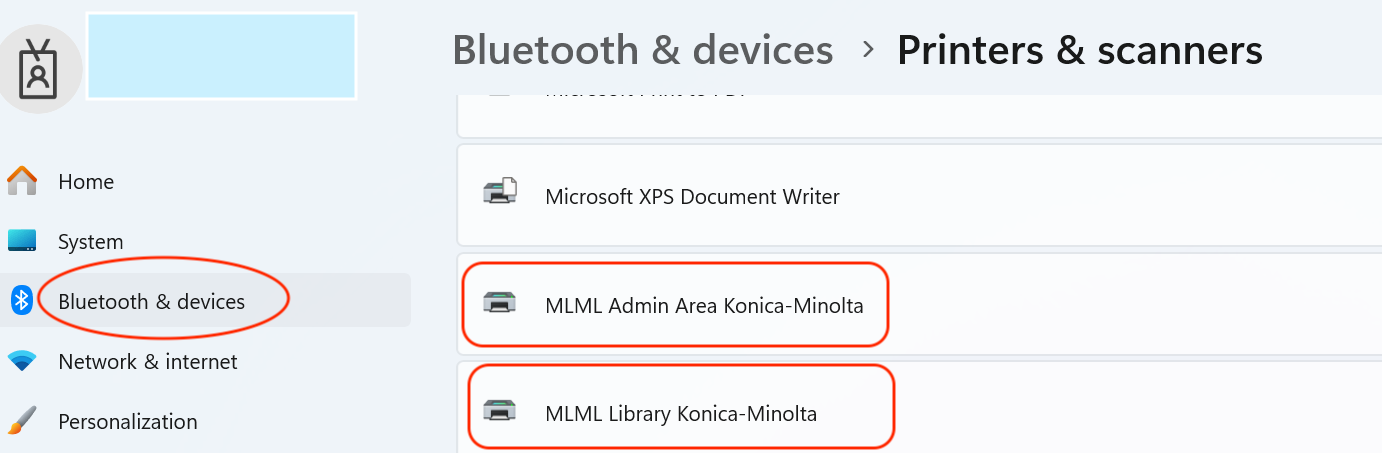
Confirm the printers appear in your printer list.
Manual macOS Printer Install:
NOTE: Refer to this post if you want to print to a Konica Minolta (admin/library) copier on macOS.
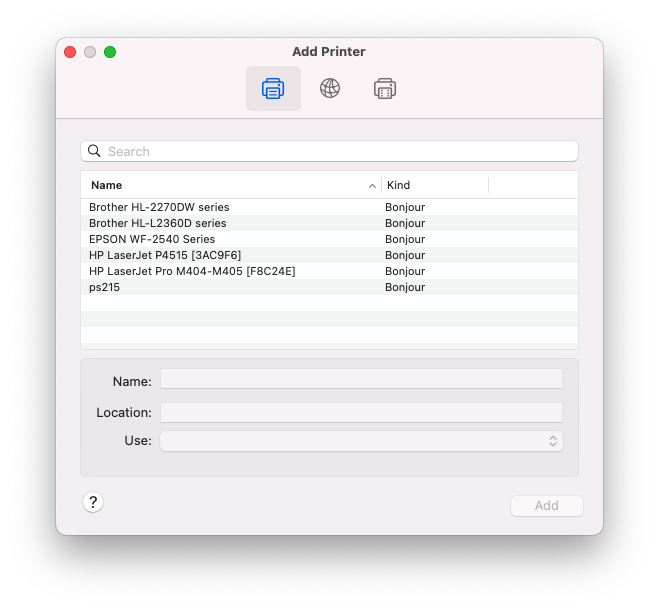
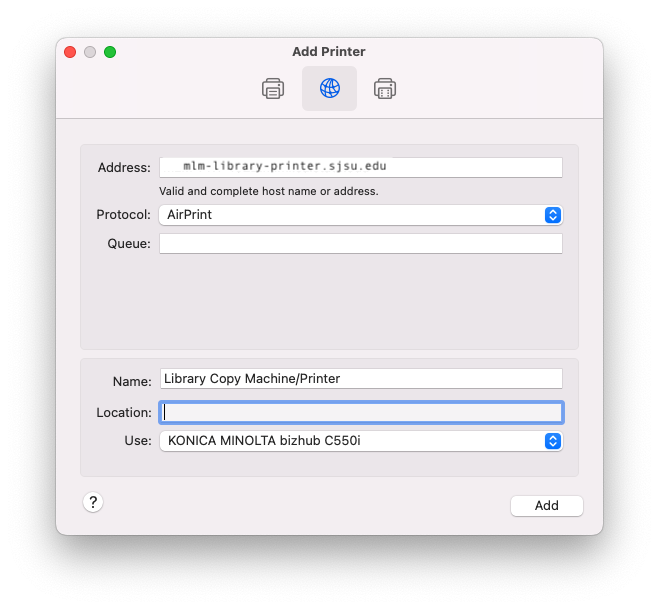
- Go to System Preferences > Printers & Scanners and click Setup Printers or the + button.


- Click the IP tab.

- Enter the following information:
- Protocol: AirPrint (if possible) or Line Printer Daemon - LPD
- Address: ps... or use the IP address. A list of printers and their hostnames can be found here. (e.g. mlm-library-printer.sjsu.edu)
- Queue: leave blank
- Name: Your printer name - ps...
- Print using:
- Your printer model
- or - - Select a driver to use... > Your printer model

- Your printer model
- Click the Add button.
- Click Continue

Manual Windows Printer Install:
NOTE: Refer to this post if you want to print to a Kyocera (admin/library) copier on Windows.
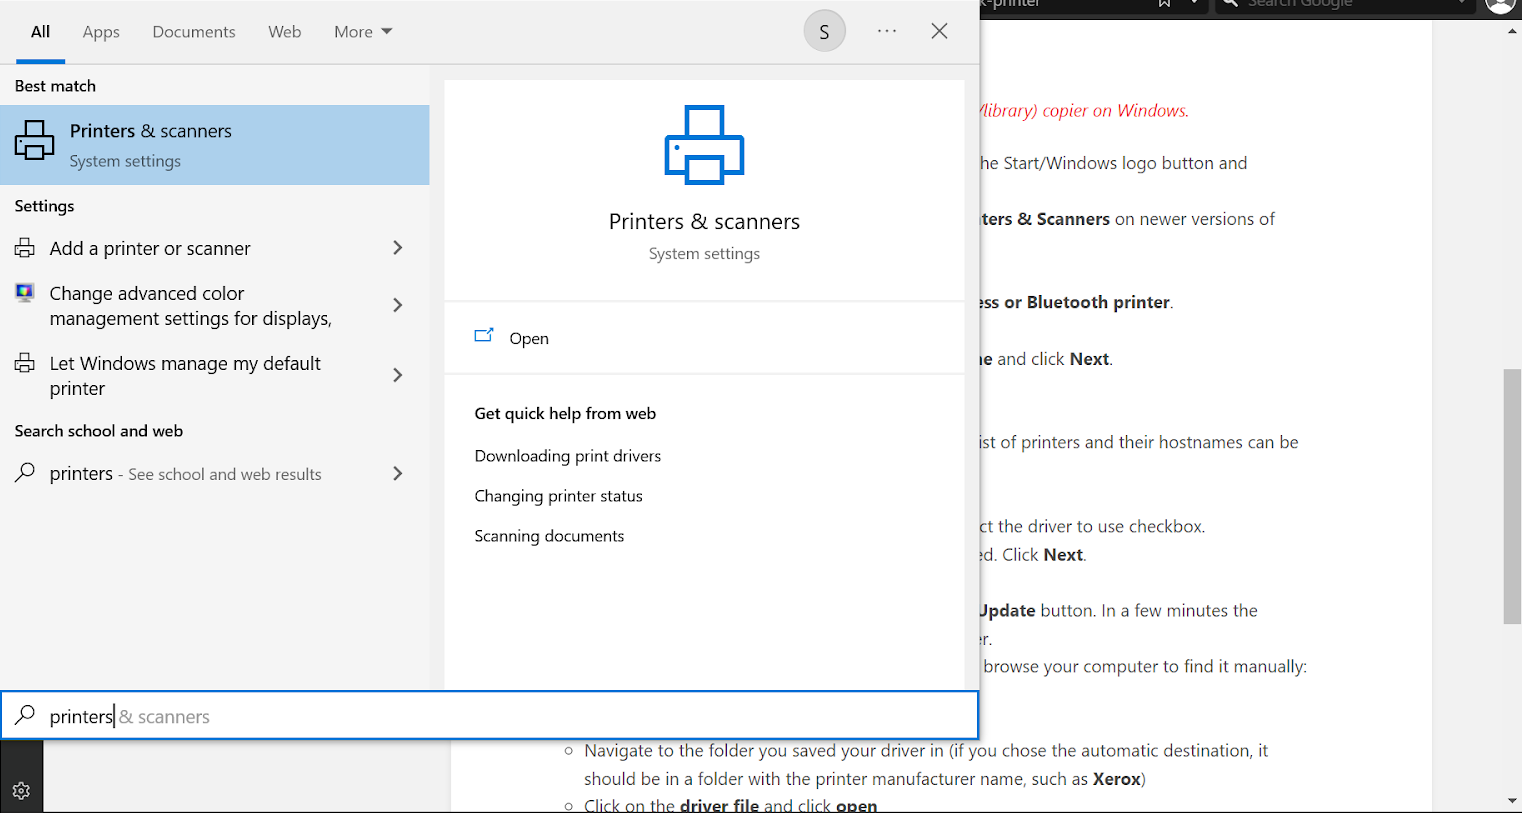
- Go to Printers & Scanners. You can find this by clicking the Start/Windows logo button and typing Printers & Scanners into the search bar.

- Click Add a printer.

- On Windows Vista/7 only: Click Add a network, wireless or Bluetooth printer.
- Click The printer I want isn't listed

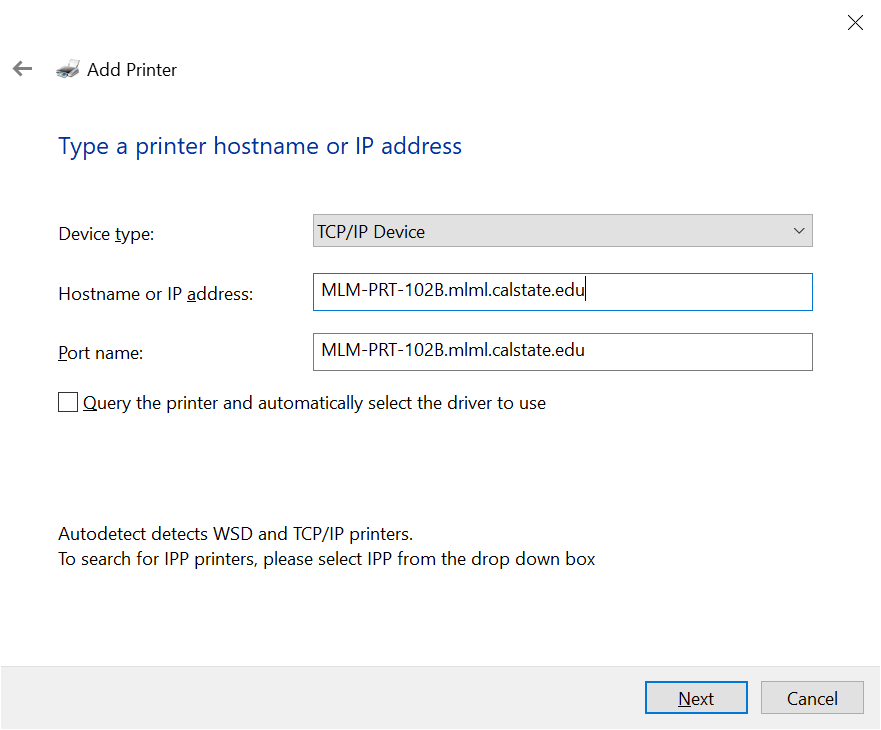
- Select Add a printer using a TCP/IP address or hostname and click Next.

- Enter the following information:
- Device Type: TCP/IP Device
- Hostname or IP address: ps... or use the IP address. A list of printers and their hostnames can be found here. (e.g. mlm-library-printer.sjsu.edu)
- Port Name: this will be auto-filled.
- Un-check the Query the printer and automatically select the driver to use checkbox.

- You may be told that additional port information is required. Click Next.
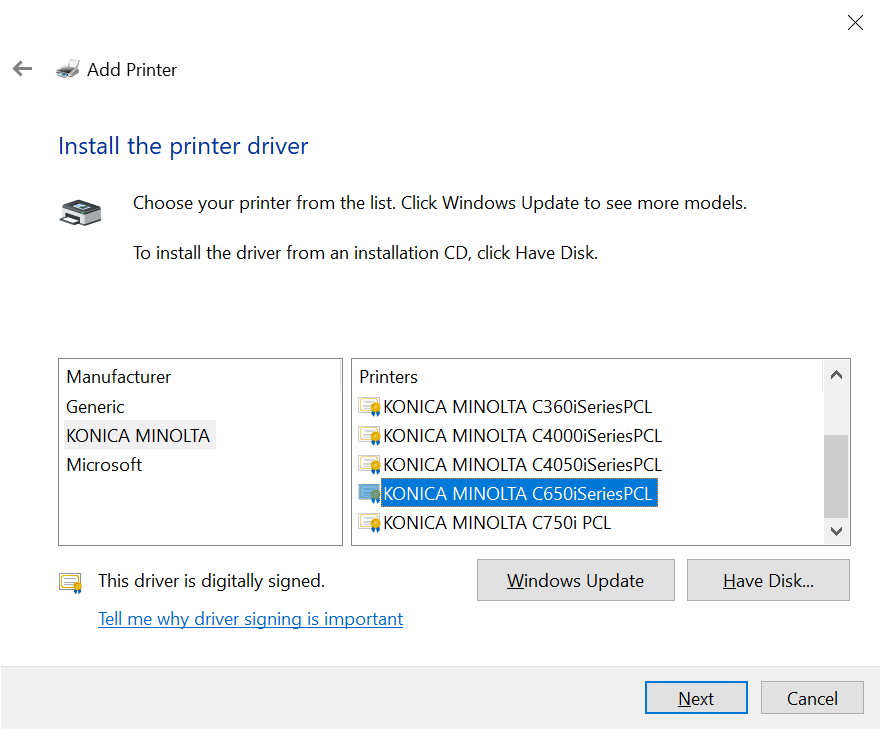
- Select Your printer model and click the Next button.

- If you can't find the printer model, click the Windows Update button. In a few minutes the available selection of printer models will be much larger.
- If you still can’t find the printer model, you will have to browse your computer to find it manually:
- Click Have Disk
- Click the Browse button
- Navigate to the folder you saved your driver in (if you chose the automatic destination, it should be in a folder with the printer manufacturer name, such as Xerox)
- Click on the driver file and click open
- Click OK
- Now you should see the printer model. Select it and click Next.
- If this manual process is unsuccessful, you may have installed your driver incorrectly. Be sure to restart your computer after install, as this is important to complete the process. Also try a manual install of the driver itself if the automatic install does not seem to work (follow the instructions above to do so).
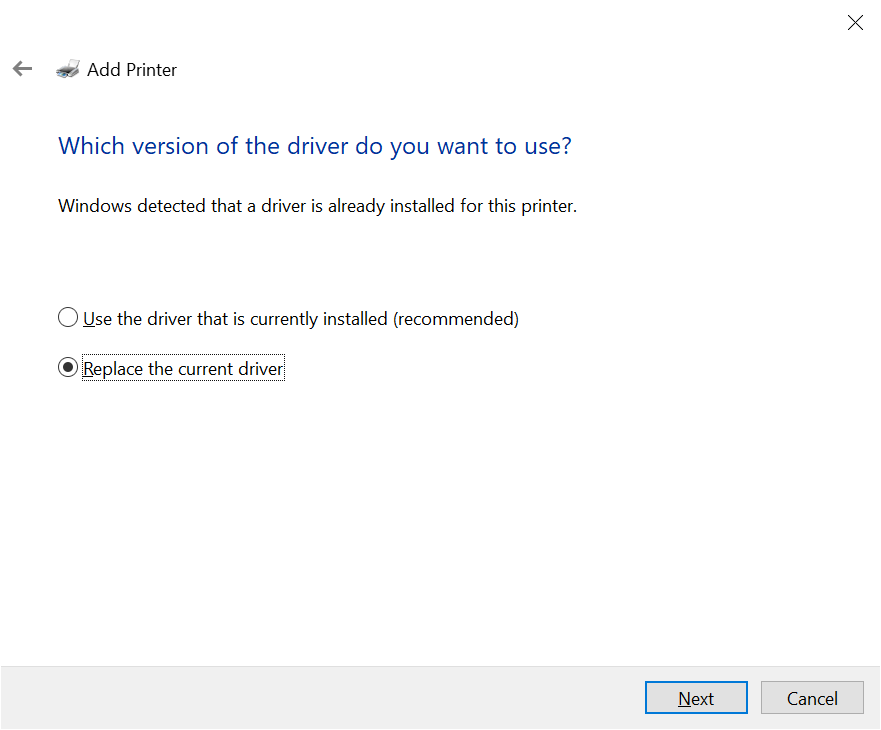
- If the installer detects that the driver is already installed, select Replace the current driver and click Next.

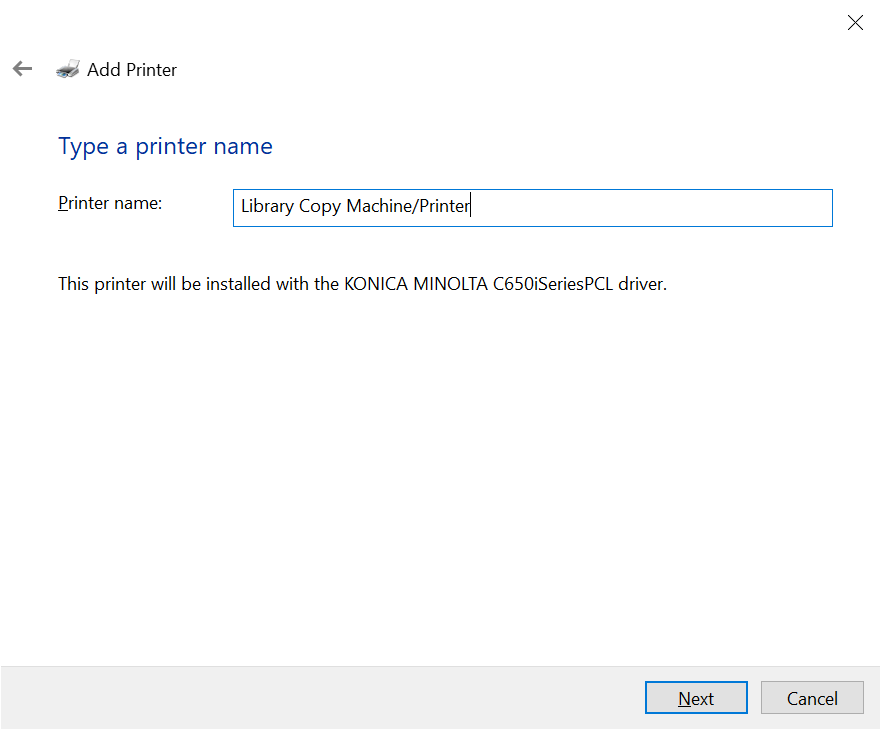
- Name the printer Your printer name and click Next.

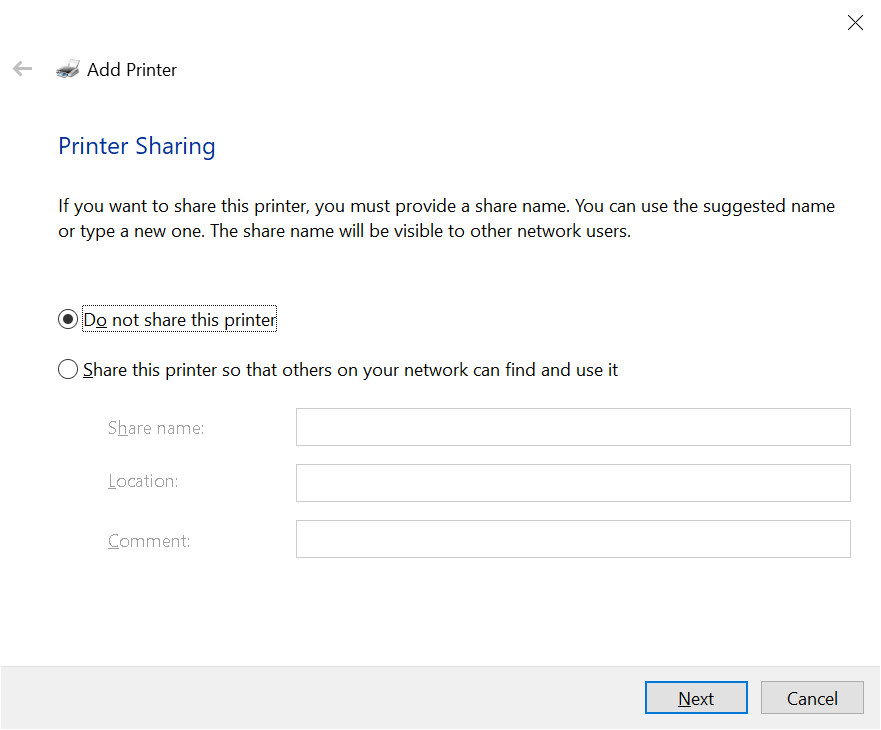
- If the option exists, select Do not share this printer and click Next.

- Rather than clicking the Print a test page button, complete the printer installation procedure and print a document you need as not to waste paper.
- Click Finish.


Create a Scan to Email Account on the Konica Minolta Copiers
- Tap the touch screen to wake-up the copier
- If needed, tap the HOME button in the lower left corner of the touchscreen.
- Tap Address Book.
- Tap New at the bottom of the touchscreen
- For Address Type, select E-mail
- Use the on-screen keyboard to enter your name and your @sjsu.edu email address
- If you scan to email frequently, tap to select Favorites under the name section
- Click Register
You are now entered into the address book.
Scan a Document Using the Konica Minolta Copiers
The Konica Minolta copiers in the Library and the Admin Copy room can scan documents directly to your SJSU email address. All of these instructions are posted for your convenience on the board next to the admin and library copiers.
Scan your document:
- Tap the touch screen to wake-up the copier
- If needed, tap the HOME button in the lower left corner of the touchscreen.
- Tap Scan to E-mail
- Insert the document into the document feeder (adjusting for size, as necessary) or place it onto the glass.
- Browse the address book entry for the desired recipient and tap the checkbox next to their name.
- If the desired recipient is not listed in the address book:
- If you plan to scan items regularly: You can add the email address as described in this KB post: Create a scan to email account on the Konica Minolta copiers
- If you do not plan to scan items regularly: Tap sample@test.local at the top of the screen and enter the email address manually
- If the desired recipient is not listed in the address book:
- Configure the scanner settings on the right side of the touch screen (if necessary):
(Below are the settings that you may want to change, otherwise leave as default)- Resolution - Change the resolution of the scan (higher res provides more detail, lower res means smaller file sizes).
- File Type - PDF/Compact PDF (default), TIFF, JPG (PDF is best for documents, images should be TIFF or JPG)
- Duplex Settings - Select whether your document is one-sided or two-sided
- Density - Lighten or darken the scan.
- Press the Start button
- Once the scan is complete, tap the Home button in the lower left corner of the touchscreen.
IMPORTANT NOTE: If the copier beeps and/or displays an error code, it is likely that your address book entry in the scanner is not correct. If so, please verify that the email address in your address book entry is correct.
Retrieve your scanned document:
- Simply login to your SJSU Gmail account to download your scanned document: https://mail.google.com/
MLML Network Printer DNS Names
STUDENT PRINTERS
Library Copy Machine/Printer - Konica Minolta bizhub C550i: mlm-library-printer.sjsu.edu
NOTE: The printers below are restricted, please do not use them unless you have approval.
LAB PRINTERS
Mammal Lab Printer - HP M401dne: ps215
Benthic Lab Printer - Brother HL-5250DN: ps216
ChemOce Printer - HP LaserJet 2300dn: ps507
Phyc Lab Printer - HP LaserJet P4014n: ps218
GeoOce Printer - HP LaserJet 2300dn: ps511c
Invert Lab Printer - NONE
PhysOce Lab Printer - NONE
Ich Lab Printer - NONE
BioOce Lab Printer - NONE
FRONT OFFICE PRINTERS
Admin Copy Machine/Printer - Konica Minolta bizhub C550i: mlm-admin-printer.sjsu.edu
Admin Printer- Faculty offices wing - HP LaserJet M610: faculty-printer.mlml.calstate.edu
GROUP PRINTERS
Faculty Printer - HP LaserJet p4515d: ps416
MOBY Printer - Xerox ColorQube 8570DN: ps509c
PSRC Printer - HP LaserJet 4250N: ps5141
Starr Lab Printer - HP LaserJet 1320n - ps514
Marine OPs Copier - Xerox WorkCentre 3615: psmarineops
Marine OPs Printer - Xerox Phaser 6180: psmarineops2
Hab Center Printer - Minolta QMS MC2350: pshabc
Small Boats Printer - HP K60: HP K60
Norte Printer - Xerox Phaser 3610: psnorte
Norte Printer - Xerox WorkCentre 3615: psnorte2
Norte MPSL Field Crew Printer - Brother HL-5100DN - psnorte47
CCWG Printer - HP Laser Jet Pro M402dw: pssandholdt1
CCWG Printer - HP OfficeJet Pro 8715: pssandholdt2
Aquaculture Center Printer - Lexmark C746: psaquaculture
Installing Admin/Library Konica Minolta Copiers (Windows)
IMPORTANT:
|
Windows 10
These are instructions for setting up the new Konica Minolta copiers that were installed in December 2021 on Windows machines. If you find something that is out of date, please submit a Help Desk ticket.
1. Download the printer driver
-
- Click this link to be taken to the Konica Minolta driver website for this printer (C550i).
- Click on the category for your operating system (most likely Windows 10 64-bit)
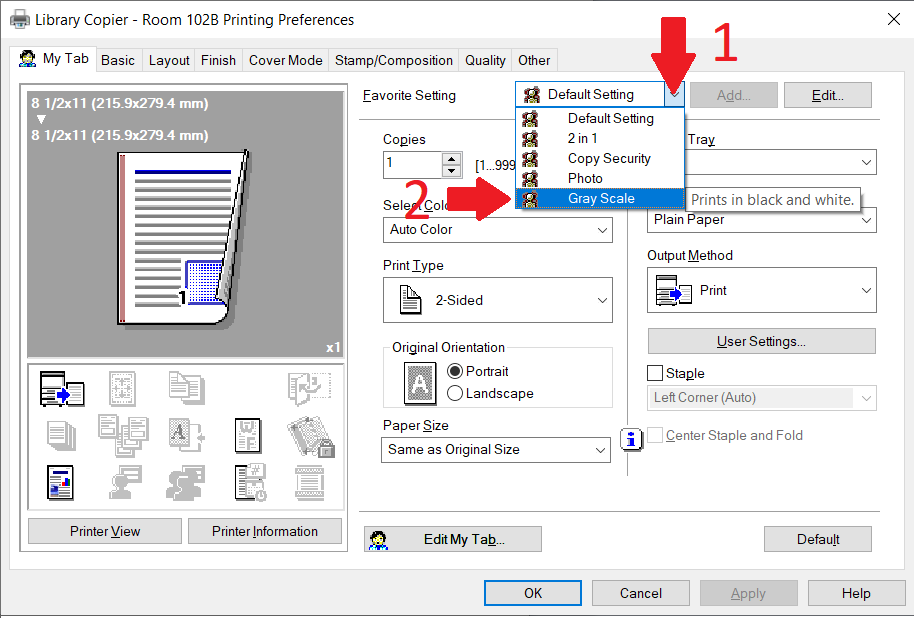
- The page has multiple files available for download. Download the newest version of the full printer driver (.zip), as shown below. There may be a newer version than what is shown in this screenshot.

- Save the .zip file to your computer, and open it when the download is complete.
- Extract the files to a folder:

- Most of the time, it will offer to extract the contents to same location where the zip file is saved (ex: Downloads folder)


2. Add the printer
-
- Open the Windows Start Menu and find the Settings app:
- Open the Windows Start Menu and find the Settings app:

-
- In Settings, click Devices > Printers & scanners
- Click Add a printer or scanner.
- At the bottom of the list of printers, click The printer I want isn’t listed.

- Select Add a printer using an IP address or hostname and click Next.

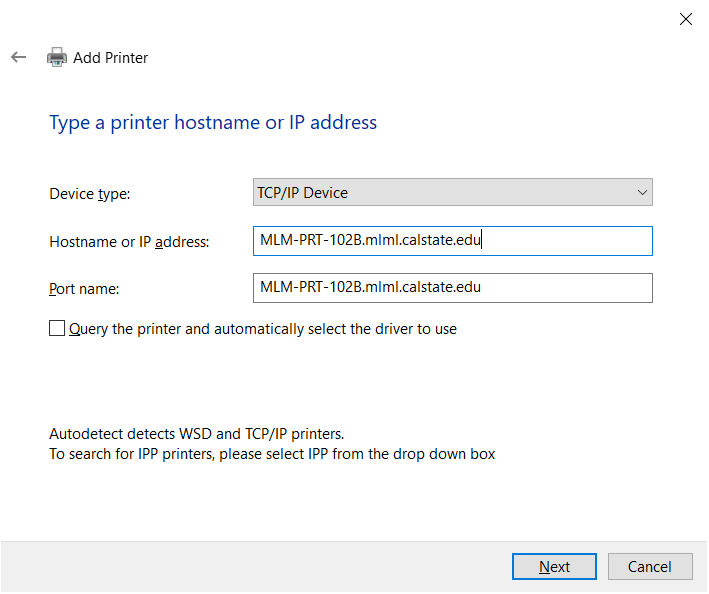
- Enter the following information:
- Device type: TCP/IP Device
- Hostname or IP Address:
- Library Copier: mlm-library-printer.sjsu.edu
- Admin Office copier: mlm-admin-printer.sjsu.edu
- Port name: this will auto-fill based on the hostname entered, you don’t need to change it.
- UNCHECK Query the printer and automatically select the driver to use.

- Click Next.
- You may be told that additional port information is required. Leave Generic Network Card selected and click Next.
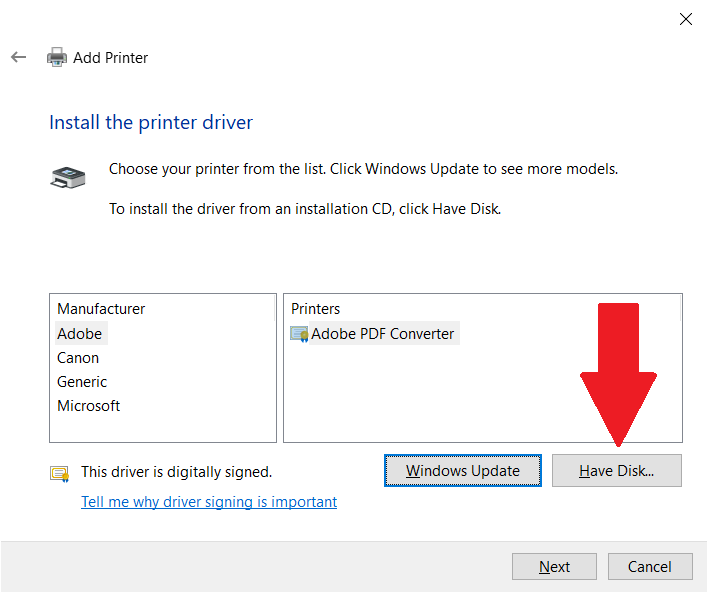
- Click Have disk.

- Click Browse and locate the folder that you extracted containing the driver files in Step 1.
- Inside the folder, navigate to Drivers/PCL/EN/Win_x64/
- Select the .inf file that appears in the folder and click Open.

- Click OK and then Next.
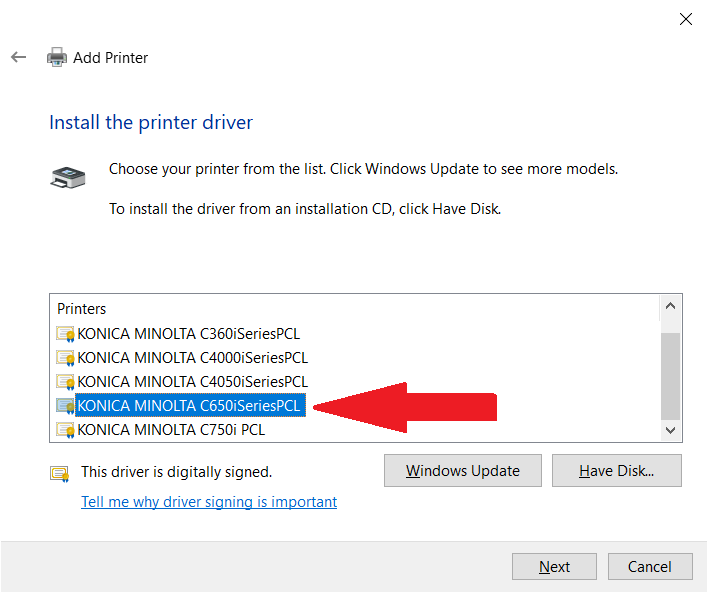
- Select KONICA MINOLTA C650iSeriesPCL from the list of drivers (The 550i and 650i use the same software):

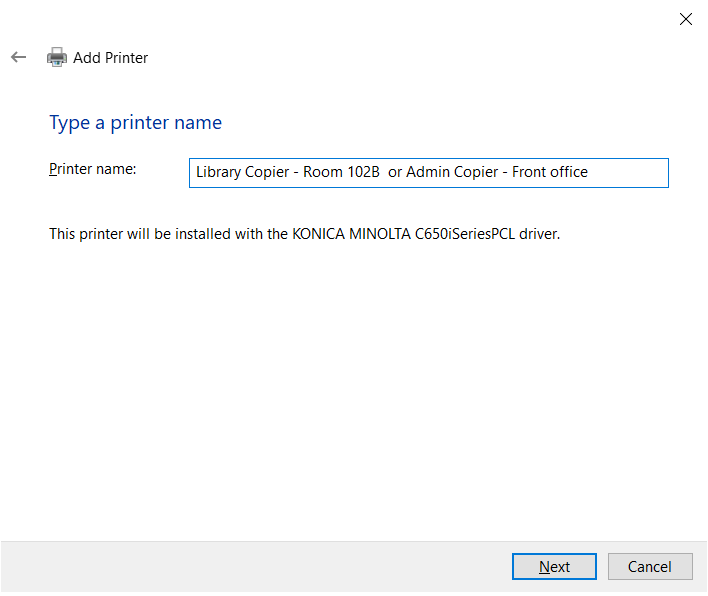
- Name the printer (E.g. “Library Copier - Room 102B” or “Admin Copier - Front office”)

- Click Next.
- You will be asked if you want to share the printer on the network. Select Do not share this printer and click Next.
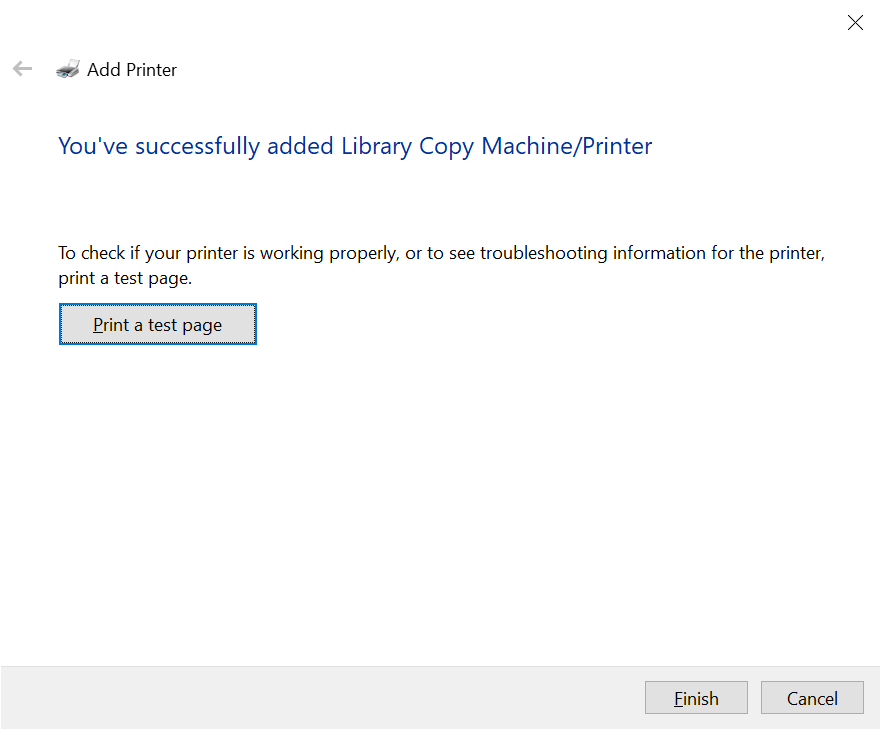
- Click Finish. Do not print a test page. Uncheck the box for "Print a test page" if applicable.


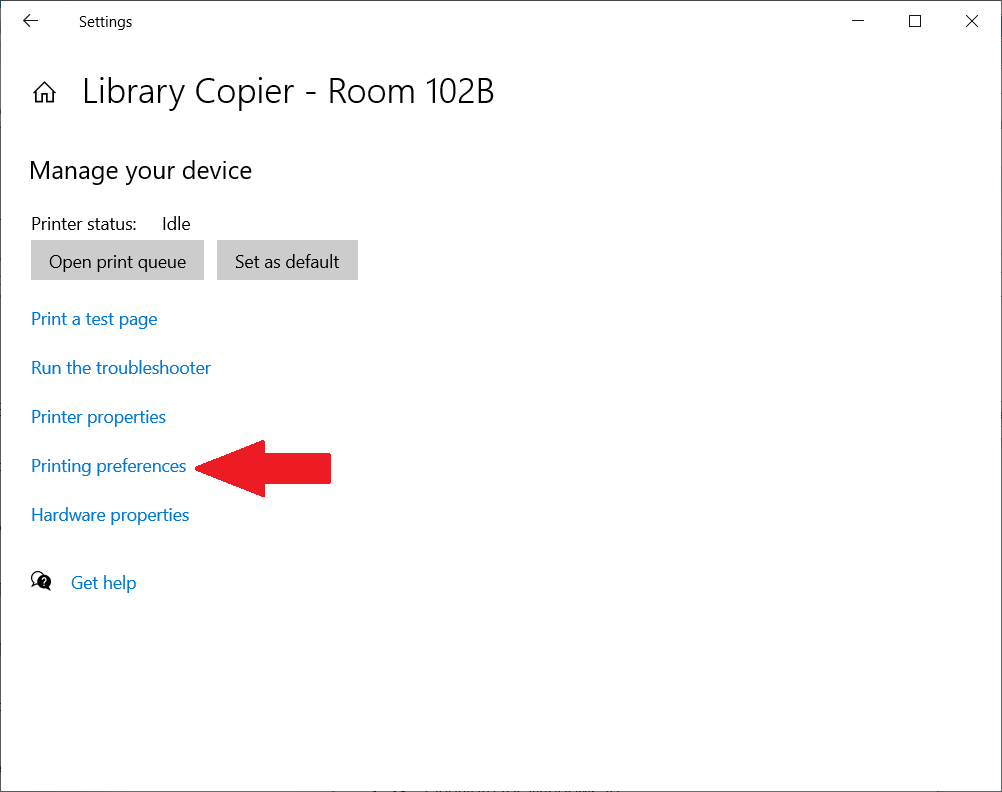
3. Set Default Printing Settings
-
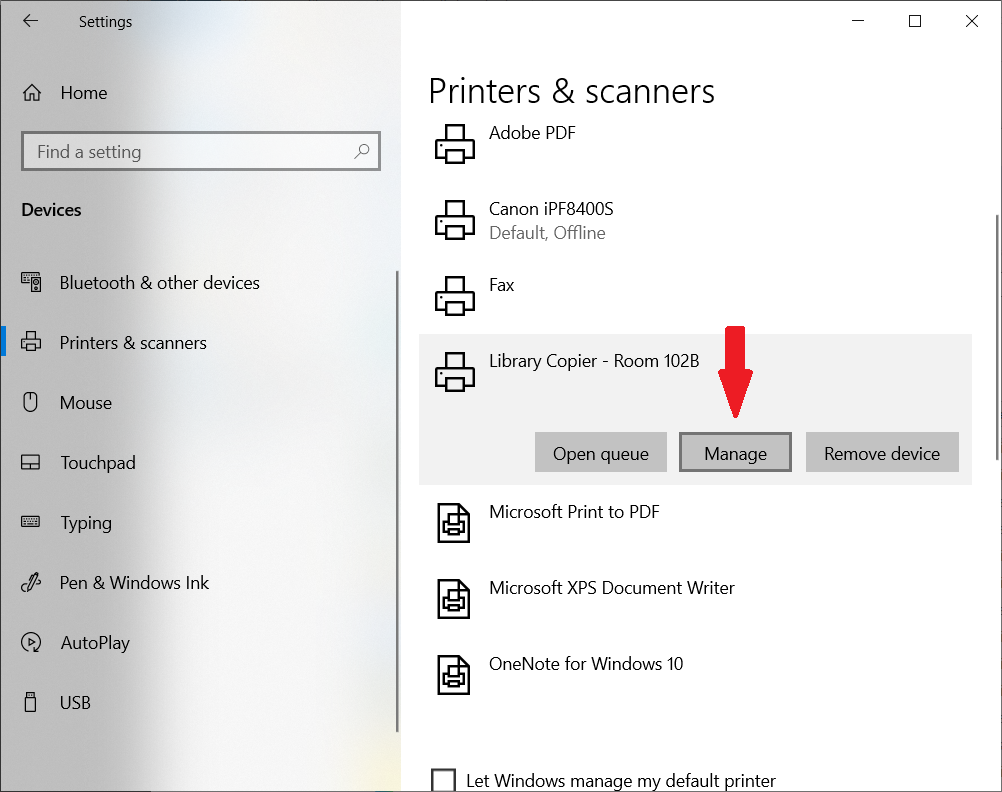
- Find the copier in your list of printers and click on it, then click Manage:

- Click Printing preferences:

- Select the “Favorite Setting” dropdown and click Gray Scale:

- Click OK.
- This means that when you print, it will default to grayscale (black and white). If you need to print in color, you can select a color preset, but you should leave the default/favorite setting as grayscale.
- If you need to change other printing settings, the Printing preferences menu is where you access them. Remember to leave the default set to grayscale.
- The printer is now ready to be used.
- Find the copier in your list of printers and click on it, then click Manage:
Installing Admin/Library Konica Minolta Copiers (macOS)
IMPORTANT:
|
These instructions are for the NEW Konica Minolta copiers that were installed in December 2021 for use with newer versions of macOS. Older versions of macOS will have similar instructions, but certain fields may be named slightly different. If you find something that is out of date, please submit a Help Desk ticket.
1. Download the printer driver
- Click this link to be taken to the Konica Minolta driver website for this printer (C550i)
- Find your operating system and select it
- If you do not know your operating system, click on the Apple icon in the top left corner of your screen and select “About This Mac”
- Download the newest version of the full printer driver (.zip), as shown below. There may be a newer version than what is shown in this screenshot.
- There may be multiple versions of the print driver. If so, make sure you are selecting the driver for Letter paper, as shown below.

- There may be multiple versions of the print driver. If so, make sure you are selecting the driver for Letter paper, as shown below.
- Once the download is complete, open the .zip file to extract the .pkg file and run it

- When the installer launches, click continue/agree when prompted and complete the driver installation. If a pop-up comes up saying "Installer" would like to access files in your Downloads folder click OK. Move the Installer to Trash.

2. Add the printer
- Access your System Preferences (in the drop-down menu from clicking on the Apple logo in the top left corner of the desktop).
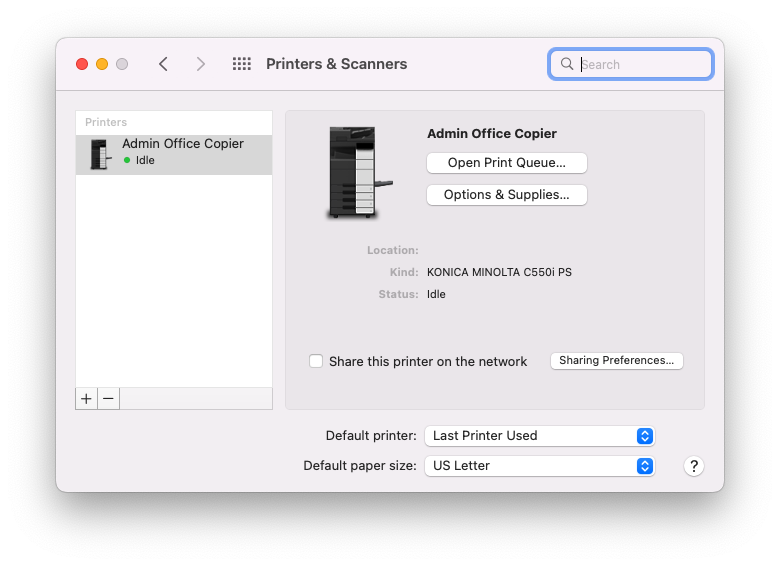
- Go to Printers & Scanners. Click on the + button to add a printer.
NOTE: If you have the old library or admin printer installed, remove it first by highlighting it, then clicking on the - symbol.
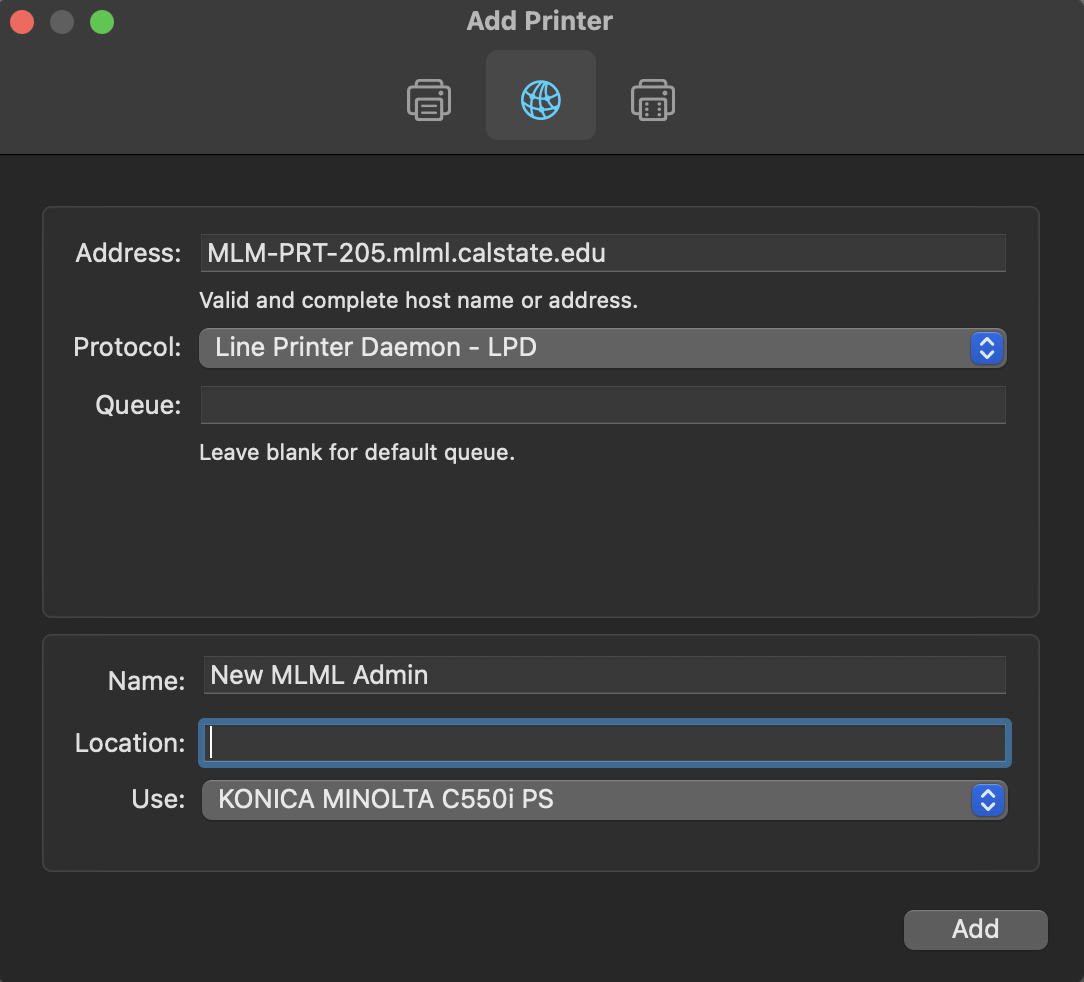
- Click the globe icon/IP tab at the top of the window

OR
- Enter the following for the printer you wish to add into the Address text box
- Library Copier: mlm-library-printer.sjsu.edu
- Admin Office copier: mlm-admin-printer.sjsu.edu
- Select Line Printer Daemon - LPD from the Protocol drop-down menu.
- Leave the Queue field blank.
- Change the name of the printer to something that helps you easily identify the printer (eg. "Library Printer" or "Admin Copier"). You may do the same for the Location field if you desire.
- Select the Select Software… option from the Use drop-down menu. Search for the model # of the printer
- Library and Admin office copiers: KONICA MINOLTA C550i PS
- Highlight the correct print driver and click OK without changing any fields, then click the Add button
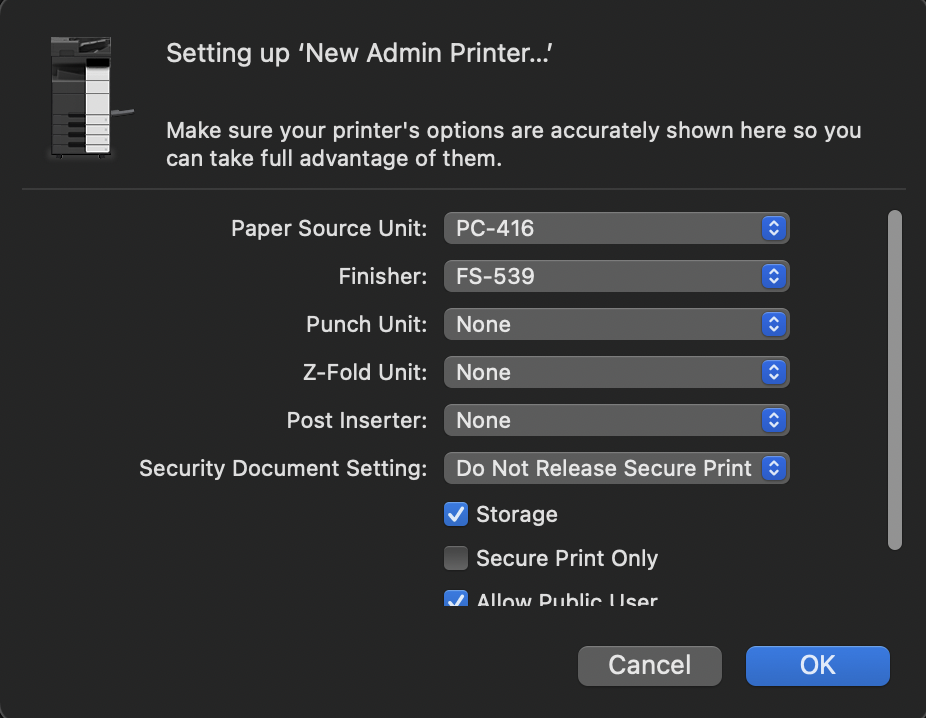
- Admin Copier Example:

- Select the following options in the printer setup window then click OK:
- Paper Source Unit: PC-416
- Finisher: FS-539
- Leave all other settings as default, click OK

- The printer is now installed, follow the next steps in order to print successfully.


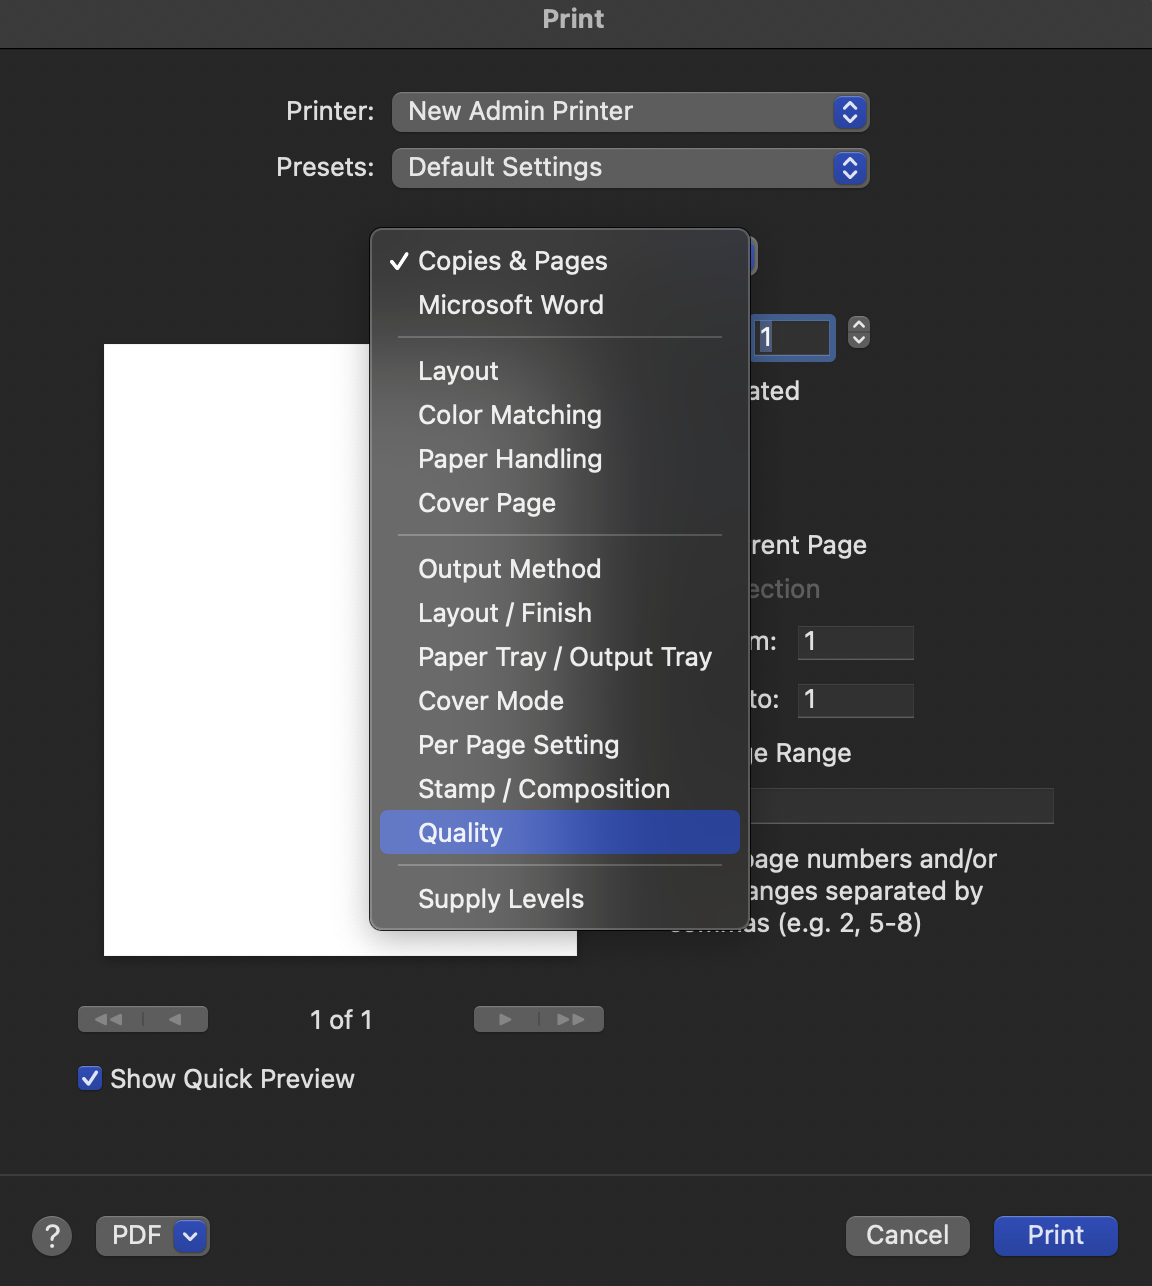
3. Configure Printing Presets
- Open a blank Word document or text file.
- Select Print… from the File menu
- From the drop down list in the middle of the print dialogue box select Quality

- Under Select Color choose Gray Scale

- Go to the Presets drop-down menu and select Save Current Settings as a Preset… Name this preset something easy to distinguish, such as “MLML B&W” and apply only to this printer. Click OK.

- Repeat these steps to create a preset for color printing by selecting Auto Color.
- Click Cancel to exit the print dialog.
- Ensure that you are selecting the correct preset when printing B&W vs. color documents.