Operating Systems
Find information about different operating systems.
- Recommended Operating Systems: MacOS & Windows
- Computer Storage Management
- Computer Performance
- Change your macOS Login Password
- Change your Windows 10 Login Password
- Backing Up with Windows File History
- Change the Default Application Associated with a File Type
- How do I install device drivers?
- Help for New Mac Users
- Start your Windows Computer in Safe Mode
- macOS Startup Key Commands
- Use VirtualBox to Create a Windows Virtual Machine
- Create a Disk Image Backup with Macrium Reflect
Recommended Operating Systems: MacOS & Windows
IT highly recommends using either macOS or Windows 10 operating systems. Keeping your operating system up to date with the most current upgrades available will allow your system to run at optimal performance and security levels.
macOS
Apple provides free upgrades to newer operating systems when they become available.
Big Sur
- Apple's newest version of macOS
- Compatible with these computers: https://support.apple.com/en-us/HT211238
Once you have installed the latest operating system available, keep it up-to-date by enabling automatic updates by following the instructions here.
Windows
Microsoft's newest operating systems must be purchased before being installed.
Windows 10
- Microsoft's newest windows operating system
- Windows 10 is compatible with most PCs
Once you have installed the latest operating system available, keep it up-to-date by enabling automatic updates by following the instructions here.
Windows 7
- Microsoft no longer provides support for Windows 7. If you have any computers that are still running Windows 7, contact IT as soon as possible to be upgraded to Windows 10.
- If you have a computer that must continue running Windows 7 (for hardware or software compatibility reasons), it must be disconnected from the MLML network and the internet at all times.
Computer Storage Management
NOTE: For image management, see our Image Management, Search, & Use Best Practices Page.
Disk Space Analyzers
- Both Disk Inventory X and WinDirStat show the sizes of files and folders on your drive in a graphical tree map and in a list
- For both programs, DO NOT delete any files in Windows Directory or Program Files Directory
- Recommended that you delete files only in your Users Directory
Windows
WinDirStat - This is a program that may be used to analyze and manage hard drive disk space on Windows. This programs shows which folders, file types, and files are taking up the most space (e.g. ZIP, EXE, JPEG, etc.). Make sure you do not delete any important system files.
macOS
Disk Inventory X - This is a program that may be used to analyze and manage hard drive disk space on MacOS . This programs shows which folders, file types, and files are taking up the most space (e.g. MP3, ZIP, JPEG, etc.). Delete files by selecting the file and then click “Move To Trash”. Make sure you do not delete any important system files.
- If error message “‘Disk Inventory X’ can’t be opened because it is from an unidentified developer” is received, follow these instructions.
Determine Disk Use with Analyzers:
Windows
- WinDirStat may be used to scan your entire system and shows which folders, file types, and files are using up the most space.
- Run WinDirStat
- If already downloaded, search for the application in your Start Menu
- Select the Drive you would like to analyze
- Click OK - the analyzing process will commence
- Below is what the results will look like, each color corresponds to a file or folder, and the size is equivalent to the percentage it takes up on your disk. You can see the file/folder name in the bottom of the window when you scroll over the section.

- Right-Click a file/folder on the list or in the graphical tree to either “Move to Recycle Bin” or “Reveal in Folder”. The latter will allow you to select specific files in a folder to delete.
macOS
- Disk Inventory X will provide a list of files taking up the most space. Delete files that you no longer need that are clogging up your disk.
- Run Disk Inventory X as an administrator
- If Disk Inventory X installed previously, click Command + Space and type “Disk Inventory X” then Enter
- Select which Drive you’d like to analyze
- Click “Open Volume” - the program will start analyzing the Drive
- Below is an example of what your results will look like

- The “Statistics” tab will show you which apps and files are taking up the most space
- Right-Click a file/folder on the list or in the graphical tree to either “Move to Trash” or “Reveal in Finder”. The latter will allow you to select specific files in a folder to delete.
- Run Disk Inventory X as an administrator
- For more tips on steps you can take to clear space, follow procedures listed on MacPaw.
Free-Up Disk Space
- Start with cleaning up applications, files, photos, etc. that you no longer need on your computer. Empty your Trash/Recycling Bin on your computer.
Windows
- Open Windows Explorer
- Right-click on C: drive and select Properties
- Select Disk Cleanup
- This program analyzes your hard drive and identifies files that are no longer of any use. After browsing the results, you can remove the unnecessary files
- Once Disk Cleanup has finished running, review files it found that are no longer of use<
- Files to get rid of: temporary files, recycle bin, temporary internet files, and windows update cleanup files
- DO NOT get rid of Windows ESD Installation Files
- All other files should be reviewed by you
- Here’s a guide on how to use Disk Cleanup safely and effectively from HowToGeek.
- Delete files and uninstall programs on your own:
- Here’s another good guide from HowToGeek for more general disk space cleanup.
- Good places to look for large sets of old files to delete:
- Downloads folder: Programs you’ve downloaded are generally installed, and then these installer files just end up wasting lots of space.
- Pictures / Videos folder: If there’s anything you don’t want any more. (Videos especially can take up tons of space)
- Documents folder: These shouldn’t take up lots of space, but cleaning up old things you have no need for is good practice.
- Periodically: Go to Control Panel > View By Category > Uninstall a Program, and uninstall any old programs you no longer use.
- Deleting Temporary Files - Temporary files, such as “cab_” are found on your hard drive. These are reminiscent of Windows Update; deleting these files may free up some space on your hard drive.
-
To delete “cab_” files:
- Right click on the Windows icon.
- Go to File Explorer → This PC > OS: C in left sidebar
- Open Windows folder → Temp folder → Continue
- Scroll down to the files beginning with "cab_"
- Delete these “cab_” files
- For more tips on how to clear disk space, go to Microsoft Disk Cleanup.
macOS
- Though there are no “Disk Cleanup” equivalents for MacOS, here are some tips on how to manage and free-up storage space from Apple Support
Computer Performance
macOS is Apple’s operating system for all Mac devices. For more information about macOS visit the macOS Apple Page.
About This Mac
- This dialog shows you basic information about the manufacture date and hardware of your Mac.
- Click the Apple icon at the top left of the screen on the menu bar.
- Click About This Mac.
- The dialog window with basic system information will pop up

- Click the System Report button for more detailed information for the advanced user.

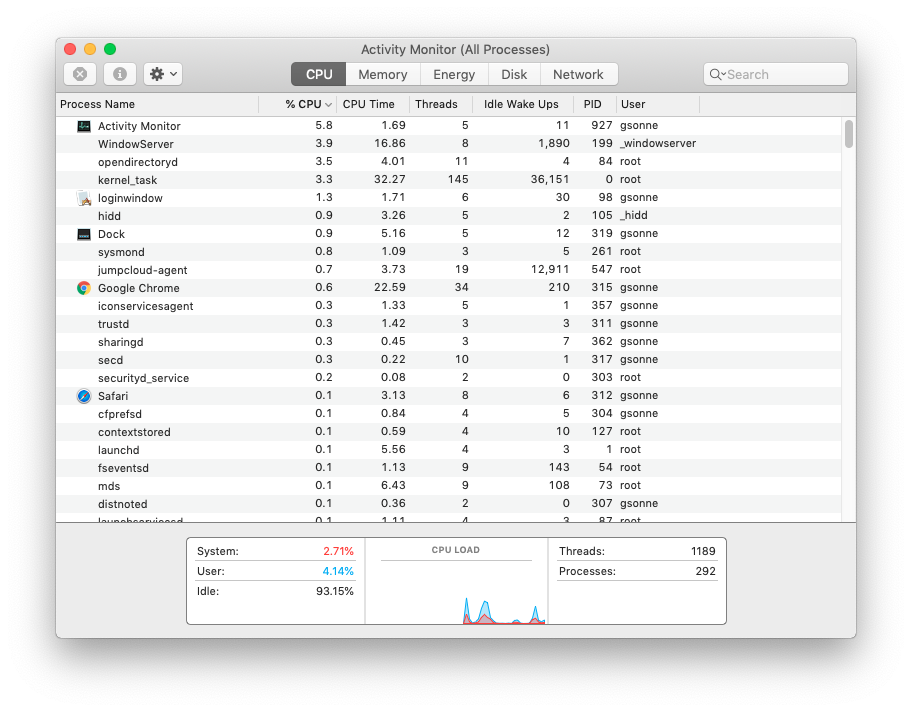
Activity Monitor
- Similar to Task Manager for PC, Activity Monitor displays every program running on your Mac. You can manage these running programs and identify how they are affecting your Mac’s performance.
- For more information visit Activity Monitor Support.
Uninstall Unnecessary Applications
- One simple way to clear disk space and keep your computer running smoothly is to uninstall applications you don’t need or aren’t using.
- NOTE: Make sure you know what the application function is before you delete it, some applications are key to keeping your computer functioning properly.
- Find the list of applications: Open Finder → Applications (left side panel)
- How to Uninstall Applications on Mac
Windows
Windows is Microsoft’s operating system for PCs. For more information about Windows visit the Microsoft Windows Page.
System Information
- Windows also has a basic system information dialog, similar to About This Mac (OS Version, Processor, Memory, 32/64bit info)
- Right click the This PC Icon on your Desktop and Click Properties.
- If it isn't there, search "This PC" in the Search Box on your Taskbar.
- This system information dialog should pop up

- For more detailed and advanced info, download a third-party system info utility program like CPU-Z.
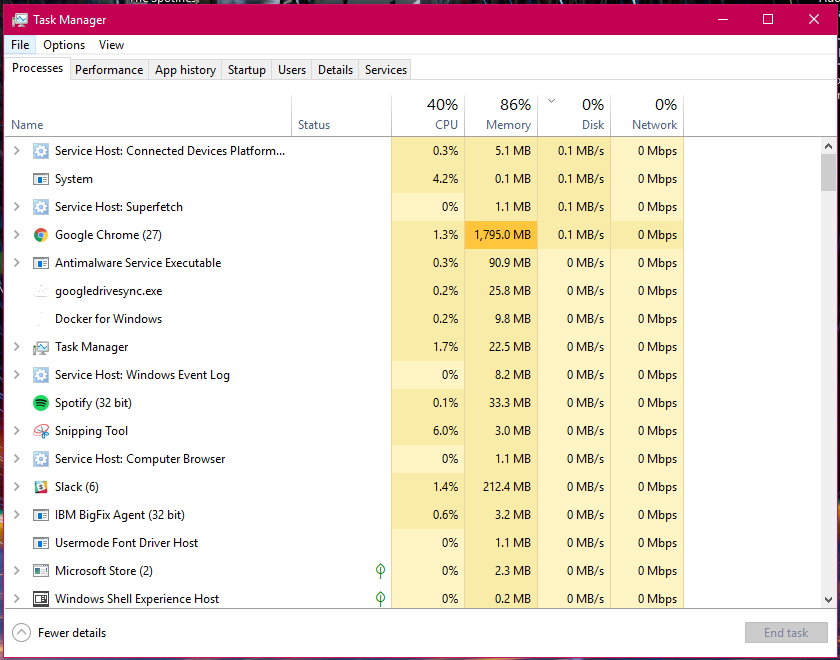
Task Manager
- Similar to Activity Monitor for Mac, Task Manager displays every program running on your computer. You can manage these open programs and identify how they are affecting your computer’s performance.
- You can access the Task Manager by pressing Ctrl-Alt-Delete (press all three keys at once). Once the screen changes color and a menu pops up, click Task Manager.
- For more information visit About Task Manager.
Resource Monitor
- The Resource (and Performance) Monitor in Windows allows the user to monitor CPU and memory usage, and disk and network activity in real time. It’s a great resource if your computer or your software is running slow and you’d like to see what program is causing the slowdown.
- You can access the Resource Monitor by pressing Ctrl-Alt-Delete (press all three keys at once). Once the screen changes color and a menu pops up, click Task Manager. The Resource Monitor is a tab, Performance, within the Task Manager window.

- There is a more detailed Resource Monitor within the Performance tab. At the bottom of the dialog window, there is a button Open Resource Monitor, with a speedometer icon. Click on this for a resource monitor where you can find details on which programs are eating up resources.
- For more information visit PC World Resource Monitor.

Event Viewer
- Log files such as security changes, administrative files, application files, etc. are all compiled for viewing in the Event Viewer. It can be very helpful in locating a source of a problem if your computer starts to have issues.
- For more information visit How to Use Event Viewer.
- To use Event Viewer to detect problems in your PC visit Microsoft Support - Event Viewer.
Uninstall Unnecessary Applications
- One simple way to clear disk space and keep your computer running smoothly is to uninstall applications you don’t need/use.
- NOTE: Make sure you know what the application function is before you delete it, some applications are key to keeping your computer functioning properly.
- Find the list of applications by following these instructions.
- How to Uninstall Windows Applications
3rd Party Tools
See the list of 3rd party tools below, or visit these websites:
- Mac 3rd Party Tools
- Etrecheck - Find serious problems on your Mac
- MacKeeper - DO NOT USE THIS! (Uninstall if present)
- Uninstall Instructions - be sure to clean up bits that may be leftover
- PC 3rd Party Tools
Change your macOS Login Password
macOS
How to change your macOS Login Password
Change your Windows 10 Login Password
Windows 10
If you use a Microsoft account on your Windows 10 computer, you need to follow the instructions in Method 2 of this guide (or sign into the Microsoft online website) to change your password.
Method 1:
Change the Windows 10 Password from Control Panel
- Open the Control Panel. Set the View by option to Large icons. Click User Accounts.
-
- Click the Manage another account link.
-
- Click the user account that you want to change the password for.
-
- On the next screen, click the Change the password option.
- Type in your current password and then enter the new one you wish to use. Click Change password.
-


Method 2:
Change the Windows 10 Password from PC Settings
- Press the Windows + I keys together to open the Settings app. Click Accounts.

- Click Sign-in options on the left side, and click the Change button under Password section on the right side.
-
- Enter your current password and click Next.
- Enter and reenter a new password, and set a password hint. Click Next.


Backing Up with Windows File History
Windows File History is a backup solution included with Windows 10 that behaves similarly to Apple’s Time Machine. These instructions assume you are running Windows 10.
Note that File History will backup all folders and their contents within your user account’s home directory (C:\Users\<your username>). That includes your Desktop, Documents, and Downloads folders among others.
Initial setup
- Press the Windows key/click the Start button.
- Type “backup” without quotes.
- The search results should include “Backup settings”. Click “Backup settings”.


- Click “Add a drive” to bring up a list of eligible backup drives.
- Select your USB backup hard drive.
- Note that in this example a 32 GB USB flash drive is being used as the backup drive. This is an example only - use a USB hard drive for your backups.


- Note that in this example a 32 GB USB flash drive is being used as the backup drive. This is an example only - use a USB hard drive for your backups.
- “Add a drive” should now be replaced with an on/off switch for “Automatically back up my files” with the switch in the On position. Your files are now backing up automatically.
Additional configuration
- Return to the File History settings page (steps 1-3 of Initial setup above).
- Click “More options”.


- Back up my files: The default of every hour is good.
- Keep my backups: I recommend setting this to 3 months, which will simply remove backups from over 3 months ago. Any reasonable timeframe or the “Until space is needed” option are fine choices.


- Add a folder: You can optionally add folders you want backed up that are outside of your user account’s home directory (C:\Users\<your username>).
Restore files
- Return to the File History settings page (steps 1-3 of Initial setup above).
- Click “More options”.
- Scroll to the bottom. Click “Restore files from a current backup” under “Related settings”.
- Navigate to the time/date of the backup you wish to restore.
- Restore SPECIFIC files/folders in-place
- Select the file(s) and/or folder(s) you wish to restore.
- Click the big green restore button labeled “Restore to original location” to replace the current version of the file(s) and/or folder(s) with the one(s) from your chosen backup.
- Restore ALL files/folders in-place
- NOTE: You probably do not want to do this. Changes to every file and folder since your selected backup will be lost and replaced with the version from your backup.
- Click the big green restore button labeled “Restore to original location” to replace the current version of all your files and folders with the ones from your chosen backup.
Change the Default Application Associated with a File Type
Windows
- Right-click on the file you want to open.
- Mouse over the Open With... menu option, and select Choose Program...
- Select the desired program from the list, or browse for a program if it is not listed.
- Check the "Always use the selected program..." checkbox.
- Click OK.
macOS
Method 1 (Recommended):
- Right-click on a file and select "Get Info". (The shortcut is command-I)
- In the file info window, under "Open with", select the application you want as the default from the drop-down menu.
1. If the application you want to use is not listed,
click the "Other..." button.
2. If the application you want to use is greyed out in the
"Choose and application to open the document ________ "
window, change the "Enable" setting from "Recommended
Applications" to "All Applications".
3. Check the "Always Open With" check box and click "Add". - Once you have selected your application, you have the choice to make this change affect all files of this type, or just this one. To have this change affect just this one, simply close the window. For the change to affect all files of this type, press the "Change All..." button.
- When you are prompted to "Change all similar documents to open in the application _________ ", click the "Continue" button.
- The selected file type should now open using the application selected in the steps above when the file is double-clicked.
Method 2:
- Right-click on a file, point to "Open With" and select "Other..."
- Browse to your Applications directory and select the application you want to open the file type by default, check the "Always Open With" check box and click "Open". (NOTE: If the application you want to use to open the file is greyed out, change the "Enable" setting from "Recommended Applications" to "All Applications".)
- The selected file type should now open using the application selected in the steps above when the file is double-clicked.
How do I install device drivers?
Identify the device (Windows)
Determine the make and model of the device for which you want to update the drivers. If it's an external device (printer, scanner, webcam, etc.) you can usually read the make and model number right off the device. If the make and model info is not easy to determine, you'll need to do some research to figure it out. You should be able to find the information using one of the following methods:
Windows 10:
- Select Start, in Search, type Device Manager, and select it from the list of results.
- Select Search automatically for updated driver software.
- If Windows doesn't find a new driver, you can try looking for one on the device manufacturer's website and follow their instructions.
Download the Drivers
From the manufacturer's website (recommended):
- Go to the device manufacturer's website.
- Locate the Software and Driver download page on their support site.
- Search for the specific model number of the device.
- Locate and download the driver specific to your device and operating system. (Determine your operating system by right-clicking My Computer and selecting "properties".
Install the Drivers
Some drivers are provided as a self-extracting, self-installing executable package. Some will be a self-extracting archive that contains an installer you need to run. Others will be a file or set of files that need to be installed manually.
To install drivers from an installer:
- Double-click the installer file.
- Click through the installation process.
- After the installer finishes, restart your computer to complete the installation process.
To update drivers in Windows 10 click here.
Help for New Mac Users
A good place to start is Apple's Mac 101 web site:
http://www.apple.com/support/mac101/
Start your Windows Computer in Safe Mode
As of Windows 10, Windows will automatically start in Safe Mode if it detects that you are unable to boot up normally. It may take 2-3 tries before Windows starts in Safe Mode.
If your computer boots normally and you want to enter Safe Mode, such as to install software which isn't working in normal mode, follow these steps: https://support.microsoft.com/en-us/windows/start-your-pc-in-safe-mode-in-windows-10-92c27cff-db89-8644-1ce4-b3e5e56fe234
macOS Startup Key Commands
One of the features of macOS is the ability to issue commands during the startup of the macOS to perform specific operations or evoke different startup states. In order to issue the commands associated with the different key combinations, the key combinations must be pressed at the moment the startup chime sound is heard and the screen changes color from black to grey on system startup and held until the desired operation occurs.
Please note that these key combinations only work on Macs with Intel processors. For newer Macs with Apple Silicon chips, follow this guide to access different startup options: https://support.apple.com/guide/mac-help/macos-recovery-a-mac-apple-silicon-mchl82829c17/mac
- Option - Display all bootable volumes (Startup Manager)
- Shift - Perform Safe Boot (start up in Safe Mode)
- C - Start from a bootable disc
- T - Start in FireWire target disk mode
- X - Force Mac OS X startup (if non-Mac OS X startup volumes are present)
- Command-V - Start in Verbose Mode
- Command-S - Start in Single User Mode
- Mouse button - Force eject CD/DVD
More information about macOS key commands are available on the Apple website:
http://support.apple.com/kb/HT1343
More startup key-command information:
https://support.apple.com/en-us/HT201255
Use VirtualBox to Create a Windows Virtual Machine
Download VirtualBox:
Instructions for creating a Windows 10 virtual machine using VirtualBox:
-
https://www.extremetech.com/computing/1 ... al-machine
IMPORTANT: Make sure you install the Guest Additions and create shared folders.
(When you create a shared folder, make sure you check the "make permanent" check box)
Once you've installed VirtualBox and created a VM, you can use Ninite to install essential Windows applications:
Create a Disk Image Backup with Macrium Reflect
Creating a disk image is a great way to keep your computer and files backed up. This is one of two ways IT recommends backing up your devices. The other way is to back up with Windows File History or macOS Time Machine.
Follow the instructions below to create a disk image:
- Download Macrium Reflect
-
During installation:
- Do not include the PE environment
-
Reflect Defaults:
- Backup - set priority to 3/4
- Advanced - Disable backup notification
-
Once installation complete, configure backup settings:
- Open Macrium Reflect
-
Select "Create an image of the partition(s) required to backup and restore Windows" on the left side panel of Macrium

- Make sure the whole disk is selected (far left box is checked, as well as all sections of that disk are checked)
-
Set your destination of the images you create

- Click Next
- Select a Template for your Backup Plan: Differential Backup Set
-
Select Edit Schedule with Full highlighted
- Configure settings:
- Monthly
- Every first Sunday at 3:00am
- Conditions: (check all mentioned)
- Run task as soon as possible after a scheduled start is missed
- Start the task only if the computer is on AC power
- Wake the computer to run this task
- Select OK
- Configure settings:
- Select Edit Schedule with Differential highlighted
- Configure settings:
- Daily
- Weekdays at 12:30pm
- Conditions: (check all mentioned)
- Run task as soon as possible after a scheduled start is missed
- Start the task only if the computer is on AC power
- Wake the computer to run this task
- Select OK
- Configure settings:
- Define Retention Rules
- Full: change amount to 2, change from "Weeks" to "Backups"
- Differential: change to 30 Days
- Hit Finish
- Hit OK