WordPress
Learn about WordPress and creating websites, webpages, and posts on the MLML WordPress platform.
- General Information
- WordPress Website Support Guidelines
- WordPress Tutorial & Support Information
- WordPress FAQs
- WordPress User Roles and Permissions
- WordPress Third-Party Plugin Documentation
- How-To Guides
- Content Guidelines for Posts on MLML Website
- How to Become a WordPress Admin
- Wordpress Posts and Pages Best Practices and Policies
- WordPress Menu Best Practices and Policies
- 5 Tips for Creating WordPress Posts
- Media Use & Policies
General Information
An introduction to WordPress and the resources available to help you build your website.
WordPress Website Support Guidelines
The purpose of this page is to guide you through the process of getting help with your WordPress website.
- Check out the WordPress FAQ's
- Use resources from our Getting Started with WordPress page
- Learn how to become a WordPress Admin
- Browse our WordPress Resource Website
- Put in a Help Desk ticket
- If you did not find an answer using the available resources then put in an Help Desk ticket.
- Include in the ticket, a description of what you are trying to do and where in wordpress you are trying to do this. Also be sure to include the URL of the specific wordpress page on which you are working.
- If you did not find an answer using the available resources then put in an Help Desk ticket.
WordPress Tutorial & Support Information
To access WordPress tutorials and resources, visit our Getting Started with WordPress page on the WordPress Resources website.
WordPress FAQs
For WordPress FAQs, please visit the WordPress FAQs page on the WordPress Resources website.
WordPress User Roles and Permissions
For more information, please visit out Wordpress User Roles and Permissions page on the IT Services website.
WordPress Third-Party Plugin Documentation
For more information about Third-Party plugins, please visit our Third-party plugin documentation page on the WordPress resources website.
How-To Guides
Instructions on how to accomplish various tasks in WordPress.
Content Guidelines for Posts on MLML Website
Goal: To outline desired content and format of different types of posts
Target Audience: Front Desk, Social Media, IT, WAG
Review: No formal review of posts → please proofread carefully
Types of posts covered:
-
Press coverage
- Posted by Front Desk or Social Media
-
Events
- Posted by Front Desk
-
Public seminars
- Posted by Front Desk or HelpDesk
-
Defense seminars
- Posted by Front Desk
Content Guidelines
-
Use an existing post or a post template from the WordPress Resources webpage
- To learn how to use an existing post or template follow these instructions
- Writing for the general public, not MLML community
- 5 Tips for Creating Posts
All posts must follow these guidelines:
- Have a minimum of one photo (make sure you have permission)
-
If a photo is not provided use:
- A photo of the speaker or MLML personnel involved
- A picture of the journal the article is published in
- Relevant embedded video is encouraged
-
If a photo is not provided use:
- Set a "featured image"
-
Add links where possible
- Hyperlink all MLML personnel to their pages on the website
- If you mention a lab, hyperlink to that lab
- Hyperlink to original article if appropriate
- Add tags: faculty names, subject matter, MLML lab, etc.
-
Change the url ending (default is title of post with dashes)
- E.g. for a seminar speaker, you can change the url to be firstname-lastname-seminar
Additional guidelines based off type of Post:
Press/Achievement posts:
-
-
Catchy title relevant to article or achievement
- Good → MLML professor creates only land based seaweed business in the USA
- Bad → MLML’s new aquaculture facility in The Californian
- Catchy one-line description that can be on front page with links to key player and/or article
-
Summary of article (150-250 words)
- Provide some details about the article or achievement
- Provide information so the general public can understand even if they do not click on the article link
- Include links to labs and faculty involved
- Properly cite source material
-
Catchy title relevant to article or achievement
Example:
Event Posts:
-
- Title should be in the following format:
- "Title of Talk/Event - Month DD, YYYY"
- Add post to "Upcoming Events" category
- After the event, change the category to "Events"
- Title should be in the following format:
Example:
Seminar Posts:
-
- The Visiting Scientist collects information about the speakers and adds them to a google sheet schedule and a google drive folder
- Use previous Seminar posts as a template
-
Content to include
- Talk title is title of post: "Title of Talk - Month DD"
-
At the top of each page include:
- Presenter name, position title, university or institution affiliation
- Moss Landing Marine Labs Seminar Series - Month DD, YYYY
- Hosted by the xxx Lab (link this to the lab's webpage)
- MLML Seminar Room, 4pm
- (or Watch it Live here!) <- only if they agree to be publicly streamed
- Open to the public
- ~More info coming soon!~ (until you receive the abstract and more info)
- Brief talk abstract (~100-200 words)
- Link to speakers website
- DO NOT include post date (confusing with two dates)
-
Put post in "Upcoming Seminars" category
- After seminar, change the category to "Seminars"
- Create the last seminar's post first - this way they display in chronological order
Example:
Thesis Defense posts:
-
- Front desk will request talk title, abstract, and photos 2-3 weeks before a thesis defense
-
Content to include:
- Post title: "Thesis Defense by [NAME] - Month DD"
-
At the top of each page include:
- Talk title
- Presenter name
- Lab affiliation (link to lab's webpage)
- Date and Time
- MLML Seminar Room
- (or Watch it Live here!) <- only if they agree to be publicly streamed
- ~More info coming soon!~ (until you receive the abstract and more info)
- Brief talk abstract (~100-200 words)
- DO NOT include post date (confusing with 2 dates)
-
Put post in "Upcoming Thesis Defenses" category
- After defense, add to "Thesis Defenses" category
- Note: having a website post is not a requirement; the students are busy and likely stressed about the talk, so don’t bombard them with emails to send info.
Example:
How to Become a WordPress Admin
Submit an IT Helpdesk Ticket
-
First you must submit an IT Helpdesk Ticket with IT and give them the following information:
-
What website you want to become a WordPress Admin for
-
What your goal or plan is for the website
-
Your availability for a WordPress Training Session
-
Attend a WordPress Training Session
-
IT will be holding WordPress training sessions that go into detail how to use WordPress effectively and responsibly
-
All who would like to become a WordPress admin must attend a training session
How to Login
-
To login to your website use the following URL - input your website's name where it says "yoursite":
-
mlml.sjsu.edu/yoursite/admin
-
Use your MLML username and password when the login pop-ups
-
-
You may also login using intranet
-
Navigate to intranet > login with your MLML username and password
-
Now navigate to your site using your site's URL
-
Now visit our Getting Started with WordPress page for information on how to start creating an awesome website!
Wordpress Posts and Pages Best Practices and Policies
Summary
- Posts are to capture a point in time (such as an event).
- Pages are for regular website content
- Always use Page Builder to create all types of content--makes it easier!
Posts
Capturing a point in time - content will not be updated over time
- Content Type:
- News
- Blogs
- Events
- Editor/Admin Roles:
- Contributors - Can create posts which will then be moderated
- Authors - Can create, edit, and publish their own posts only
- Editors and Admins - Can create, edit, and publish any posts
- Authorization for certain webpages should be obtained by the corresponding admins:
- Main MLML website - Approved by Ivano or Jim
- Tier 1 sites - Approved by website owners
- Tier 2 & 3 sites - Approved by website owners or web admins (as website owner decides)
- General Info:
- Posts are displayed by the order of when they were created.
- You can change the post date to make sure that events stay in order--please do this!
- Content Guidelines for Posts (Press Highlights and Events)
- Posts are displayed by the order of when they were created.
Pages
Content not tied to a specific date - may be updated over time
- Content Type:
- About page
- Project pages
- Bio pages
- Editor/Admin Roles:
- Editors and Admins - Can create, edit, and publish
- Authorization for certain webpages should be obtained by the corresponding admins:
- Main website - IT Helpdesk Ticket
- Tier 1 sites - IT Helpdesk Ticket
- Tier 2 & 3 sites - Website owners and web admins
- Reviewing Process:
- Main website - IT Helpdesk Ticket > WAG review > approval > page updated
- Tier 1 sites - IT Helpdesk Ticket > WAG review > approval > page updated
- Tier 2 & 3 sites - Approved by website owners and web admins
- Getting Started:
- Page Templates - Use these pre-made templates to outline the layout of your page
- Need help using them? Go to How to use Page Templates
- Page Templates - Use these pre-made templates to outline the layout of your page
Widget Recommendations:
For more information on the different widgets available: Third-Party Plugins
Page layout:
- Use Page Builder for every Page and Post created, even the simplest posts and pages
-
- Organize with rows and columns
- Copy and paste rows and widgets
-
Text:
- SiteOrigin Editor widget
- Headline Widget
Images: (Image Use Guidelines)
- SiteOrigin Editor widget
- FooGallery - use shortcode in Custom HTML widget
- SiteOrigin Image widget
- Inline with text wrap around
- Photo gallery/slideshow
- Single image
WordPress Menu Best Practices and Policies
Summary
Instructions
Visual Instructions
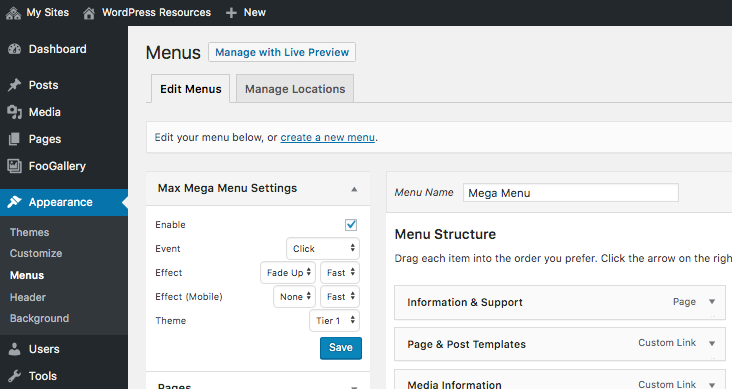
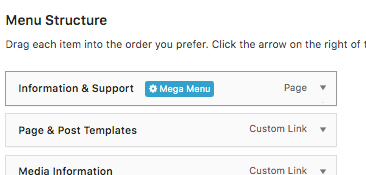
Use Layout Builder. Click the Wrench icon on the right to edit

Open Builder:
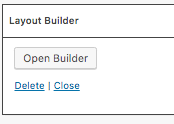
Here you have the standard Page Builder interface where you can add rows, columns, and widgets to create menu items.

5 Tips for Creating WordPress Posts
Posts on the MLML website are meant to be a brief, but intriguing introduction to an event or article affiliated with the labs. It is important that they look nice and give enough information that someone reading can understand the article or event without clicking on further links.
1. Include Pictures and Make Them Interactive
Always include at least one picture when creating a post (the more the better). Make your photos interactive when possible. At the very least, enable Lightbox for the photos you include in your post. Give photos descriptive captions. Templates on different ways to display captions are available under the Media Information section of the WordPress Resources website. You can also have your photo link to another website by assigning it a Destination URL.
When posting a photo always ensure you have permission to use the photo and give credit as best you can. Click here to learn more about MLML's image use guidelines.
2. Format Text for a Clean Appearance
Something as simple as setting a paragraph of text to align center (ctrl+alt+c) or justify (ctrl+alt+j) can greatly improve the aesthetics of your post.
Example:
Default alignment (align left):
Text Justified:
3. Incorporate Quotes
When creating a post about an article, include relevant quotes directly from the article using blockquote in WordPress.
Blockquote is dictated by an open quotation mark in the WordPress Toolbar.

Blockquote makes quotes stand out from the body of the text. For example:
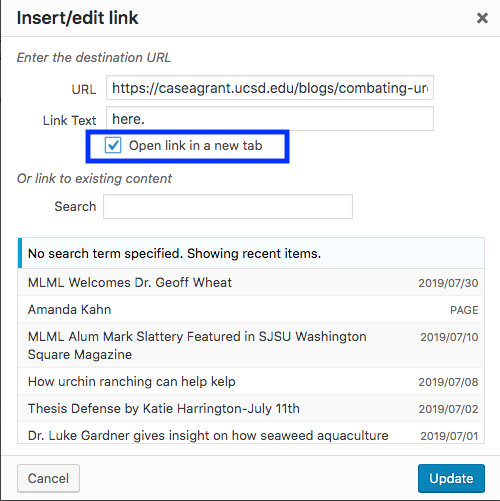
4. Set Hyperlinks to Open in a New Tab
This is especially important if a link directs you to an outside website. It allows the viewer to easily navigate back to MLML's website.
To set a hyperlink to open in a new tab:
1. Click Link Options
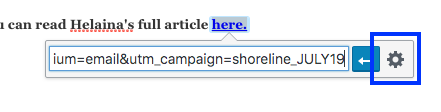
2. Check Open Link in a New Tab
5. Use a Previous Post as a Template
When in doubt, finding a post that you think looks nice and copying it as a template is a simple way to create a great post. There are also a host of templates on the WordPress Website.
If you want further help creating a post, feel free to drop by the IT Help Desk in the main office or submit an IT Helpdesk Ticket.
Media Use & Policies
Image Management and Usage information
WordPress Media Best Practices and Policies
For more information, please visit out Media Best Practices and Policies page on the IT Services website.
WordPress Image Use Guidelines
Our website is the public face of MLML. We want it to be rich in multimedia and visually appealing. The images we use on our website must be used legally, according to their copyright and licensing. The guidelines below will help to make sure that the image specs are appropriate for use on the web and that we have the right to use a photo. Pay special attention to statements of allowable re-use and how the image owner would like you to give them credit. Please also see our Permitting Guidelines.
Image Specifications
Resolution:
-
- Slider
- Upload original image, then (within WordPress) resize/crop to:
- Width - 1400px
- Height - Anything you want, but keep it consistent amongst all of your slider images or it will look bad. For reference, the main website uses 500px for its slider images.
- Upload original image, then (within WordPress) resize/crop to:
- Everything Else
- Original size, high resolution images. WordPress will automatically generate appropriately sized thumbnails.
- Enable Lightbox whenever it is appropriate (usually all the time).
- Slider
File Types:
-
- JPG - For photos.
- PNG - For drawings, graphs, logos, etc.
Image Metadata
*indicates required information
Enter the information below for each image you upload to the Media Library:
-
- *Title - The Title is used by WordPress to sort your Media Library. Set this to the author/copyright owner's title for the image if there is one.
- Caption - Use this field for image attribution when required by a license.
- *Alt Text - Always enter alt text for 508 accessibility compliance. See https://moz.com/learn/seo/alt-text for a good explanation and some examples of alt text.
- *Description - Paste image licensing info here using the Image Author/Copyright Owner & Licensing Template found below. This field is internal to WordPress and does not display to the public. Use the Caption field for attribution or other info you want to convey to the public.
- Custom URL - Add if you want your image to link to another web page when clicked.
- Custom Target - Default is sufficient.
- Custom Class - Leave this blank.
Image Author/Copyright Owner & Licensing Template
Instructions:
-
- Fill out the template and paste it in the Description metadata field on every image uploaded to your website.
- The template consists of the following:
- Image title - The author/copyright holder's title for the image. Specify "No title" if no title is available.
- Image author/copyright owner - Photographer, artist, or owning group name.
- Image source - Where you got the image from. Self, email from {x}, and the URL of the original image are examples of image sources.
- Image License - Creative Commons (CC0, BY, BY-SA, BY-NC, etc); CSU Photography, Visual Image & Concept Ideas release form; individual permission given; public domain.
- Image License URL - URL to the license, if applicable. Specify N/A; image is in the public domain' or similar if not.
- Image subjects - People, animals, or any other important objects/scenery in the image.
- Image permit information - If applicable. Specify "N/A" if not.
- The template consists of the following:
- Fill out the template and paste it in the Description metadata field on every image uploaded to your website.
Template:
Required Fields:
-
- Image title:
- Image author/copyright owner:
- Image source:
- Image license:
- Image license URL:
- Image permit information:
- Image subjects:
Important Notes:
- Even if image contents are irrelevant, this template must be filled out; there are no exceptions.
- You must fully understand and abide by the license terms used by the author/copyright owner.
- Although in many cases attribution will be sufficient, you cannot assume this is the case.
- If you are unable to fill out all applicable fields in the template for an image, you cannot use it.
Image Metadata Example
Title
Young humpback whale with blowholes clearly visible
Caption
By D. Gordon E. Robertson (Own work) [CC BY-SA 3.0 (http://creativecommons.org/licenses/by-sa/3.0)], via Wikimedia Commons
Alt Text
Overhead view of a young humpback whale at the ocean's surface with its blowholes clearly visible
Description
Image Title: N/A
Image Source: https://commons.wikimedia.org/wiki/File:Humpback_Whale,_blowholes.jpg
Image license: CC BY-SA 3.0
Image license URL: http://creativecommons.org/licenses/by-sa/3.0
Image permit information: N/A
Image subjects: Young humpback whale

WordPress Image Management, Search, & Usage
Both Apple and Microsoft have various applications that aid in image management which allow you to import/export photos, backup images, create and manage photo albums, and label your images. Use the Management, Search, and Use sections below to learn more.
Image Management
Management Software
Mac OS Software:
1. Photos.app
Photos.app is an application included with macOS that you can use to store, organize, and search photos.
- How to import photos:
- How to create an album:
- Scroll down to “Create a new album” on Apple’s Organize and find your photos page
- How to add photos to an existing album:
- Scroll down to “Add to an existing album” on Apple’s Organize and find your photos page
- How to manage your albums:
- Scroll down to “Manage your albums” on Apple’s Organize and find your photos page
- How to label your photos:
- Select the following link to see hot to label your photos
- How to export your photos into a folder:
- Select the following link on exporting your photos OR
- Select your images and drag and drop them into a folder
- How to export your photos into Microsoft Word/Powerpoint:
- Click on the following link to learn how to export your photos into Microsoft Word/Powerpoint
2. Image Capture.app
Image Capture is an application program from Apple that enables users to upload pictures from digital cameras or scanners which are either connected directly to the computer or the network.
- How to Import Photos from a Connected Phone or Camera:
- Click on the following link to learn how to import photos into Image Capture
Windows Software:
1. Microsoft Photos App
The Microsoft Photos app can be used to view, edit, and create albums with your images and videos.
- How to import images:
- How to create an album:
- Click on the following link to learn how to create a new album
- How to tags to your images:
- Click on the following link to learn how to enter tags onto your images
- How to edit photos and videos:
- Click on the following link to learn how to edit your photos and videos
- How to export your photos into Microsoft Word/Powerpoint:
- How to insert images into Microsoft Word and Powerpoint. Check your Picture Folder if you are having trouble searching for where your images are stored
- How to save images in multiple folders:
- Select image
- Click the three dot on the top right → Save As
- Select folder you wish to save your image in and click Save
Image Search Engines & Repositories
MLML Digital Repository is a storage site where you can find images and videos that can be publicly or internally used. Search through events, local fauna, and field images taken by other MLML staff and faculty.
Lychee:
The MLML Lychee image storage site is where you can access images taken by staff and faculty and use them for your own site.
AssetBank:
Asset Bank is an image storage repository site where you can upload your images and share them with staff and faculty.
Google Image Search:
Google Images is an image search engine to find images you might want to use for your own site. There is also a reverse image search function to search high resolution images of photos you are using.
NOTE: When using an image from another site, make sure you are giving proper credit and have permission to use that image (See MLML Image Use Guidelines). Also check out our G Suite Page to learn more about Google Suite.
How to reverse image search:
- Go onto Google Images and click on the camera icon in the search bar.
- Upload or enter the image URL and click Search by Image.
Tineye:
Tineye is a reverse image search engine and is a great way to find the source and high resolutions of an image you wish to use, or use it to keep track of where your own personal images that are being posted online.
- Upload or enter the image URL and click on the search icon.
Google Image Search also now has reverse image search functionality: “search by image”.
Image Use
MLML Image Use Guidelines
Permit Guidelines:
- Before adding any media from work completed under a permit, make sure there are no limitations to posting media within your permit agreement.
- If there are no limitations to the media you want to post then do the following:
- Display the permit number on the media where it is visible to viewers - using a textbox works well in photo editing applications
- Add the permit number in the “Description” section when uploading media into WordPress
- NOTE: It is important to determine if the media is appropriate for a public audience, or if it may be misinterpreted.
- Examples:


WordPress Image Storage and Backup: Drop Box, Google Photos, iCloud
Image Storage Strategies and Backup Best Practices
Backup Options and Locations
1. Dropbox
Dropbox is a storage site for all kinds of files, including images. You can create folders and upload your images to them. There is no tagging options for Dropbox currently. We recommend changing the name of your images to search for them easily.
2. Google Photos
Google Photos is an online service that is similar to Google Drive. You can upload your photos, videos, animations, and movies onto Google Photos and store them into albums. You are also capable of adding a single image to multiple albums for organizational purposes (See our How to add a single image to multiple albums section below). Google will auto-tag your images which you can use to find specific images (Also see our How to add your own tags section below). MLML students, staff, and faculty have unlimited storage space with Google (See G Suite for more information).
- How to upload images:
- Option 1:
- Select Upload
- Select images and click Open
- You have the option to upload your images as high quality at a reduced size or keep your images in its original resolution
- Option 2:
- Drag and drop your images onto the screen
- Option 3:
- Download the Backup and Sync application to automatically backup photos from your Mac or PC, phones, connected cameras, and SD cards
- Option 1:
- How to import photos from Google Drive:
- Check out this link to learn how to import your photos from Google Drive
- How to add your own tags:
- Select and open your image
- Select the info icon in the upper right corner and add tags through 'Add a description'
You can now search through your images with those tags
Example:
- How to tag people or pets in your photos:
- Click on this link to learn how to tag people/pets
- How to add a location to photos:
- Click on this link to learn how to edit the location of your photos
- How to create an album:
- Click on this link to learn how to create albums
- How to add a single image to multiple albums
- Scroll down to the "Add, upload, or remove photos and videos" sections under "Change items in your album" on Google's Support Page
- How to transfer your images from one account to another?
- If you have all of your personal photos linked to one account, but would like to separate them into another account here's how you can change the ownership of those photos
3. iCloud
iCloud is an iOS based cloud storage system that lets you store your photos, videos, documents, notes, contacts, and more. You can sync multiple Apple products together for easy access and automatic backup.
- How to sync with Mac:
- Click on this link to sync your Mac to iCloud
- How to sync with Windows
- Click on the following link to sync your Windows to iCloud
4. Other Options
For more options, please see our OneDrive and Flickr KB Posts.
Backing Up Photos On Your Phone
For computer backup, see our Computer Backup & Storage Page.
1. iOS
- Syncing your iPhone/iPad to iCloud:
- Tap Settings
- Tap on the Apple ID banner at the top of the screen
- Make sure you're using the same apple ID as your other Apple products
- Select iCloud
- Tap Photos
- Tap iCloud Photo Library to enable it
- Enable Upload to My Photo Stream to enable instant photo and video sync over Wi-Fi
- Save memory on your iPhone by selecting Optimize Storage or Download and Keep Originals options
- Optimize Storage will store your original photos onto iCloud, but keep low resolution versions of your photos on your iPhone
- Save memory on your iPhone by selecting Optimize Storage or Download and Keep Originals options
- Other options:
- You can always download other applications onto your phone to connect it online or with other products
2. Android
- Syncing your phone to Google Photos
- Make sure to download the Google Photos app, if needed
- Open the app and sign into your Google Account
- At the top, tap Menu
- Select Settings and then Back up & sync
- Tap "Back up & sync" on or off
- Changing backup settings will affect all apps that use Back up & sync, such as Google Drive
- If you have Back up & sync on, deleting the Google Photos app from your device will not turn it off. To turn off Back up & sync, follow the instructions above.
- Syncing your phone to Google Drive:
- Open the Google Drive app
- Tap Menu
- Tap Backups
- Tap on the backup you want to manage
- If you are using multiple Google accounts, you can choose which account you want to upload your images to
- Other options:
- You can always download other applications onto your phone to connect it online or with other products
WordPress Embedding Best Practices and Policies
What does embedding mean?
Definitions
Shortcode - Kind of like a widget in text form. Paste these into the Custom HTML widget.
Example: [foogallery id="4772"]
iframe - Raw HTML code that embeds a web page. Commonly used to embed things like Google Calendar and Google Maps. Submit a Help Desk ticket for assistance.
Example: <iframe src=”https://example.org”></iframe>
- Embedding
-
-
- Videos
Do not upload videos within WordPress. They will be removed.- Embed method(s)
- Video widget
- Add Video > Insert from URL
- YouTube, Vimeo, and other video services should work. Give it a try.
- Add Video > Insert from URL
- Video widget
- Embed method(s)
- FooGallery
- Embed method(s)
- Shortcode
- Shortcode
- Embed method(s)
- PDF’s
- Upload via media upload
- Insert as in-line text
- Insert as in-line text
- Upload via media upload
- Web Forms
- Submit a Help Desk ticket before publishing a web form. IT needs to ensure that anti-spam protection is in place (reCAPTCHA).
- Ninja Forms
- Embed method(s)
- Shortcode
- “Append a Ninja Form” option on Posts and Pages - located to the right of the editor.
- Embed method(s)
- Videos
-
-
-
- Google Maps/My Maps
- Embed method(s)
- iframe
- Embed method(s)
- Google Maps/My Maps
-
-
-
- Google Drive
- Embed method(s)
- iframe
- Embed method(s)
- Google Drive
-