| ##### Quick Tips: - - Common IT related items available for checkout can be found in the [IT library in Populi](https://mlml.populiweb.com/library/catalog/index.php) and on this [page.](https://kb.mlml.sjsu.edu/books/classrooms-academic-technology/page/equipment-available-for-checkout) - If you'd like to check out an item please contact the IT staff by either [submit an IT Helpdesk Ticket](https://isupport.sjsu.edu/mlml/Dashboard) or by [emailing](mailto:mlml-helpdesk@sjsu.edu). |
| #### [Adapters](https://mlml.populiweb.com/library/catalog/index.php?search_resource_type=0&search_field=&library_catalog_search=adapters&task=SEARCH&offset=0) | #### [Cables](https://mlml.populiweb.com/library/catalog/index.php?search_resource_type=0&search_field=&library_catalog_search=Cable&task=SEARCH&offset=0) | #### [Cameras & Accessories](https://mlml.populiweb.com/library/catalog/index.php?search_resource_type=0&search_field=&library_catalog_search=Camera&task=SEARCH&offset=0) | #### [Chargers](https://mlml.populiweb.com/library/catalog/index.php?search_resource_type=0&search_field=&library_catalog_search=Charger&task=SEARCH&offset=0) |
| #### [Hard Drives & Flash Drives](https://mlml.populiweb.com/library/catalog/index.php?search_resource_type=0&search_field=&library_catalog_search=Drive&task=SEARCH&offset=0) | #### [USB Hubs](https://mlml.populiweb.com/library/catalog/index.php?search_resource_type=0&search_field=&library_catalog_search=hub&task=SEARCH&offset=0) | #### [Keyboards](https://mlml.populiweb.com/library/catalog/index.php?search_resource_type=0&search_field=&library_catalog_search=Keyboards&task=SEARCH&offset=0) | #### [Laptops](https://mlml.populiweb.com/library/catalog/index.php?search_resource_type=0&search_field=&library_catalog_search=laptop&task=SEARCH&offset=0) |
| #### [Laser Pointers](https://mlml.populiweb.com/library/catalog/index.php?search_resource_type=0&search_field=&library_catalog_search=laser+pointer&task=SEARCH&offset=0) | #### [Monitors](https://mlml.populiweb.com/library/catalog/index.php?search_resource_type=0&search_field=&library_catalog_search=monitors&task=SEARCH&offset=0) | #### [Mice](https://mlml.populiweb.com/library/catalog/index.php?search_resource_type=0&search_field=&library_catalog_search=mouse&task=SEARCH&offset=0) | #### [Conference Phones](https://mlml.populiweb.com/library/catalog/index.php?search_resource_type=0&search_field=&library_catalog_search=phone&task=SEARCH&offset=0) |
| [](https://kb.mlml.sjsu.edu/uploads/images/gallery/2020-08-Aug/Og4IMG_8238.jpeg) |
Please ensure that your [Computer Backups](https://kb.mlml.sjsu.edu/books/software/page/computer-backup) are functioning and up-to-date.
--- #### Panasonic LUMIX GH5 ##### **Media transfer** **Windows 10:** 1. While the camera is powered on, connect your computer to the camera using the supplied USB cable. 2. The camera's display will prompt you to choose a USB mode. Select **PictBridge(PTP).** 3. Open the **File Explorer** application and navigate to **This PC** on your computer. 4. Open the **DC-GH5 > SD1** folder. 5. Copy the **DCIM** folder onto your Desktop (or wherever else you would like). 6. Once the media is copied to your computer, unplug the camera from the computer. 7. Remove all media from the camera using the "Clearing the SD card" procedure below. **macOS:** 1. While the camera is powered on, connect your computer to the camera using the supplied USB cable. 2. The camera's display will prompt you to choose a USB mode. Select **PictBridge(PTP).** 3. Open the **Image Capture** application on your computer. 4. Select **DC-GH5** under **Devices.** 5. Set **Import To** to the Pictures folder (or wherever else you would like). - We recommend selecting **Make subfolders per camera** from the same list in order to avoid cluttering your destination folder. 6. Click **Import All.** 7. Once the media is copied to your computer, unplug the camera from the computer. 8. Remove all media from the camera using the "Clearing the SD card" procedure below. ##### **Clearing the SD card** 1. Enter **Playback Mode** (Press **Menu** > ) 2. Press the **trash can icon.** 3. Select **Delete All** and press **Menu/Set.** #### GoPro HERO7 ##### **Media transfer** **Windows 10:** 1. While the GoPro is powered on, connect your computer to the GoPro using the supplied USB cable. 2. Open the **File Explorer** application and navigate to **This PC** on your computer. 3. Open the **GOPRO HERO7** folder. 4. Copy the **DCIM** folder onto your Desktop (or wherever else you would like). 5. Once the media is copied to your computer, unplug the GoPro from your computer. 6. Remove all media from the camera using the "Clearing the SD card" procedure below. **macOS:** 1. While the GoPro is powered on, connect your computer to the GoPro using the supplied USB cable. 2. Open the **Image Capture** application on your computer. 3. Select **GOPRO HERO7** under **Devices.** 4. Set **Import To** to the Pictures folder (or wherever else you would like). - We recommend selecting **Make subfolders per camera** from the same list in order to avoid cluttering your destination folder. 5. Click **Import All.** 6. Once the media is copied to your computer, unplug the GoPro from your computer. 7. Remove all media from the GoPro using the "Clearing the SD card" procedure below. ##### **Clearing the SD card** 1. Power on the GoPro and **swipe up** on the touch screen to enter playback mode. 2. Tap the **set of squares** in the upper right corner. 3. Tap the **checkbox** in the upper right corner, then tap it again. 4. Tap the **garbage can** to delete all files. #### Insta360 ONE X **Windows and macOS:** 1. While the Insta360 is powered on, connect your computer to the Insta360 using the supplied USB cable. 2. Open **Finder** or **File Explorer**. The Insta360 will appear as if it were an SD card or a USB flash drive. 3. Copy the **DCIM** folder onto your Desktop (or wherever else you would like). 4. Once the media is copied to your computer, delete the contents of the **DCIM** folder. # General Procedure for Remote Seminars/Defenses This guide provides basic procedure for giving remote presentations at MLML. There is information for both the presenter as well as the individual who will be introducing the speaker. --- #### Remote Seminars **Prior to the seminar:** 1. Make sure you have updated to the most recent version of Zoom. 2. 1-2 days prior to presentation, perform a test run with a member of the IT group. - Please use the exact set up you plan to use for the actual seminar during the dry run. - If you wish to use presenter view, you will need a second monitor. **During the seminar:** 1. **Speaker and sponsor should join at ~3:40 pm PST** - **IT host** will go over this procedure with the **speaker** and **sponsor** one last time 2. **Speaker** shares their screen with title slide at 3:55pm 3. Just before 4pm, the **Speaker**, **sponsor**, and **IT host** will turn off audio and video. - Sponsor and Speaker may elect to leave their video on. 4. **IT host** will begin the recording/streaming of the seminar and let in the audience participants. 5. **Sponsor** will unmute themselves, and they will read the following **etiquette script** and introduce the **speaker**: - *All audience participants will be muted throughout the seminar.* - *Please DO NOT attempt to turn on your video or share your screen during the talk.* - *There will be an opportunity for the audience to ask questions live at the end of the talk just like a normal seminar. Once the speaker has finished their talk, you can use Zoom’s raise hand feature to notify the meeting host that you’d like to ask a question. The raise hand feature is located under the reactions tab at the bottom of the Zoom window.* - *You are invited to turn on your video during the questions portion of the talk.* 6. **Sponsor** is muted after intro 7. **Speaker** will unmute themselves and begin their presentation 8. **During the presentation, Host/Co-Hosts will:** - Mitigate any tech issues that arise - Kick out unwanted participants 9. **Questions Portion:** - At this point, the **IT host** will allow everyone to turn on their video - **Speaker** will either show questions slide, or stop their screen share and start their video - **Sponsor** will prompt for questions and remind participants to use the raise hand feature. - **Sponsor** will open participants tab and call on those with their hand raised for questions. - **IT host** will unmute those that are called on by the **sponsor.** 10. **Speaker** says a closing statement 11. Live Stream and recording stopped 12. OPTIONAL: **IT host** will allow participants to unmute themselves and **sponsor** will announce the beginning of the informal happy hour. The **sponsor** is made the host of the Zoom meeting and the informal happy hour begins - Duration of the happy hour is managed by the **sponsor** and the **speaker**, and can be concluded at any desired time --- #### Remote Thesis Defenses **Prior to the defense:** 1. Submit an [iTicket](https://kb.mlml.sjsu.edu/helpdesk.mlml.calstate.edu) notifying IT of the date and time of your thesis. The sooner the better. 2. Notify the Front Desk, Ivano, and Jocelyn of your plans to defend, **especially** if you will be using a lab space. 3. Make sure you have updated to the most recent version of Zoom. 4. 1-2 days prior to the defense, perform a dry run with member of the IT group. - Please use the exact set up you plan to use for the actual defense during the dry run. - If you wish to use presenter view, you will need a second monitor. **During the defense:** 1. **Student and advisor should join 15-20 minutes prior to the start of the defense** - **IT host** will go over this procedure with the **student** and **advisor** one last time 2. **Advisor** will begin screen share and show the title slide of the introductory presentation 5 minutes prior to defense. - If the advisor does not have a presentation prepared, the student will share their presentation. 3. Just before 4pm, the **student**, **advisor**, and **IT host** will turn off audio and video. - Student and Advisor may elect to leave their video on. 4. **IT host** will begin the recording/streaming of the defense and let in the audience participants. 5. **IT host** will unmute the **advisor** and they will read the following **etiquette script** and introduce the **student**: - *All audience participants will be muted throughout the seminar.* - *Please DO NOT attempt to turn on your video or share your screen during the talk.* - *There will be an opportunity for the audience to ask questions live at the end of the talk just like a normal seminar. Once **{student's*** **name}** *has finished* ***{his/her/their}** talk, you can use Zoom’s raise hand feature to notify the meeting host that you’d like to ask a question. The raise hand feature is located under the reactions tab at the bottom of the Zoom window.* - *You are invited to turn on your video during the questions portion of the talk.* 6. **Advisor** will stop screen share and **student** will start their screen share. 7. **Advisor** is muted after intro 8. **IT Host** will unmute the **student** to begin their presentation 9. **During the defense, Host/Co-Hosts will:** - Mitigate any tech issues that arise - Kick out unwanted participants 10. **Questions Portion:** - At this point, the **IT host** will allow everyone to turn on their video - **Student** will either show questions slide, or stop their screen share and start their video - **Advisor** will prompt for questions and remind participants to use the raise hand feature. - **Advisor** will open participants tab and call on those with their hand raised for questions. - **IT host** will unmute those that are called on by the **advisor.** 11. After questions, **IT host** will stop recording/live stream and allow participants to unmute themselves for a brief informal celebration prompted by the **advisor** 12. After the celebration, the **advisor** will ask all participants to leave except the **student**, **advisor**, and their **committee members** - **IT Host** will kick out any straggling participants - **IT host** will make the student or the advisor the host and leave the meeting # Zoom Rooms User Guide This guide explains how to use Zoom Rooms located in the Dry Classroom and Think Tank. #### The setup includes: - Mac mini running Zoom Rooms - TV - Meeting Owl (camera + mic + speaker) - iPad Zoom Rooms controller - Dry Classroom & Think Tank shared calendar (read/write for faculty and staff) 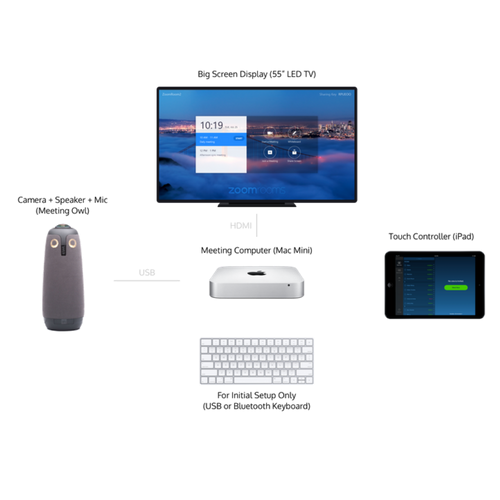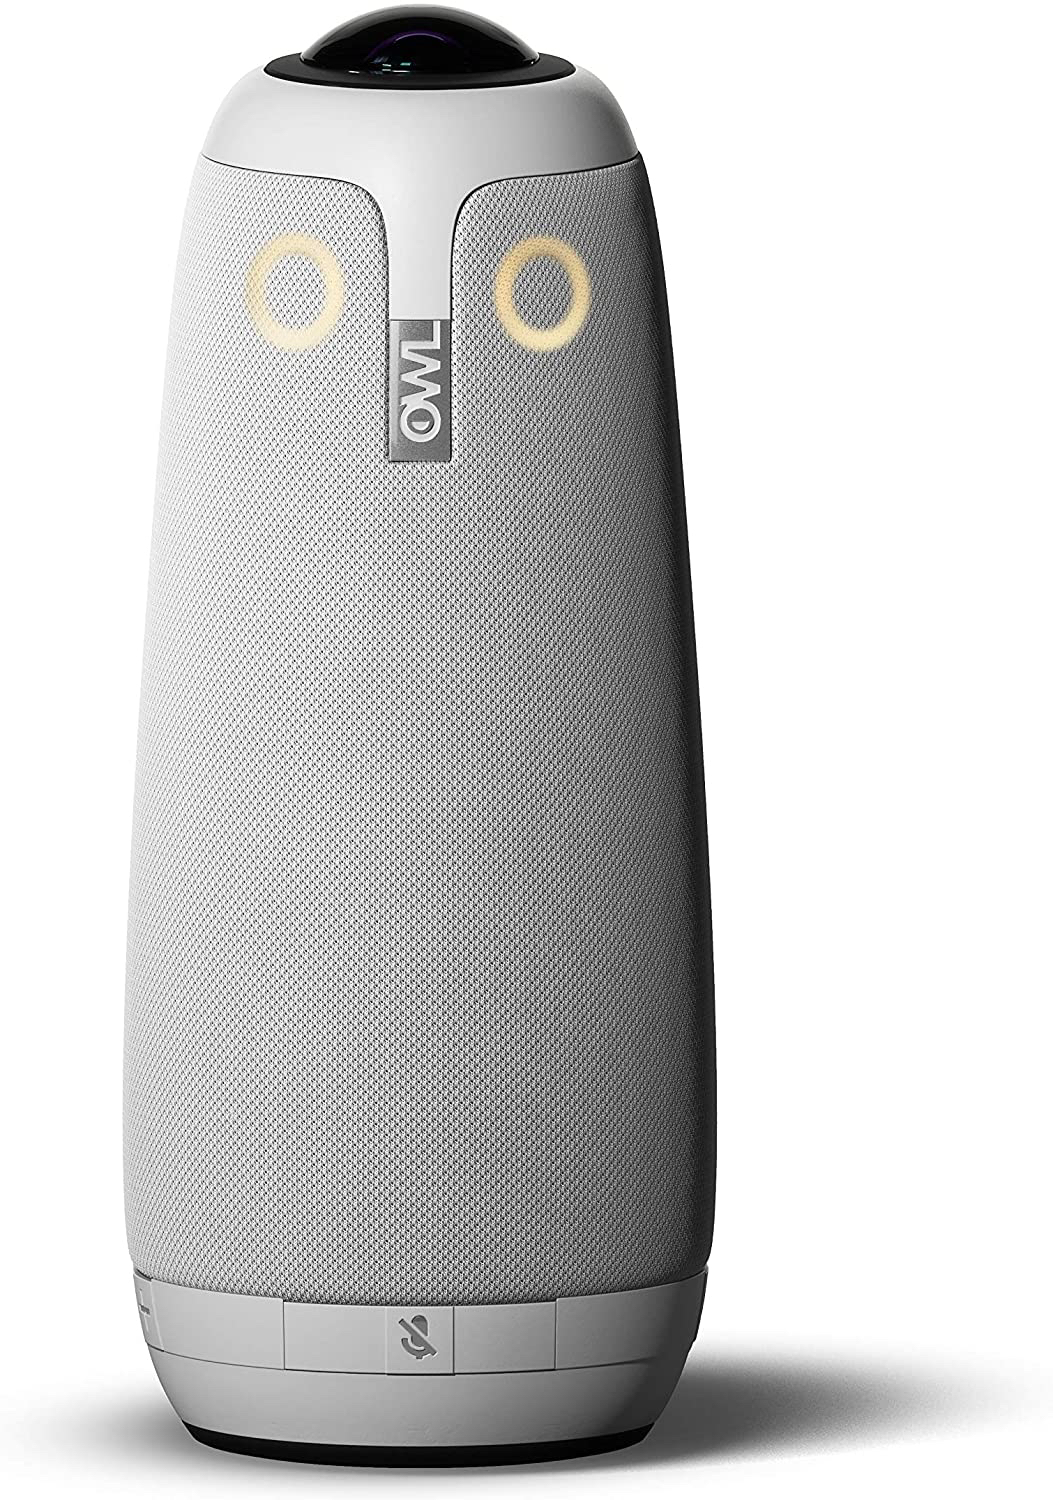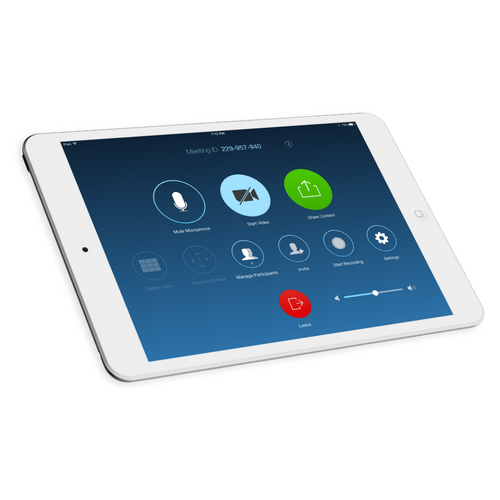 ### 1. Turn on the TV and log into the Mac mini Turn on the TV and Mac Mini behind the TV. Note: Mac Mini remains turned on at all times, turning on the wireless keyboard and mouse and pressing any key will wake up the machine. #### Steps: 1. Wake the Mac mini + TV 2. Log in using the following credentials Username: MLMLuser | Password: mlml1234 (Same password used to exit Zoom Rooms) 3. Launch Zoom Rooms (if it doesn’t open automatically)  ### 2. Launching Zoom Rooms on the Mac mini When open, the TV will show the room name and any scheduled meetings. The iPad should automatically sync as the controller. If the controller does not connect, check Wi-Fi signal. ### 3. Scheduling a Meeting All users (faculty and staff) may add events directly to the Dry Classroom | Think Tank Calendar. Scheduled meetings will automatically appear on the TV. When scheduling: 1. Select the Dry Classroom | Think Tank Zoom Room as the room/location 2. Add Zoom links only if hosting from outside the room. ### 4. Starting a Meeting from the iPad #### To start: 1. Tap Start next to your calendar event or 2. Tap Join and enter a Meeting ID or 3. Tap New Meeting for an instant session ### 5. In-Meeting Controls (iPad) #### The iPad lets you have full control over the Zoom meeting, including: - Mute/unmute the room microphone - Start/stop video - Assign host/co-host - Manage participants - Control volume - Share screen - End or leave the meeting ### 6. Video & Audio Settings: ALWAYS Select the Meeting Owl When the meeting begins, ensure Zoom Rooms is using the correct hardware. #### The Zoom Room should automatically select: - Camera: Meeting Owl | Microphone: Meeting Owl | Speaker: Meeting Owl If not: 1. On the iPad, tap Settings → Microphone > Speaker >Camera 2. Select Meeting Owl for all three The Owl provides: 360° video | Built-in microphone array | Built-in speaker | Active speaker tracking. ### 7. Preventing Echo & Improving Audio: Use Companion Mode (RECOMMENDED) One of the biggest causes of bad audio is people joining the meeting on their laptops without muting or using incorrect audio settings. To prevent feedback and improve clarity, participants should join in Companion Mode. #### What is Companion Mode?   Companion Mode lets users join the same Zoom Room meeting from their laptop with audio, cancelling echo or audio interference. Allowing: - Laptop screen share - Chat - Reactions - Participant controls - Notes and collaborative tools ### How to use Companion Mode From your laptop, go to the Zoom Application, click on the Companion icon  and select one of two options. 1. Click on Connect to room. You should see: - MLML-109-Dry Classroom | MLML-202-Think Tank 46. Pair with another room - Punch in the Sharing Key, i.e., A2BZ, F9QML The Sharing Key is usually shown in the top-left of the TV screen 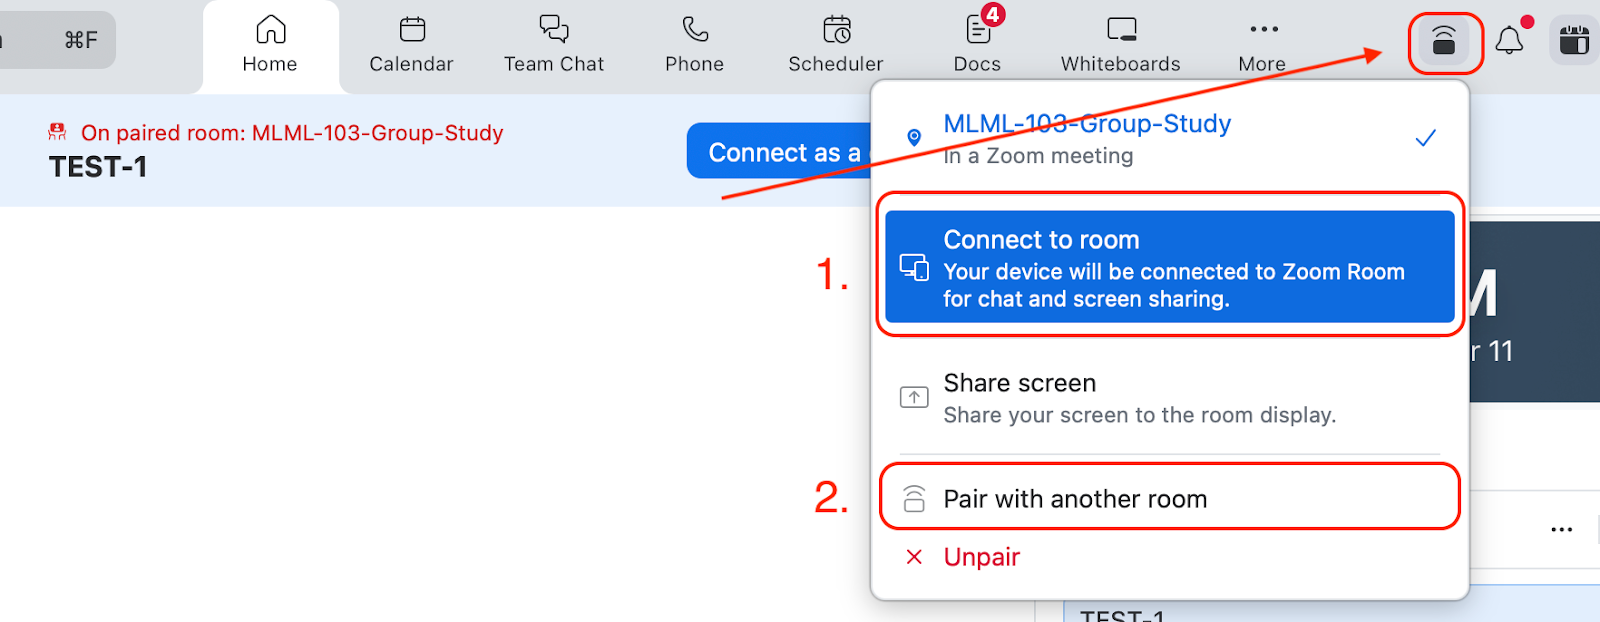 #### Benefits - No echo - No high-pitched feedback - Cleaner audio for remote participants - Local users can still share their screen or use chat ### 8. Sharing Content in the Room (Optional) #### A) Wireless (AirPlay) 1. Open Screen Mirroring on your device 2. Select MLML-109-Dry Classroom or MLML-202-Think Tank Zoom Room #### B) Using the iPad - Tap Share Screen > choose the source #### C) Using Companion Mode - Join via companion mode - Click Share Screen from your laptop - No feedback issues ### 9. Ending the Meeting On the iPad: 1. Tap End 2. Choose End Meeting for All (recommended) ### 10. Exiting Zoom Rooms (Admin only) To return to macOS: 1. On the iPad, tap Settings → Exit Zoom Rooms 2. Enter passcode: mlml1234 ### **Troubleshooting Tips** #### Owl not detected - Unplug/replug Meeting Owl USB cable - Restart Zoom Rooms - Ensure Owl is powered on (LED ring) #### Audio issues - Confirm Meeting Owl is selected for mic/speaker - Lower the TV volume - Make sure participants join in Companion Mode #### iPad not syncing - Restart the iPad controller app - Ensure it’s on the same network #### The meeting won’t start - Confirm the event was added to the MLML-109-Dry Classroom | MLML-202-Think Tank Calendar. MLML IT