General Software
- Software Availability (link)
- Service Level Agreements
- How to Register for & Purchase Software from the Spartan Store
- Import and export Firefox bookmarks
- Installing Web Browser Extensions: Google Chrome, Safari, FireFox
- Recommended Software (link)
- Remote Software & Computer Access Procedure
- General Software Information Reference Page (Link)
Software Availability (link)
See the Software Availability page on the IT Website.
Service Level Agreements
Public/Outside Groups:
Wifi
- Guests and outside groups are able to access and connect to the MLML guest WiFi. The WiFi network will appear as “moss-guest” under network selections. Click here to learn how to connect to the MLML WiFi.
Volunteers
Wifi
- Volunteers are able to access and connect to the MLML WiFi. The WiFi network will appear as “moss” or “eduroam” under network selections. Click here to learn how to connect to the MLML WiFi. Eduroam connectivity requires California State University credentials, click here to learn more.
MLML Account
- Volunteers are provided MLML user accounts after their MLML Supervisor submits the appropriate paperwork. Your MLML username is composed of the first initial of your first name followed by your last name (i.e. bsimpson for Bart Simpson). Your MLML password may be different from your gmail password. If you have forgotten your MLML password, please submit an IT Helpdesk Ticket.
VPN
- Volunteers must demonstrate a need to use the VPN server. Authorized faculty or research affiliates must provide approval. Click here to learn how to access the MLML network using VPN.
Students
WiFi
- Students are able to access and connect to the MLML WiFi. The WiFi network will appear as “moss” or “eduroam” under network selections. Click here to learn how to connect to the MLML WiFi. Eduroam connectivity requires California State University credentials, click here to learn more.
MLML Account
- Students are provided MLML user accounts. Your MLML username is composed of the first initial of your first name followed by your last name (i.e. bsimpson for Bart Simpson). Your MLML password may be different from your gmail password. If you have forgotten your MLML password, please submit an IT Helpdesk Ticket.
- User accounts at Moss Landing Marine Laboratories are required to authenticate faculty, staff, students, and visiting scientists and to enable access to services. Click here to view provided services requiring user authentication.
- Students are granted SJSU email accounts (i.e. firstname.lastname@sjsu.edu). If you have forgotten your SJSU Gmail account password, click here.
VPN
- Students must demonstrate a need to use the VPN server. Authorized faculty or research affiliates must provide approval. Click here to learn how to access the MLML network using VPN.
Hardware
- To view a list of hardware available for checkout click here. If you would like to checkout an item on the list please submit an IT Helpdesk Ticket under the Request Type “Tech checkout.” Once the checkout is approved, visit the IT Help Desk cubicle (Admin offices Room 200) any time from 9-5 on M-F to pickup or return the item.
- To view a list of hardware available in individual classrooms click here.
Software
- For a list of available software click here. Submit an IT Helpdesk Ticket if you would like to request a program listed in the software section or if you need assistance with an installation.
Network Printing
MS Students
WiFi
- MS Students are able to access and connect to the MLML WiFi. The WiFi network will appear as “moss” or “eduroam” under network selections. Click here to learn how to connect to the MLML WiFi. Eduroam connectivity requires California State University credentials, click here to learn more.
MLML Account
- MS Students are provided MLML user accounts. Your MLML username is composed of the first initial of your first name followed by your last name (i.e. bsimpson for Bart Simpson). Your MLML password may be different from your gmail password. If you have forgotten your MLML password, please submit an IT Helpdesk Ticket.
- User accounts at Moss Landing Marine Laboratories are required to authenticate faculty, staff, students, and visiting scientists and to enable access to services. Click here to view provided services requiring user authentication.
- Students are granted SJSU email accounts (i.e. firstname.lastname@sjsu.edu). If you have forgotten your SJSU Gmail account password, click here.
VPN
- MS Students must demonstrate a need to use the VPN server. Authorized faculty or research affiliates must provide approval. Click here to learn how to access the MLML network using VPN.
Hardware
- To view a list of hardware available for checkout click here. If you would like to checkout an item on the list please submit an IT Helpdesk Ticket under the Request Type “Tech checkout.” Once the checkout is approved, visit the IT Help Desk cubicle (Admin offices Room 200) any time from 9-5 on M-F to pickup or return the item.
- To view a list of hardware available in individual classrooms click here.
Software
- For a list of available software click here. Submit an IT Help Desk ticket if you would like to request a program listed in the software section or if you need assistance with an installation.
Network Printing
- MS Students are authorized to print from the Library Copier.
- The procedure for installing the Konica Minolta copier as a printer will depend on whether you own a Windows or Mac OS X system. General printer installation may be found here.
- A list of MLML network DNS names could be found here.
Faculty
WiFi
- Faculty are able to access and connect to the MLML WiFi. The WiFi network will appear as “moss” or “eduroam” under network selections. Click here to learn how to connect to the MLML WiFi. Eduroam connectivity requires California State University credentials, click here to learn more.
MLML Account
- Faculty are provided MLML user accounts. Your MLML username is composed of the first initial of your first name followed by your last name (i.e. bsimpson for Bart Simpson). Your MLML password may be different from your gmail password. If you have forgotten your MLML password, please submit an IT Helpdesk Ticket.
- Faculty at Moss Landing Marine Laboratories are required to authenticate faculty, staff, students, and visiting scientists and to enable access to services. Click here to view provided services requiring user authentication.
- Faculty are granted SJSU email accounts (i.e. firstname.lastname@sjsu.edu). If you have forgotten your SJSU Gmail account password, click here.
VPN
- Faculty must demonstrate a need to use the VPN server. Authorized faculty or research affiliates must provide approval. Click here to learn how to access the MLML network using VPN.
Hardware
- To view a list of hardware available for checkout click here. If you would like to checkout an item on the list please submit an IT Helpdesk Ticket under the Request Type “Tech checkout.” Once the checkout is approved, visit the IT Help Desk cubicle (Admin offices Room 200) any time from 9-5 on M-F to pickup or return the item.
- To view a list of hardware available in individual classrooms click here.
Software
- For a list of available software click here. Submit an IT Helpdesk Ticket if you would like to request a program listed in the software section or if you need assistance with an installation.
Network Printing
Staff
WiFi
- Staff are able to access and connect to the MLML WiFi. The WiFi network will appear as “moss” or “eduroam” under network selections. Click here to learn how to connect to the MLML WiFi. Eduroam connectivity requires California State University credentials, click here to learn more.
MLML Account
- Staff are provided MLML user accounts. Your MLML username is composed of the first initial of your first name followed by your last name (i.e. bsimpson for Bart Simpson). Your MLML password may be different from your gmail password. If you have forgotten your MLML password, please submit an IT Helpdesk Ticket.
- User accounts at Moss Landing Marine Laboratories are required to authenticate faculty, staff, students, and visiting scientists and to enable access to services. Click here to view provided services requiring user authentication.
- Staff are granted SJSU email accounts (i.e. firstname.lastname@sjsu.edu). If you have forgotten your SJSU Gmail account password, click here.
VPN
- Staff must demonstrate a need to use the VPN server. Authorized faculty or research affiliates must provide approval. Click here to learn how to access the MLML network using VPN.
Computer Provided
- Staff are provided a computer during the on-boarding process. Staff may request additional computers by submitting an IT Helpdesk Ticket.
Hardware
- To view a list of hardware available for checkout click here. If you would like to checkout an item on the list please submit an IT Helpdesk Ticket under the Request Type “Tech checkout.” Once the checkout is approved, visit the IT Help Desk cubicle (Admin offices Room 200) any time from 9-5 on M-F to pickup or return the item.
- To view a list of hardware available in individual classrooms click here.
Software
- For a list of available software click here. Submit an IT Helpdesk Ticket if you would like to request a program listed in the software section or if you need assistance with an installation.
Network Printing
How to Register for & Purchase Software from the Spartan Store
The SJSU Spartan Store has a wide selection of software available to staff and faculty at significantly reduced prices.
Register
- Go to https://spartanshops.onthehub.com/
- Click Register in the upper right corner of the page.
- Enter your @sjsu.edu email address.
NOTE: If you don't have access to/don't know your SJSU email address, please check the SJSU Services Introduction post. - Enter your first name, your last name, and choose a password. Your SJSU email address should already be filled in. This will be your username when using the Spartan Store.
- Under Proof of Eligibility, there is a Group of which you are a member dropdown list. Select the option that reflects you.
- Complete the captcha and click Register.
- Find the most accurate options for the Which department/field of study do you work in, Which operating system do you use more often, and Where did you hear about us dropdowns, then click Save.
- A verification email will be sent to your SJSU email address. Follow the instructions in that email and you'll be able to start using the store.
Purchase
NOTE: Once you complete your purchase, save a copy of any product keys you receive in a safe place. The Spartan Store will not hold onto them for you forever. If you lose your product key you may have to buy the software again.
- Go to https://spartanshops.onthehub.com/ and login with your SJSU email address.
- Find the software you want by navigating the site or by using the Product Search bar.
- Navigation
- Make sure you are on the Faculty/Staff tab if that matches your description. This will display the full list of software available to you.
- Use the tabs to find the product you need. For instance, if you're looking for Microsoft Office or Microsoft Windows, click the Microsoft tab.
NOTE: The Show recent versions only checkbox sometimes hides software that it shouldn't, such as the Windows versions of Microsoft Office. Leave this unchecked or you risk the website hiding the software you're looking for. - Click the icon for the software you want, then click Add to cart.
- Search
- Simply type the software you want into the Product Search bar and hit Enter. Be non-specific - the base product name (such as "office") without any version numbers is best.
- Scroll to the software version you want, select it, and click Add to cart.
- Navigation
- Open your Shopping Cart located on the upper right side of the page. If everything looks correct to you, click Check Out.
- Follow the prompts and enter your billing information to complete your order.
Import and export Firefox bookmarks
Import bookmarks into Firefox:
(Restore backed-up or migrated bookmarks)
- Open Firefox.
- Select Library (stacked books icon) > Bookmarks > Show all Bookmarks.
- In the Library window, click Import and Backup >Import Data from Another Browser…..
The Import Wizard will open. - Select the browser that contains the bookmarks or other data that you want to use in Firefox and then continue to the next screens to make your selections and complete the import.
- If the Import Wizard does not list your other browser, you can still import bookmarks from another browser but you will need to first export and save those bookmarks as an HTML file. Visit the support site for your other browser if you need help with that.
For more information on importing bookmarks into Firefox from other browsers click here.
To learn how to import bookmarks into Firefox from another Firefox installation or profile, see Recovering important data from an old profile.
To learn how to import bookmarks into Firefox from an HTML file click here.
Export bookmarks out of Firefox:
(Back-up or migrate your bookmarks)
- Open Firefox.
- Select Library (stacked books icon) > Bookmarks > Show all Bookmarks.
- From the toolbar on the Library window, click Import and Backup > Export Bookmarks to HTML...
- In the Export Bookmarks File window that opens, choose a location to save the file, which is named bookmarks.html by default. The desktop is usually a good spot, but any place that is easy to remember will work.
- Click the Save button. The Export Bookmarks File window will close.
- Close the Library window.
For more information click here.
Installing Web Browser Extensions: Google Chrome, Safari, FireFox
Web browser extensions are popular add-ons that can aid in your day-to-day online activities and improve security. There are a lot to choose from, but simplicity is key. Only download extensions that you know you will use and benefit from on a regular basis. IMPORTANT NOTE: Always download from a reputable source and check reviews before downloading to stay safe.
Google Chrome:
- Visit the Google Chrome Extension Store
- Search for the extension you want or browse through the selection
- Click on the extension you wish to add
- Click Add to Chrome
- The extension will now appear in the top-right corner of the browser window
Safari:
- Open Safari
- Choose Safari > Safari Extensions
- Search for the extension you want or browse through the selection
- Click GET > INSTALL
- The extension will now appear to the left of the search bar
Firefox:
- Open Firefox
- Click on settings in the top-right corner
- Click Add-ons > Get Add-ons
- Search for the extension you want or browse through the selection
- Click Install
- The extension will now appear in the top-right corner of the browser window
Popular Extensions We Endorse
- uBlock Origin - adblocker
- LastPass - password manager
- Session Buddy - tab manager
- Mendeley Web Importer - citation manager
- Grammarly - your own personal editor
- Honey - online discounts
Recommended Software (link)
Check out some software we recommend on our Recommended Software Page
Remote Software & Computer Access Procedure
There are times when you need to use a certain software application or device but do not have physical access. Instead, you can remotely access a device at MLML that has the software you need or computing capabilities. Below are the instructions on how to gain software & computing access remotely.
STEP 1: Identify Needs
- Identify the application/computing that you need and research it to know what exactly it is you're looking for:
- Version/Year
- Model
- Specs (CPU, Storage)
- Pinpoint exactly what you'll be using the application/device for
STEP 2: Submit an IT Helpdesk Ticket
Once you know what you need, we can help you get access to it. Submit an IT Helpdesk Ticket with the information you uncovered from Step 1. Please do the research before submitting an IT Helpdesk Ticket so we know exactly what it is you are trying to accomplish.
STEP 3: Access MLML VPN
Once you have the go-ahead from the IT Department, setup access to the MLML network using VPN. You will need to be connected to the MLML network to access a device remotely.
Access the MLML Network using VPN Instructions
STEP 4: Launch Remote Desktop
NOTE: The following instructions are to connect to a Windows desktop computer from Windows or macOS.
IMPORTANT: You will need to configure the Windows computer to which you are connecting to allow Remote Desktop connections. Refer to the Troubleshooting section below to enable Remote Desktop connections
Windows:
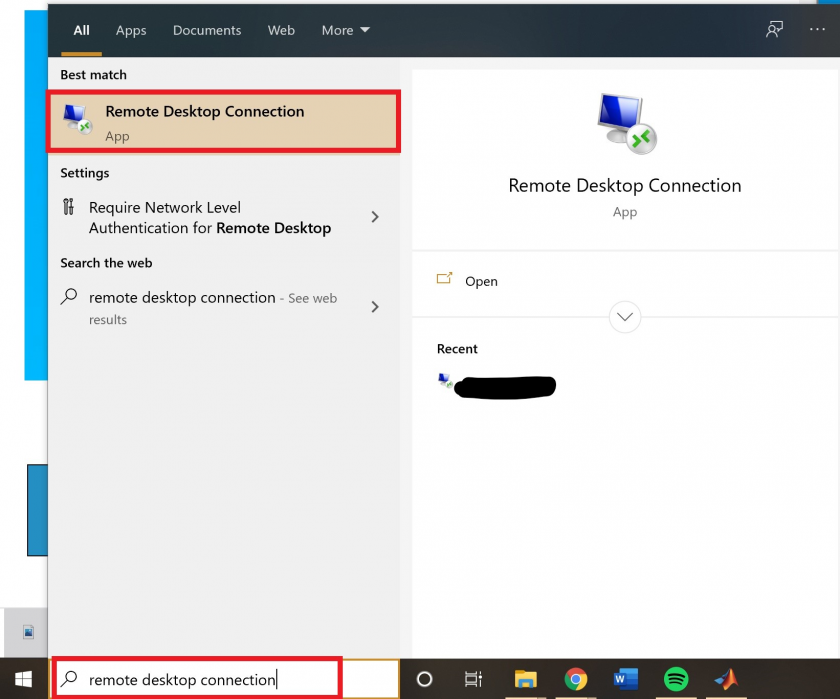
- Launch Remote Desktop Connection
-
-
- Start Menu > search for "Remote Desktop Connection" or Start Menu > Windows Accessories folder
-
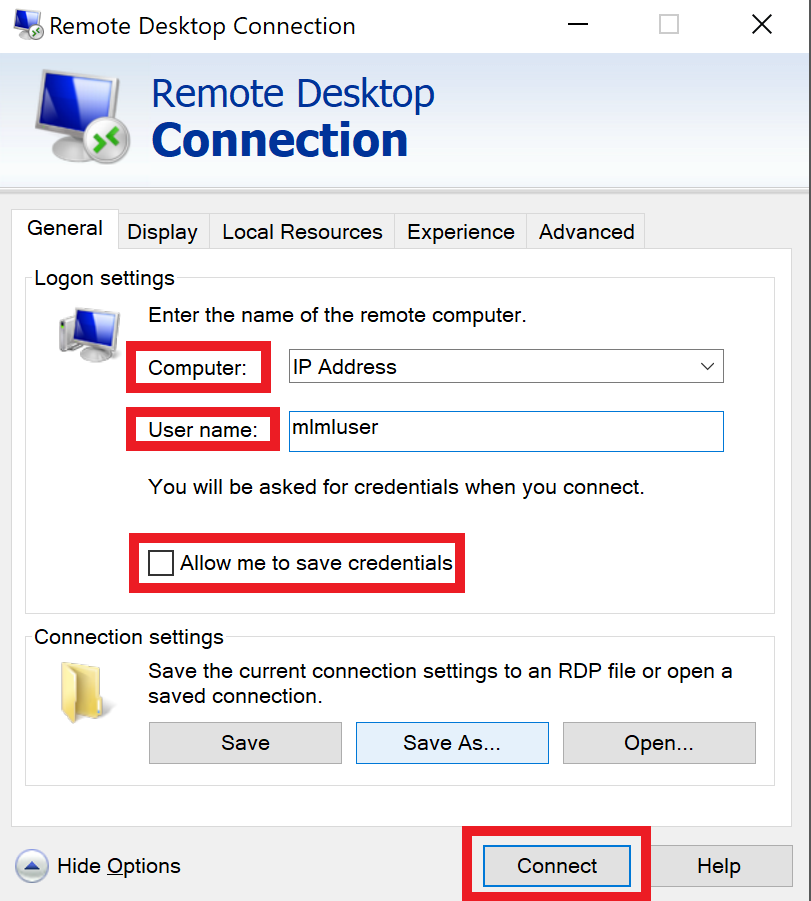
- In the Computer field type the name or IP address of the device you're connecting to
- Select Show Options
- Enter the username of the account you'll use to login
- Select "Allow me to save credentials" to save the credentials so you don't have to enter them each time you access this device
- Select Connect
-
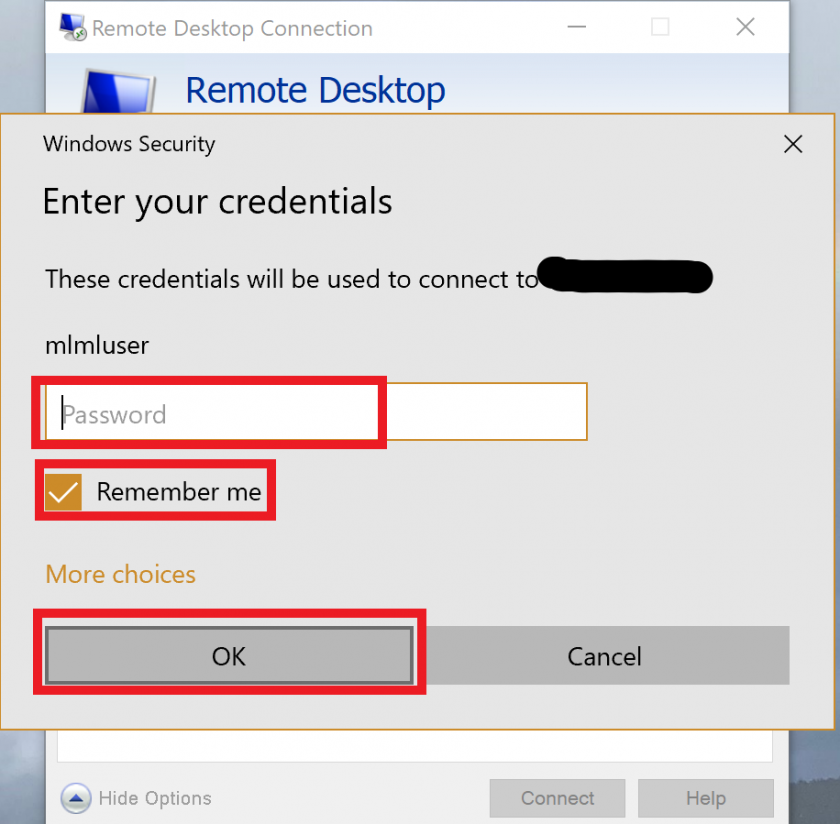
- Enter the password associated with the username you used into the window that pops-up
- Again you can select "Remember me" so you do not have to enter the password each time
- Click OK
-
- You may receive a message saying that the identity of the remote computer cannot be verified. Check the box for "Don't ask me again for connections to this computer" and click Yes
- You should now be connected
- For more information on how to use Remote Desktop Connection go to this link "How to Use Microsoft's Remote Desktop Connection"
Mac:
- Download "Microsoft Remote Desktop" from the Mac app store
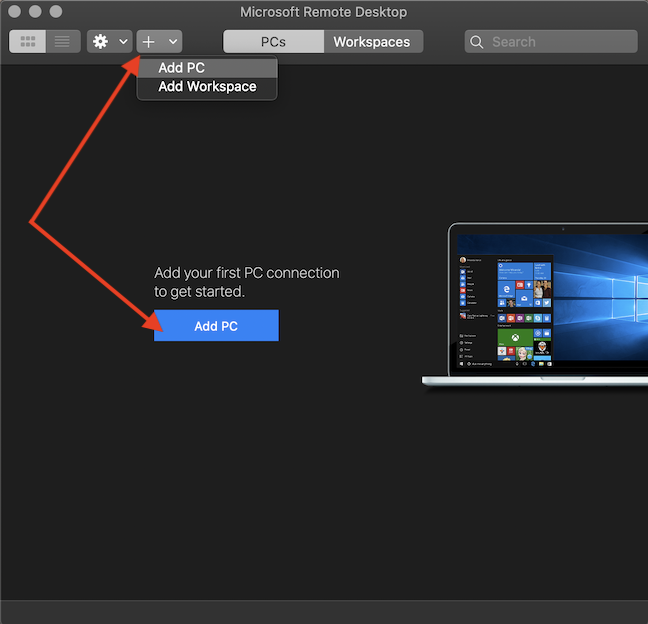
- Open Microsoft Remote Desktop
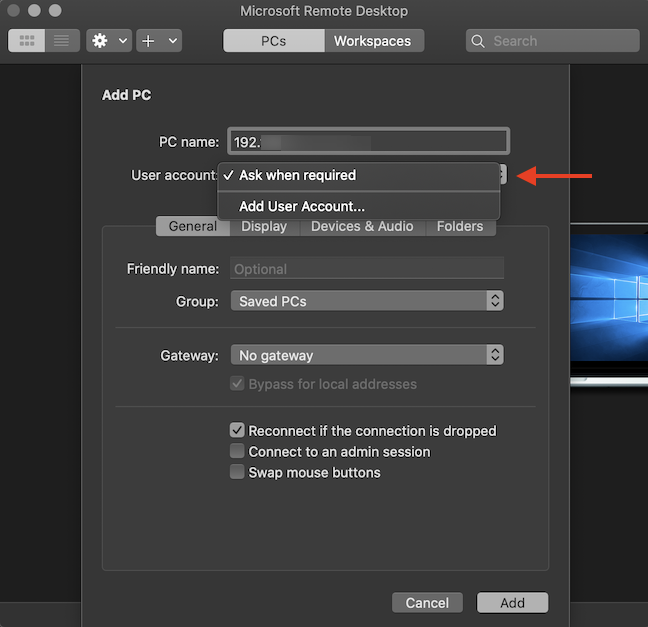
- Select "Add PC" in the center when the app opens
-
- Fill in the fields:
- PC name is the IP address
- User account: either "Ask when required" or if you will be using this account often use "Add User Account..."
-
-
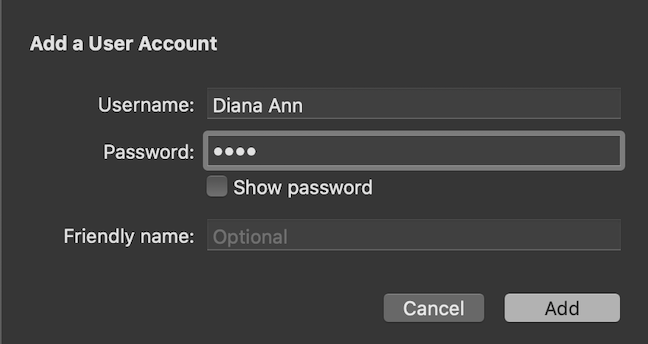
- For Add User Account: enter the username of account you're accessing & the associated password
- Press Add
-
-
- Friendly Name: what you want to call the connection - optional
- Group: Where you want to save this connection
- Gateway: no gateway configured
- For all other tabs (Display, Devices & Audio, Folders): these settings are your preference - you can stick with the standard and go from there
- The Folders tab allows you to share files and folders between the devices
- For more information about these other tabs visit "How to remote access Windows 10 from Mac"
- Click Add
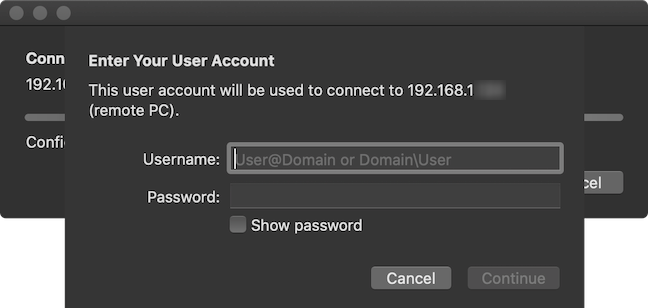
- To begin a session with that remote desktop just simply double-click it
- To edit it, select the pen in the top right corner of the desktop icon
- A pop-up should show with "Enter Your User Account" to enter your username and password
-
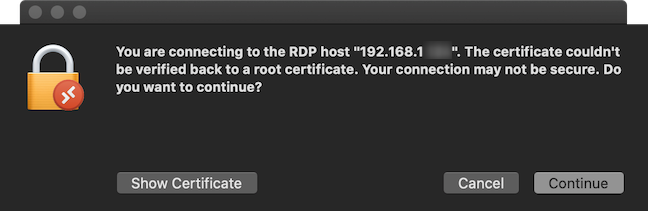
- You may see a prompt about your connection (see below), select Continue
-
- For more information about accessing using Mac, go to the link "How to remote access Windows 10 from Mac"
Troubleshooting:
If you followed all steps and are not able to connect to the remote desktop, it might be that the desktop you are trying to connect to is not setup with remote desktop. If you or someone else can access the desktop physically, use the following instructions to setup the device:
- Login to the account you will be remote accessing
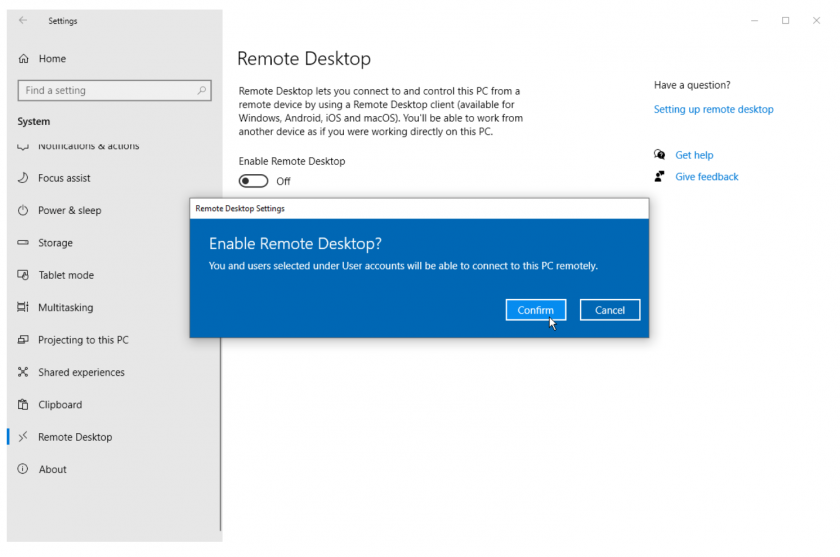
- Open Settings > System > Remote Desktop
- Turn on the switch next to "Enable Remote Desktop"
- Select Confirm
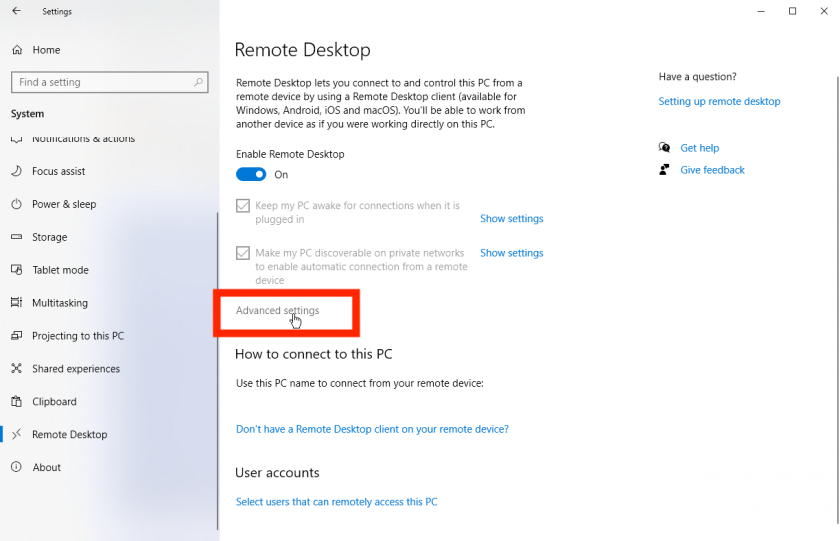
- Make sure "Keep my PC awake for connections when it is plugged in" and "Make my PC discoverable on private networks to enable automatic connection from a remote device" are checked
- Select Advanced Settings
-
- Check the box next to "Require computers to use Network Level Authentication (NLA) to connect"
For more information: How to Use Microsoft's Remote Desktop Connection or How to remote access Windows 10 from Mac