Software
Learn what software is available and the installation processes.
- General Software
- Software Availability (link)
- Service Level Agreements
- How to Register for & Purchase Software from the Spartan Store
- Import and export Firefox bookmarks
- Installing Web Browser Extensions: Google Chrome, Safari, FireFox
- Recommended Software (link)
- Remote Software & Computer Access Procedure
- General Software Information Reference Page (Link)
- Cloud-based Software
- Cloud Backup - Google Drive
- Cloud Backup - Microsoft OneDrive
- Migrating from Dropbox to Google Backup and Sync
- Operating Systems
- Recommended Operating Systems: MacOS & Windows
- Computer Storage Management
- Computer Performance
- Change your macOS Login Password
- Change your Windows 10 Login Password
- Backing Up with Windows File History
- Change the Default Application Associated with a File Type
- How do I install device drivers?
- Help for New Mac Users
- Start your Windows Computer in Safe Mode
- macOS Startup Key Commands
- Use VirtualBox to Create a Windows Virtual Machine
- Create a Disk Image Backup with Macrium Reflect
- Microsoft Office
- Request Microsoft Office for State-Owned Computers
- Microsoft Office Installation for Students
- Microsoft Office 365 Info and Tutorials
- Configure Office to Save in Compatibility Mode
- OneDrive Image Management FAQ
- Using PowerPoint's Presenter View
- Saving a Portable PowerPoint Presentation
- How do I Uninstall Office?
- Word, Excel, or PowerPoint Crashes or Freezes (macOS)
- Converting your PowerPoint Presentation to Widescreen (16:9)
- Convert Columns to Rows, or Rows to Columns using Excel
- Adobe
- Adobe Creative Cloud Information & Installation
- Save a Document or Image as an Adobe PDF
- Convert a document to a fillable PDF form using Adobe Acrobat
- How to Fill PDFs Electronically Using Adobe Reader
- Adobe Acrobat
- ArcGIS
- Statistics Software
General Software
Software Availability (link)
See the Software Availability page on the IT Website.
Service Level Agreements
Public/Outside Groups:
Wifi
- Guests and outside groups are able to access and connect to the MLML guest WiFi. The WiFi network will appear as “moss-guest” under network selections. Click here to learn how to connect to the MLML WiFi.
Volunteers
Wifi
- Volunteers are able to access and connect to the MLML WiFi. The WiFi network will appear as “moss” or “eduroam” under network selections. Click here to learn how to connect to the MLML WiFi. Eduroam connectivity requires California State University credentials, click here to learn more.
MLML Account
- Volunteers are provided MLML user accounts after their MLML Supervisor submits the appropriate paperwork. Your MLML username is composed of the first initial of your first name followed by your last name (i.e. bsimpson for Bart Simpson). Your MLML password may be different from your gmail password. If you have forgotten your MLML password, please submit an IT Helpdesk Ticket.
VPN
- Volunteers must demonstrate a need to use the VPN server. Authorized faculty or research affiliates must provide approval. Click here to learn how to access the MLML network using VPN.
Students
WiFi
- Students are able to access and connect to the MLML WiFi. The WiFi network will appear as “moss” or “eduroam” under network selections. Click here to learn how to connect to the MLML WiFi. Eduroam connectivity requires California State University credentials, click here to learn more.
MLML Account
- Students are provided MLML user accounts. Your MLML username is composed of the first initial of your first name followed by your last name (i.e. bsimpson for Bart Simpson). Your MLML password may be different from your gmail password. If you have forgotten your MLML password, please submit an IT Helpdesk Ticket.
- User accounts at Moss Landing Marine Laboratories are required to authenticate faculty, staff, students, and visiting scientists and to enable access to services. Click here to view provided services requiring user authentication.
- Students are granted SJSU email accounts (i.e. firstname.lastname@sjsu.edu). If you have forgotten your SJSU Gmail account password, click here.
VPN
- Students must demonstrate a need to use the VPN server. Authorized faculty or research affiliates must provide approval. Click here to learn how to access the MLML network using VPN.
Hardware
- To view a list of hardware available for checkout click here. If you would like to checkout an item on the list please submit an IT Helpdesk Ticket under the Request Type “Tech checkout.” Once the checkout is approved, visit the IT Help Desk cubicle (Admin offices Room 200) any time from 9-5 on M-F to pickup or return the item.
- To view a list of hardware available in individual classrooms click here.
Software
- For a list of available software click here. Submit an IT Helpdesk Ticket if you would like to request a program listed in the software section or if you need assistance with an installation.
Network Printing
MS Students
WiFi
- MS Students are able to access and connect to the MLML WiFi. The WiFi network will appear as “moss” or “eduroam” under network selections. Click here to learn how to connect to the MLML WiFi. Eduroam connectivity requires California State University credentials, click here to learn more.
MLML Account
- MS Students are provided MLML user accounts. Your MLML username is composed of the first initial of your first name followed by your last name (i.e. bsimpson for Bart Simpson). Your MLML password may be different from your gmail password. If you have forgotten your MLML password, please submit an IT Helpdesk Ticket.
- User accounts at Moss Landing Marine Laboratories are required to authenticate faculty, staff, students, and visiting scientists and to enable access to services. Click here to view provided services requiring user authentication.
- Students are granted SJSU email accounts (i.e. firstname.lastname@sjsu.edu). If you have forgotten your SJSU Gmail account password, click here.
VPN
- MS Students must demonstrate a need to use the VPN server. Authorized faculty or research affiliates must provide approval. Click here to learn how to access the MLML network using VPN.
Hardware
- To view a list of hardware available for checkout click here. If you would like to checkout an item on the list please submit an IT Helpdesk Ticket under the Request Type “Tech checkout.” Once the checkout is approved, visit the IT Help Desk cubicle (Admin offices Room 200) any time from 9-5 on M-F to pickup or return the item.
- To view a list of hardware available in individual classrooms click here.
Software
- For a list of available software click here. Submit an IT Help Desk ticket if you would like to request a program listed in the software section or if you need assistance with an installation.
Network Printing
- MS Students are authorized to print from the Library Copier.
- The procedure for installing the Konica Minolta copier as a printer will depend on whether you own a Windows or Mac OS X system. General printer installation may be found here.
- A list of MLML network DNS names could be found here.
Faculty
WiFi
- Faculty are able to access and connect to the MLML WiFi. The WiFi network will appear as “moss” or “eduroam” under network selections. Click here to learn how to connect to the MLML WiFi. Eduroam connectivity requires California State University credentials, click here to learn more.
MLML Account
- Faculty are provided MLML user accounts. Your MLML username is composed of the first initial of your first name followed by your last name (i.e. bsimpson for Bart Simpson). Your MLML password may be different from your gmail password. If you have forgotten your MLML password, please submit an IT Helpdesk Ticket.
- Faculty at Moss Landing Marine Laboratories are required to authenticate faculty, staff, students, and visiting scientists and to enable access to services. Click here to view provided services requiring user authentication.
- Faculty are granted SJSU email accounts (i.e. firstname.lastname@sjsu.edu). If you have forgotten your SJSU Gmail account password, click here.
VPN
- Faculty must demonstrate a need to use the VPN server. Authorized faculty or research affiliates must provide approval. Click here to learn how to access the MLML network using VPN.
Hardware
- To view a list of hardware available for checkout click here. If you would like to checkout an item on the list please submit an IT Helpdesk Ticket under the Request Type “Tech checkout.” Once the checkout is approved, visit the IT Help Desk cubicle (Admin offices Room 200) any time from 9-5 on M-F to pickup or return the item.
- To view a list of hardware available in individual classrooms click here.
Software
- For a list of available software click here. Submit an IT Helpdesk Ticket if you would like to request a program listed in the software section or if you need assistance with an installation.
Network Printing
Staff
WiFi
- Staff are able to access and connect to the MLML WiFi. The WiFi network will appear as “moss” or “eduroam” under network selections. Click here to learn how to connect to the MLML WiFi. Eduroam connectivity requires California State University credentials, click here to learn more.
MLML Account
- Staff are provided MLML user accounts. Your MLML username is composed of the first initial of your first name followed by your last name (i.e. bsimpson for Bart Simpson). Your MLML password may be different from your gmail password. If you have forgotten your MLML password, please submit an IT Helpdesk Ticket.
- User accounts at Moss Landing Marine Laboratories are required to authenticate faculty, staff, students, and visiting scientists and to enable access to services. Click here to view provided services requiring user authentication.
- Staff are granted SJSU email accounts (i.e. firstname.lastname@sjsu.edu). If you have forgotten your SJSU Gmail account password, click here.
VPN
- Staff must demonstrate a need to use the VPN server. Authorized faculty or research affiliates must provide approval. Click here to learn how to access the MLML network using VPN.
Computer Provided
- Staff are provided a computer during the on-boarding process. Staff may request additional computers by submitting an IT Helpdesk Ticket.
Hardware
- To view a list of hardware available for checkout click here. If you would like to checkout an item on the list please submit an IT Helpdesk Ticket under the Request Type “Tech checkout.” Once the checkout is approved, visit the IT Help Desk cubicle (Admin offices Room 200) any time from 9-5 on M-F to pickup or return the item.
- To view a list of hardware available in individual classrooms click here.
Software
- For a list of available software click here. Submit an IT Helpdesk Ticket if you would like to request a program listed in the software section or if you need assistance with an installation.
Network Printing
How to Register for & Purchase Software from the Spartan Store
The SJSU Spartan Store has a wide selection of software available to staff and faculty at significantly reduced prices.
Register
- Go to https://spartanshops.onthehub.com/
- Click Register in the upper right corner of the page.
- Enter your @sjsu.edu email address.
NOTE: If you don't have access to/don't know your SJSU email address, please check the SJSU Services Introduction post. - Enter your first name, your last name, and choose a password. Your SJSU email address should already be filled in. This will be your username when using the Spartan Store.
- Under Proof of Eligibility, there is a Group of which you are a member dropdown list. Select the option that reflects you.
- Complete the captcha and click Register.
- Find the most accurate options for the Which department/field of study do you work in, Which operating system do you use more often, and Where did you hear about us dropdowns, then click Save.
- A verification email will be sent to your SJSU email address. Follow the instructions in that email and you'll be able to start using the store.
Purchase
NOTE: Once you complete your purchase, save a copy of any product keys you receive in a safe place. The Spartan Store will not hold onto them for you forever. If you lose your product key you may have to buy the software again.
- Go to https://spartanshops.onthehub.com/ and login with your SJSU email address.
- Find the software you want by navigating the site or by using the Product Search bar.
- Navigation
- Make sure you are on the Faculty/Staff tab if that matches your description. This will display the full list of software available to you.
- Use the tabs to find the product you need. For instance, if you're looking for Microsoft Office or Microsoft Windows, click the Microsoft tab.
NOTE: The Show recent versions only checkbox sometimes hides software that it shouldn't, such as the Windows versions of Microsoft Office. Leave this unchecked or you risk the website hiding the software you're looking for. - Click the icon for the software you want, then click Add to cart.
- Search
- Simply type the software you want into the Product Search bar and hit Enter. Be non-specific - the base product name (such as "office") without any version numbers is best.
- Scroll to the software version you want, select it, and click Add to cart.
- Navigation
- Open your Shopping Cart located on the upper right side of the page. If everything looks correct to you, click Check Out.
- Follow the prompts and enter your billing information to complete your order.
Import and export Firefox bookmarks
Import bookmarks into Firefox:
(Restore backed-up or migrated bookmarks)
- Open Firefox.
- Select Library (stacked books icon) > Bookmarks > Show all Bookmarks.
- In the Library window, click Import and Backup >Import Data from Another Browser…..
The Import Wizard will open. - Select the browser that contains the bookmarks or other data that you want to use in Firefox and then continue to the next screens to make your selections and complete the import.
- If the Import Wizard does not list your other browser, you can still import bookmarks from another browser but you will need to first export and save those bookmarks as an HTML file. Visit the support site for your other browser if you need help with that.
For more information on importing bookmarks into Firefox from other browsers click here.
To learn how to import bookmarks into Firefox from another Firefox installation or profile, see Recovering important data from an old profile.
To learn how to import bookmarks into Firefox from an HTML file click here.
Export bookmarks out of Firefox:
(Back-up or migrate your bookmarks)
- Open Firefox.
- Select Library (stacked books icon) > Bookmarks > Show all Bookmarks.
- From the toolbar on the Library window, click Import and Backup > Export Bookmarks to HTML...
- In the Export Bookmarks File window that opens, choose a location to save the file, which is named bookmarks.html by default. The desktop is usually a good spot, but any place that is easy to remember will work.
- Click the Save button. The Export Bookmarks File window will close.
- Close the Library window.
For more information click here.
Installing Web Browser Extensions: Google Chrome, Safari, FireFox
Web browser extensions are popular add-ons that can aid in your day-to-day online activities and improve security. There are a lot to choose from, but simplicity is key. Only download extensions that you know you will use and benefit from on a regular basis. IMPORTANT NOTE: Always download from a reputable source and check reviews before downloading to stay safe.
Google Chrome:
- Visit the Google Chrome Extension Store
- Search for the extension you want or browse through the selection
- Click on the extension you wish to add
- Click Add to Chrome
- The extension will now appear in the top-right corner of the browser window
Safari:
- Open Safari
- Choose Safari > Safari Extensions
- Search for the extension you want or browse through the selection
- Click GET > INSTALL
- The extension will now appear to the left of the search bar
Firefox:
- Open Firefox
- Click on settings in the top-right corner
- Click Add-ons > Get Add-ons
- Search for the extension you want or browse through the selection
- Click Install
- The extension will now appear in the top-right corner of the browser window
Popular Extensions We Endorse
- uBlock Origin - adblocker
- LastPass - password manager
- Session Buddy - tab manager
- Mendeley Web Importer - citation manager
- Grammarly - your own personal editor
- Honey - online discounts
Recommended Software (link)
Check out some software we recommend on our Recommended Software Page
Remote Software & Computer Access Procedure
There are times when you need to use a certain software application or device but do not have physical access. Instead, you can remotely access a device at MLML that has the software you need or computing capabilities. Below are the instructions on how to gain software & computing access remotely.
STEP 1: Identify Needs
- Identify the application/computing that you need and research it to know what exactly it is you're looking for:
- Version/Year
- Model
- Specs (CPU, Storage)
- Pinpoint exactly what you'll be using the application/device for
STEP 2: Submit an IT Helpdesk Ticket
Once you know what you need, we can help you get access to it. Submit an IT Helpdesk Ticket with the information you uncovered from Step 1. Please do the research before submitting an IT Helpdesk Ticket so we know exactly what it is you are trying to accomplish.
STEP 3: Access MLML VPN
Once you have the go-ahead from the IT Department, setup access to the MLML network using VPN. You will need to be connected to the MLML network to access a device remotely.
Access the MLML Network using VPN Instructions
STEP 4: Launch Remote Desktop
NOTE: The following instructions are to connect to a Windows desktop computer from Windows or macOS.
IMPORTANT: You will need to configure the Windows computer to which you are connecting to allow Remote Desktop connections. Refer to the Troubleshooting section below to enable Remote Desktop connections
Windows:
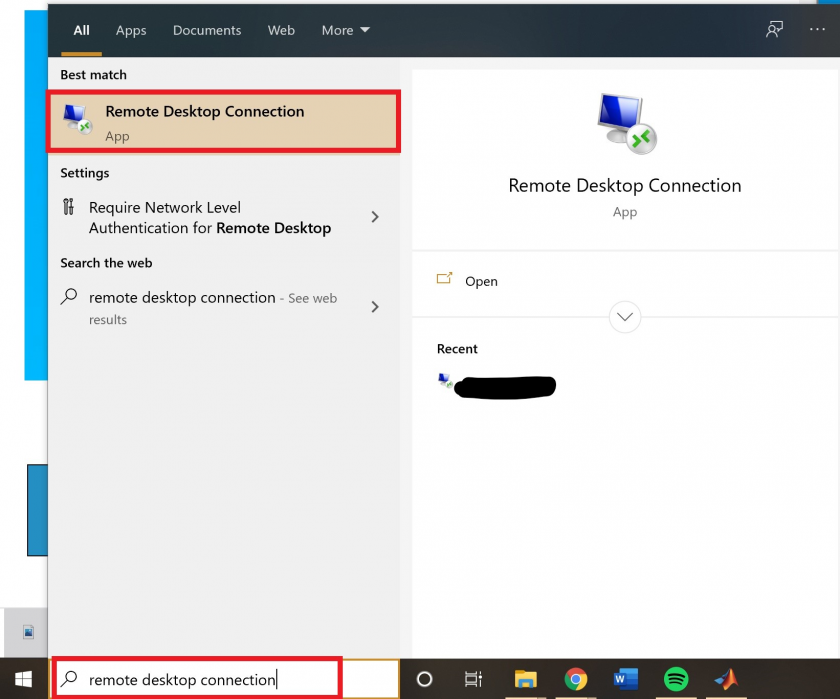
- Launch Remote Desktop Connection
-
-
- Start Menu > search for "Remote Desktop Connection" or Start Menu > Windows Accessories folder
-
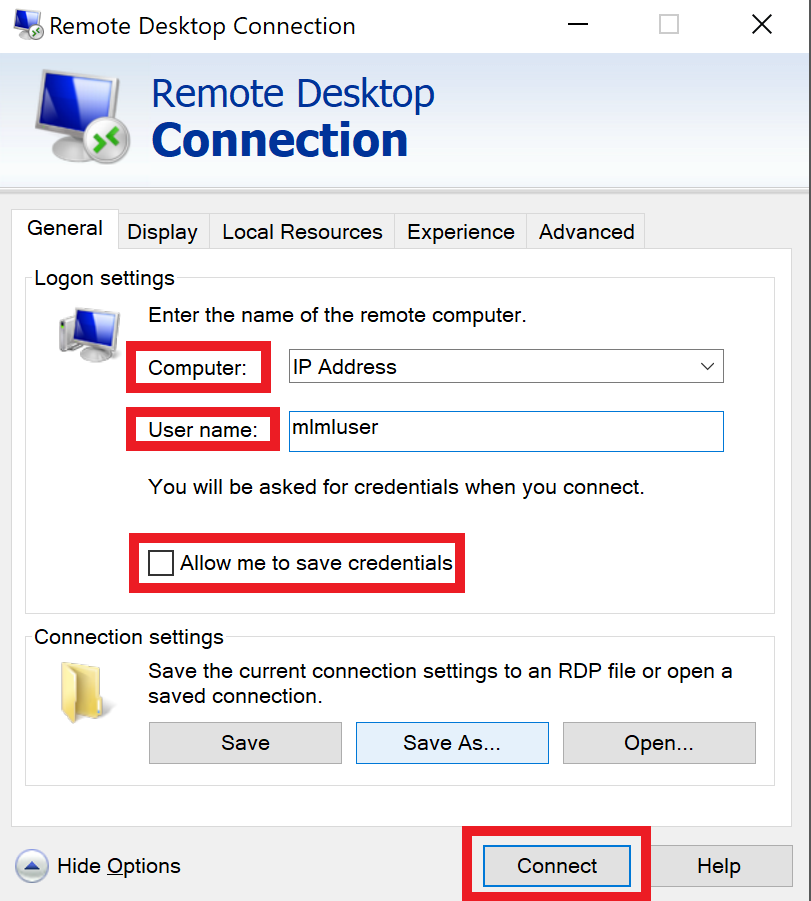
- In the Computer field type the name or IP address of the device you're connecting to
- Select Show Options
- Enter the username of the account you'll use to login
- Select "Allow me to save credentials" to save the credentials so you don't have to enter them each time you access this device
- Select Connect
-
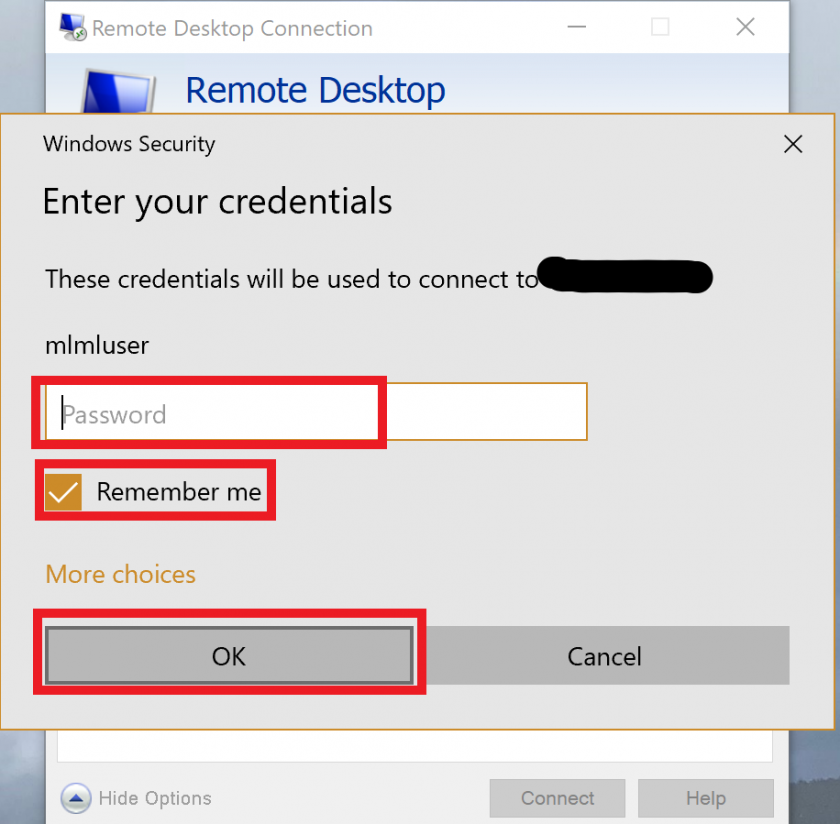
- Enter the password associated with the username you used into the window that pops-up
- Again you can select "Remember me" so you do not have to enter the password each time
- Click OK
-
- You may receive a message saying that the identity of the remote computer cannot be verified. Check the box for "Don't ask me again for connections to this computer" and click Yes
- You should now be connected
- For more information on how to use Remote Desktop Connection go to this link "How to Use Microsoft's Remote Desktop Connection"
Mac:
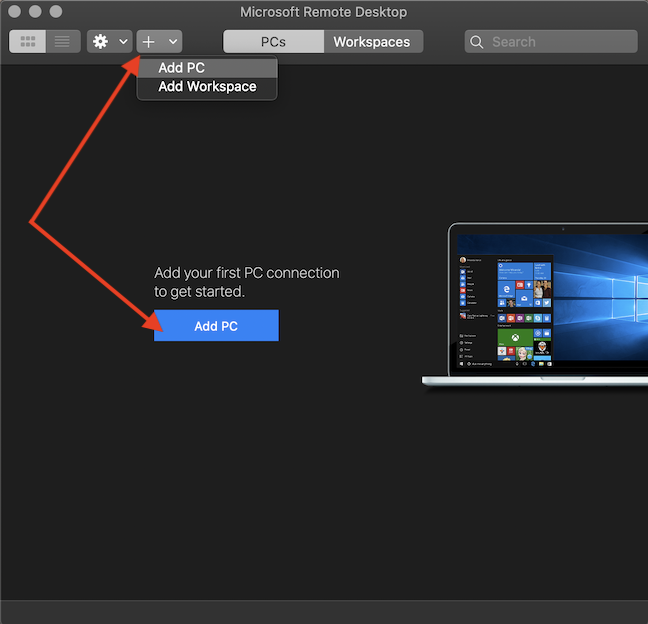
- Download "Microsoft Remote Desktop" from the Mac app store
- Open Microsoft Remote Desktop
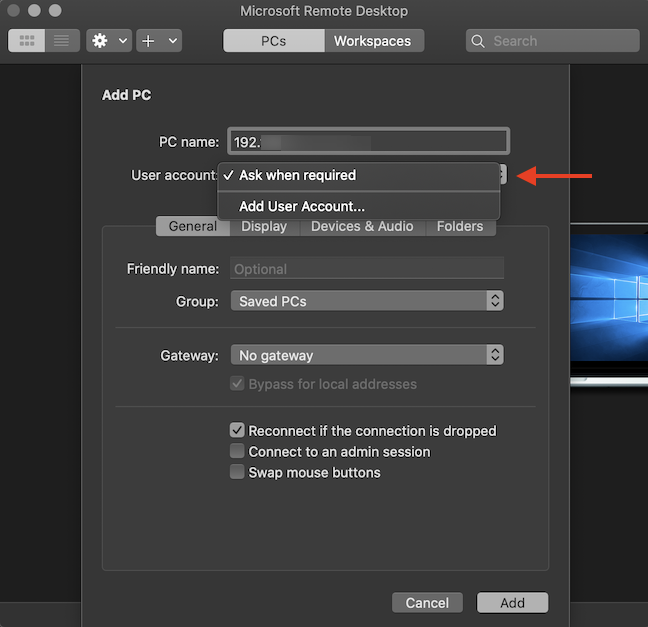
- Select "Add PC" in the center when the app opens
-
- Fill in the fields:
- PC name is the IP address
- User account: either "Ask when required" or if you will be using this account often use "Add User Account..."
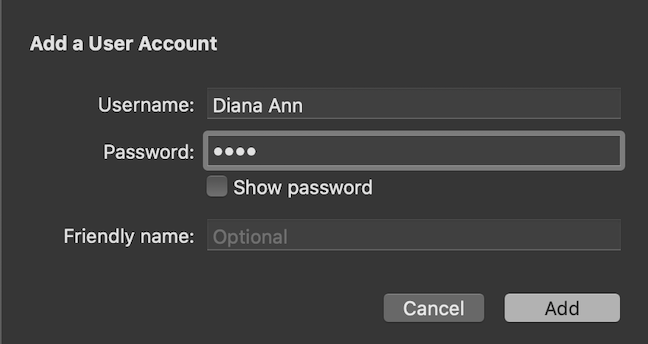
-
-
- For Add User Account: enter the username of account you're accessing & the associated password
- Press Add
-
-
- Friendly Name: what you want to call the connection - optional
- Group: Where you want to save this connection
- Gateway: no gateway configured
- For all other tabs (Display, Devices & Audio, Folders): these settings are your preference - you can stick with the standard and go from there
- The Folders tab allows you to share files and folders between the devices
- For more information about these other tabs visit "How to remote access Windows 10 from Mac"
- Click Add
- To begin a session with that remote desktop just simply double-click it
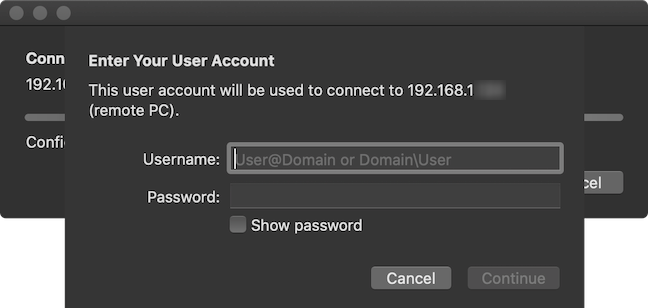
- To edit it, select the pen in the top right corner of the desktop icon
- A pop-up should show with "Enter Your User Account" to enter your username and password
-
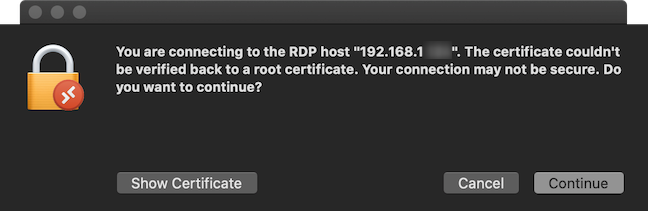
- You may see a prompt about your connection (see below), select Continue
-
- For more information about accessing using Mac, go to the link "How to remote access Windows 10 from Mac"
Troubleshooting:
If you followed all steps and are not able to connect to the remote desktop, it might be that the desktop you are trying to connect to is not setup with remote desktop. If you or someone else can access the desktop physically, use the following instructions to setup the device:
- Login to the account you will be remote accessing
- Open Settings > System > Remote Desktop
- Turn on the switch next to "Enable Remote Desktop"
- Select Confirm
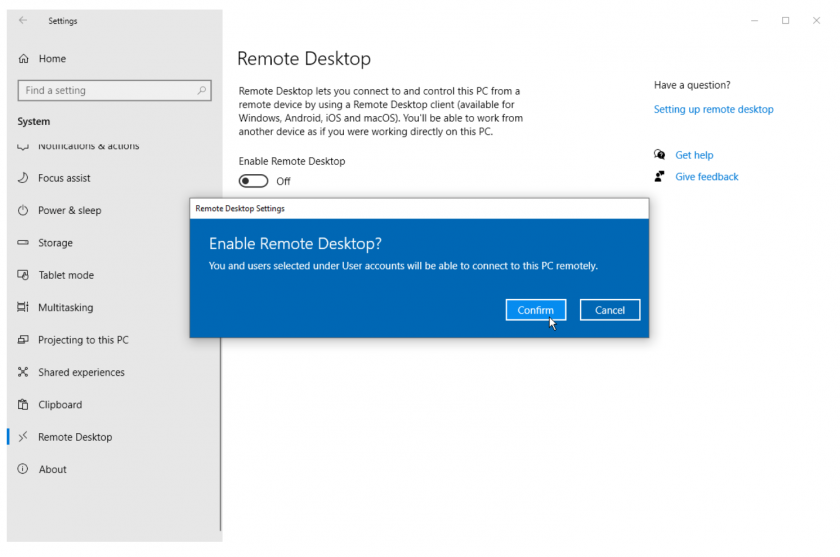
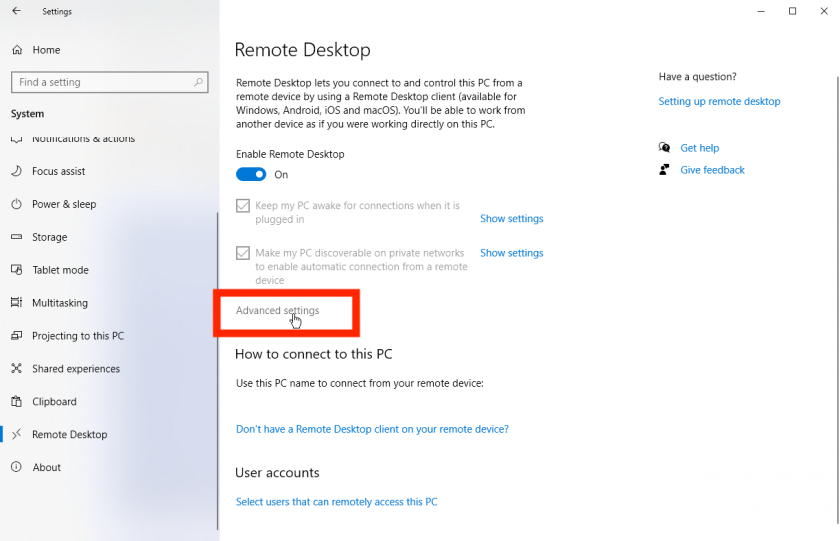
- Make sure "Keep my PC awake for connections when it is plugged in" and "Make my PC discoverable on private networks to enable automatic connection from a remote device" are checked
- Select Advanced Settings
-
- Check the box next to "Require computers to use Network Level Authentication (NLA) to connect"
For more information: How to Use Microsoft's Remote Desktop Connection or How to remote access Windows 10 from Mac
General Software Information Reference Page (Link)
Follow this link to our Software landing page to find helpful links about software available to you.
Cloud-based Software
Google Drive, One Drive, etc...
Cloud Backup - Google Drive
WHY Google Drive/ OneDrive? Some of the BENEFITS include:
-
Platform non-specific (Windows, Mac, Linux, Mobile, iOs, etc)
-
Browser non-specific (Chrome*, Firefox,, Safari, Opera) *recommended
-
Web-based allows for anytime, anywhere usage as long as internet-connected
-
Automatically updates
-
Automatically saves
-
Allows COLLABORATION
-
Provides cloud-based sharing for ANY file type (unlimited)
Installing and Backing up FILES on Google Drive: Windows Computer
1. Download and Install Google Drive: https://www.google.com/drive/download/
-
After the download is complete, locate the downloaded file (usually in your Downloads folder) named something like "GoogleDriveSetup.exe" and double-click on it.
-
A setup wizard will appear. Follow the prompts to install Google Drive on your computer.
-
Once installed, locate the Google Drive icon on your desktop or in the Start menu and double-click on it to open.
-
Sign in with your SJSU credentials.
2. Backing Up Your Computer Files:
-
Click on the File Explorer icon in the taskbar (it looks like a folder).
-
Navigate to the files and folders you want to back up in File Explorer.
-
Click and hold on the file or folder you want to back up, then drag it over to the Google Drive folder in the left sidebar of the File Explorer window
-
Release the mouse button to drop the file or folder into Google Drive.
-
Wait for Sync -Google Drive will automatically start syncing the files and folders you've added. You'll see a status icon in the system tray showing the progress.
-
Once synced, you can access your files from any device by logging in to your Google Drive account.
OPTIONAL BUT RECOMMENDED
3. Set Up Automatic Backup:
-
Right-click on the Google Drive icon in the application panel and select "Preferences."
-
In the Preferences window, navigate to the "Sync" tab and check the box next to "Sync My Drive to this computer."
-
Adjust any other settings as desired and click "Apply" or "OK" to save the changes.
Installing and Backing up FILES on Google Drive: Mac OS X
1. Download and Install Google Drive: https://www.google.com/drive/download/
-
After the download is complete, locate the downloaded file (usually in your Downloads folder) named something like "InstallGoogleDrive.dmg" and double-click on it.
-
A new window will open with the Google Drive icon. Drag the icon into the Applications folder icon to install Google Drive.
-
A setup wizard will appear. Follow the prompts to install Google Drive on your computer.
-
Once installed, locate the Google Drive icon on your desktop or in the Start menu and double-click on it to open.
-
Sign in with your SJSU credentials.
2. Backing Up Your Computer Files:
-
Click on the Finder icon in the Dock (it looks like a blue and white face).
-
Navigate to the files and folders you want to back up in Finder.
-
Click and hold on the file or folder you want to back up, then drag it over to the Google Drive icon in the sidebar of the Finder window.
-
Release the mouse button to drop the file or folder into Google Drive.
-
Wait for Sync -Google Drive will automatically start syncing the files and folders you've added. You'll see a status icon in the system tray showing the progress.
-
Once synced, you can access your files from any device by logging in to your Google Drive account.
OPTIONAL BUT RECOMMENDED
3. Set Up Automatic Backup
-
Open Google Drive preferences by clicking on the Google Drive icon in the menu bar and selecting "Preferences."
-
In the Preferences window, navigate to the "Settings" tab and check the box next to "Sync My Drive to this computer."
-
Adjust any other settings as desired and close the Preferences window.
It’s highly recommended to periodically check your Google Drive to ensure all desired files are backed up and up to date.
That's it! You've successfully downloaded and installed Google Drive on your Windows/ Mac OS X computer and backed up your important files to the cloud.
Additionally, Google maintains an active support site: https://support.google.com/drive/
And then, there’s always YouTube!
Need more help? >>>> Submit a help ticket! We’re here to help you.
Cloud Backup - Microsoft OneDrive
Installing and Backing up FILES on Microsoft OneDrive: Windows Computer
If you are using a SJSU-provided computer OneDrive is pre-installed. You can find it in the Start Menu or by searching for it. Otherwise, follow the instructions below:
1. Download and Install OneDrive: https://drive.live.com/
-
Sign in with SJSU credentials or hit the download tab. (Top center)
-
After the download is complete, locate the downloaded file (usually in your Downloads folder) named something like "OneDrive.exe" and double-click on it.
-
A setup wizard will appear. Follow the prompts to install OneDrive on your computer.
-
Once installed, locate the OneDrive icon on your desktop or in the Start menu and double-click on it to open.
-
Sign in with your SJSU credentials.
2. Backing Up Your Computer Files:
-
Automatic Backup- Once logged in, OneDrive will ask you which folders you want to sync to your computer. Select the ones you want to back up and sync across devices, ie., Documents, Pictures, Desktop, etc.
-
Manual Backup- Simply move or copy files you want to back up into the OneDrive folder on your computer. These files will sync to the cloud automatically.
-
The synching process will start immediately. You will see a status check icon in the system tray showing the progress.
-
Once synced, you can access your files from any device by logging in to your SJSU Microsoft OneDrive account.
Installing and Backing up FILES on Microsoft OneDrive: MAC OS X
1. Download and Install OneDrive: https://drive.live.com/ or Download From the Mac App Store.
-
Sign in with SJSU credentials or hit the download tab. (Top center)
-
After the download is complete, locate the downloaded file (usually in your Downloads folder) named something like "OneDrive.dmg" and double-click on it.
-
A setup wizard will appear. Follow the prompts to install OneDrive on your computer.
-
Once installed, locate the OneDrive icon on your Application Folder and double-click on it to open.
-
Sign in with your SJSU credentials.
2. Backing Up Your Computer Files:
-
Automatic Backup- Once logged in, OneDrive will ask you which folders you want to sync to your computer. Select the ones you want to back up and sync across devices, ie., Documents, Pictures, Desktop, etc.
-
Manual Backup- Simply move or copy files you want to backup into the OneDrive folder on your computer. These files will sync to the cloud automatically.
-
The synching process will start immediately. You will see a status check icon in the system tray showing the progress.
-
Once synced, you can access your files from any device by logging in to your SJSU Microsoft OneDrive account.
You have now installed OneDrive, set it up, and backed up your computer files to the cloud.
Need more help? >>>> Submit a help ticket! We’re here to help you.
Migrating from Dropbox to Google Backup and Sync
- Create a folder on Google Drive (web interface) which you would like to have synced with your Dropbox files.
- Download and Install Google Backup and Sync
- Click on the Google Backup and Sync tray icon or quick launch icon (looks like a cloud with an up arrow)
- A setup window will pop up
- Sign in to your MLML Google Account
- In the “My Laptop” section (May say “My Desktop” if you have a Desktop or “My Macbook”, etc.), uncheck all boxes.
-
In the Google Drive section, check the folder in your Google Drive you created earlier for your Dropbox files. It will also sync everything not in a folder (In your Google Drive base folder).
- If you would like to sync your entire Google Drive, check "Sync My Drive to this computer" at the top.
- Move your Dropbox files into the folder with the name that you created earlier, within the Google Drive folder on your computer.
- Finish up and let your files sync (this will take awhile)
- You can access these settings later by clicking on the Google Backup And Sync icon, clicking the three vertical dots icon, and clicking preferences
Operating Systems
Find information about different operating systems.
Recommended Operating Systems: MacOS & Windows
IT highly recommends using either macOS or Windows 10 operating systems. Keeping your operating system up to date with the most current upgrades available will allow your system to run at optimal performance and security levels.
macOS
Apple provides free upgrades to newer operating systems when they become available.
Big Sur
- Apple's newest version of macOS
- Compatible with these computers: https://support.apple.com/en-us/HT211238
Once you have installed the latest operating system available, keep it up-to-date by enabling automatic updates by following the instructions here.
Windows
Microsoft's newest operating systems must be purchased before being installed.
Windows 10
- Microsoft's newest windows operating system
- Windows 10 is compatible with most PCs
Once you have installed the latest operating system available, keep it up-to-date by enabling automatic updates by following the instructions here.
Windows 7
- Microsoft no longer provides support for Windows 7. If you have any computers that are still running Windows 7, contact IT as soon as possible to be upgraded to Windows 10.
- If you have a computer that must continue running Windows 7 (for hardware or software compatibility reasons), it must be disconnected from the MLML network and the internet at all times.
Computer Storage Management
NOTE: For image management, see our Image Management, Search, & Use Best Practices Page.
Disk Space Analyzers
- Both Disk Inventory X and WinDirStat show the sizes of files and folders on your drive in a graphical tree map and in a list
- For both programs, DO NOT delete any files in Windows Directory or Program Files Directory
- Recommended that you delete files only in your Users Directory
Windows
WinDirStat - This is a program that may be used to analyze and manage hard drive disk space on Windows. This programs shows which folders, file types, and files are taking up the most space (e.g. ZIP, EXE, JPEG, etc.). Make sure you do not delete any important system files.
macOS
Disk Inventory X - This is a program that may be used to analyze and manage hard drive disk space on MacOS . This programs shows which folders, file types, and files are taking up the most space (e.g. MP3, ZIP, JPEG, etc.). Delete files by selecting the file and then click “Move To Trash”. Make sure you do not delete any important system files.
- If error message “‘Disk Inventory X’ can’t be opened because it is from an unidentified developer” is received, follow these instructions.
Determine Disk Use with Analyzers:
Windows
- WinDirStat may be used to scan your entire system and shows which folders, file types, and files are using up the most space.
- Run WinDirStat
- If already downloaded, search for the application in your Start Menu
- Select the Drive you would like to analyze
- Click OK - the analyzing process will commence
- Below is what the results will look like, each color corresponds to a file or folder, and the size is equivalent to the percentage it takes up on your disk. You can see the file/folder name in the bottom of the window when you scroll over the section.
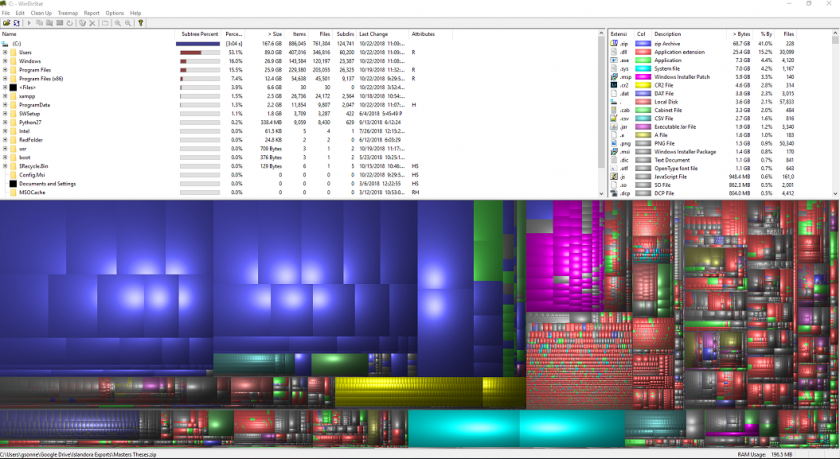
- Right-Click a file/folder on the list or in the graphical tree to either “Move to Recycle Bin” or “Reveal in Folder”. The latter will allow you to select specific files in a folder to delete.
macOS
- Disk Inventory X will provide a list of files taking up the most space. Delete files that you no longer need that are clogging up your disk.
- Run Disk Inventory X as an administrator
- If Disk Inventory X installed previously, click Command + Space and type “Disk Inventory X” then Enter
- Select which Drive you’d like to analyze
- Click “Open Volume” - the program will start analyzing the Drive
- Below is an example of what your results will look like
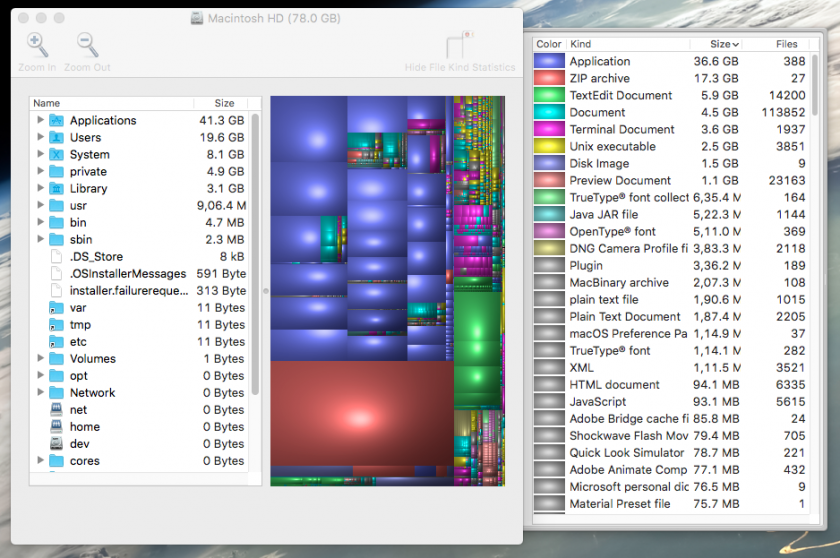
- The “Statistics” tab will show you which apps and files are taking up the most space
- Right-Click a file/folder on the list or in the graphical tree to either “Move to Trash” or “Reveal in Finder”. The latter will allow you to select specific files in a folder to delete.
- Run Disk Inventory X as an administrator
- For more tips on steps you can take to clear space, follow procedures listed on MacPaw.
Free-Up Disk Space
- Start with cleaning up applications, files, photos, etc. that you no longer need on your computer. Empty your Trash/Recycling Bin on your computer.
Windows
- Open Windows Explorer
- Right-click on C: drive and select Properties
- Select Disk Cleanup
- This program analyzes your hard drive and identifies files that are no longer of any use. After browsing the results, you can remove the unnecessary files
- Once Disk Cleanup has finished running, review files it found that are no longer of use<
- Files to get rid of: temporary files, recycle bin, temporary internet files, and windows update cleanup files
- DO NOT get rid of Windows ESD Installation Files
- All other files should be reviewed by you
- Here’s a guide on how to use Disk Cleanup safely and effectively from HowToGeek.
- Delete files and uninstall programs on your own:
- Here’s another good guide from HowToGeek for more general disk space cleanup.
- Good places to look for large sets of old files to delete:
- Downloads folder: Programs you’ve downloaded are generally installed, and then these installer files just end up wasting lots of space.
- Pictures / Videos folder: If there’s anything you don’t want any more. (Videos especially can take up tons of space)
- Documents folder: These shouldn’t take up lots of space, but cleaning up old things you have no need for is good practice.
- Periodically: Go to Control Panel > View By Category > Uninstall a Program, and uninstall any old programs you no longer use.
- Deleting Temporary Files - Temporary files, such as “cab_” are found on your hard drive. These are reminiscent of Windows Update; deleting these files may free up some space on your hard drive.
-
To delete “cab_” files:
- Right click on the Windows icon.
- Go to File Explorer → This PC > OS: C in left sidebar
- Open Windows folder → Temp folder → Continue
- Scroll down to the files beginning with "cab_"
- Delete these “cab_” files
- For more tips on how to clear disk space, go to Microsoft Disk Cleanup.
macOS
- Though there are no “Disk Cleanup” equivalents for MacOS, here are some tips on how to manage and free-up storage space from Apple Support
Computer Performance
macOS is Apple’s operating system for all Mac devices. For more information about macOS visit the macOS Apple Page.
About This Mac
- This dialog shows you basic information about the manufacture date and hardware of your Mac.
- Click the Apple icon at the top left of the screen on the menu bar.
- Click About This Mac.
- The dialog window with basic system information will pop up
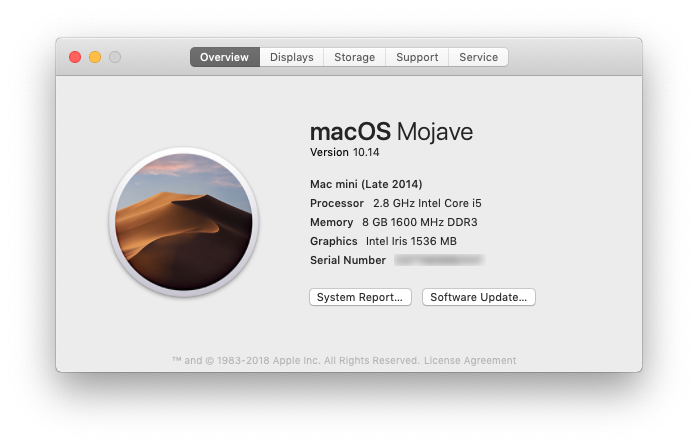
- Click the System Report button for more detailed information for the advanced user.

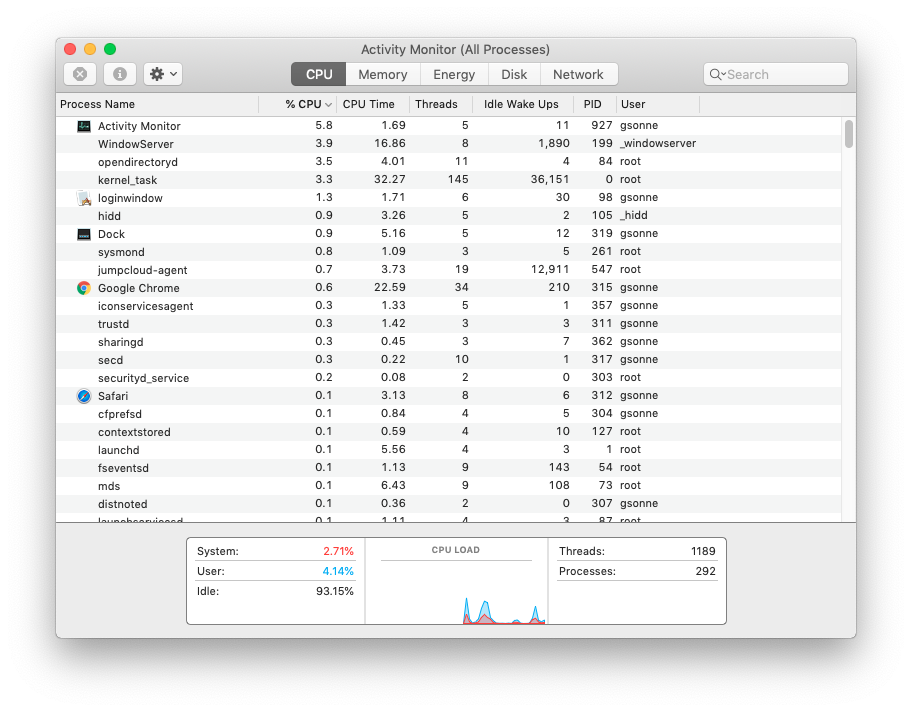
Activity Monitor
- Similar to Task Manager for PC, Activity Monitor displays every program running on your Mac. You can manage these running programs and identify how they are affecting your Mac’s performance.
- For more information visit Activity Monitor Support.
Uninstall Unnecessary Applications
- One simple way to clear disk space and keep your computer running smoothly is to uninstall applications you don’t need or aren’t using.
- NOTE: Make sure you know what the application function is before you delete it, some applications are key to keeping your computer functioning properly.
- Find the list of applications: Open Finder → Applications (left side panel)
- How to Uninstall Applications on Mac
Windows
Windows is Microsoft’s operating system for PCs. For more information about Windows visit the Microsoft Windows Page.
System Information
- Windows also has a basic system information dialog, similar to About This Mac (OS Version, Processor, Memory, 32/64bit info)
- Right click the This PC Icon on your Desktop and Click Properties.
- If it isn't there, search "This PC" in the Search Box on your Taskbar.
- This system information dialog should pop up

- For more detailed and advanced info, download a third-party system info utility program like CPU-Z.
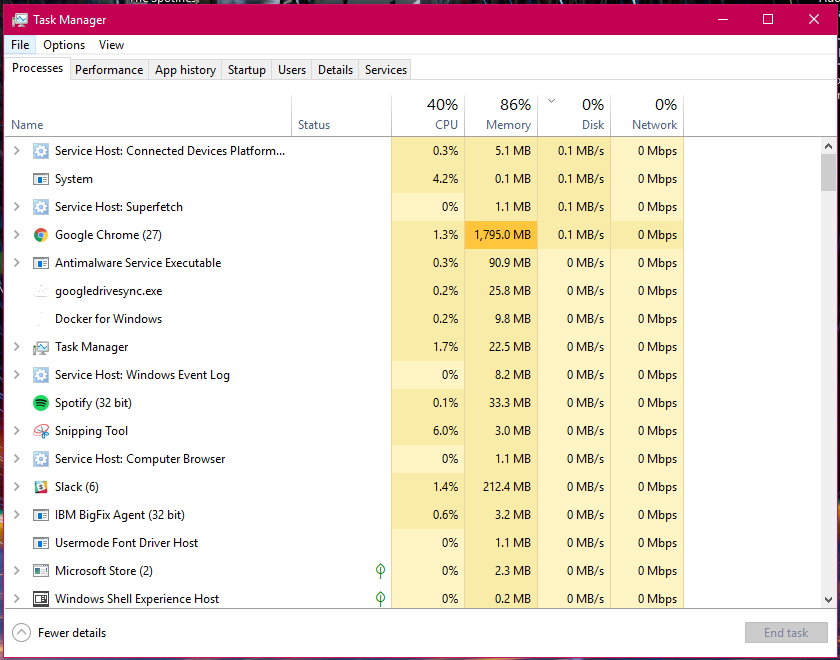
Task Manager
- Similar to Activity Monitor for Mac, Task Manager displays every program running on your computer. You can manage these open programs and identify how they are affecting your computer’s performance.
- You can access the Task Manager by pressing Ctrl-Alt-Delete (press all three keys at once). Once the screen changes color and a menu pops up, click Task Manager.
- For more information visit About Task Manager.
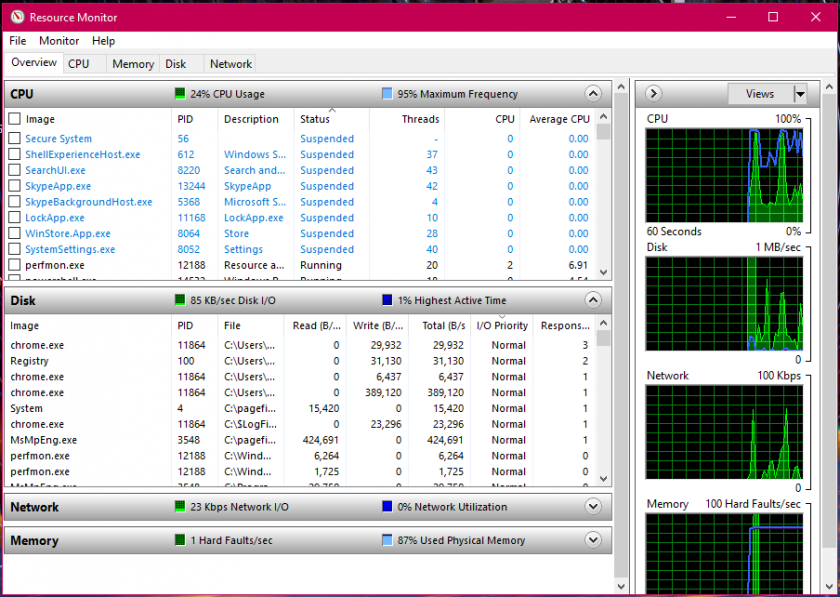
Resource Monitor
- The Resource (and Performance) Monitor in Windows allows the user to monitor CPU and memory usage, and disk and network activity in real time. It’s a great resource if your computer or your software is running slow and you’d like to see what program is causing the slowdown.
- You can access the Resource Monitor by pressing Ctrl-Alt-Delete (press all three keys at once). Once the screen changes color and a menu pops up, click Task Manager. The Resource Monitor is a tab, Performance, within the Task Manager window.
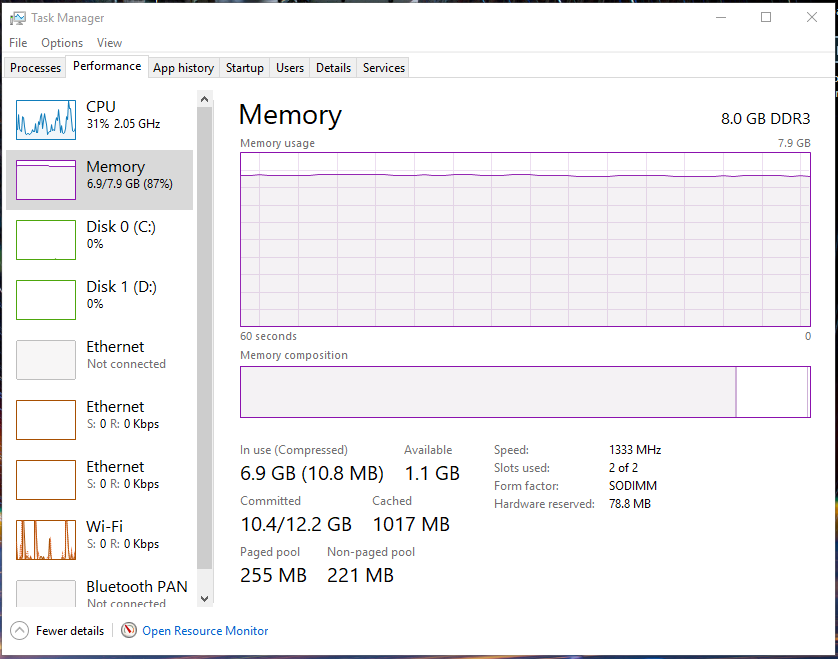
- There is a more detailed Resource Monitor within the Performance tab. At the bottom of the dialog window, there is a button Open Resource Monitor, with a speedometer icon. Click on this for a resource monitor where you can find details on which programs are eating up resources.
- For more information visit PC World Resource Monitor.
Event Viewer
- Log files such as security changes, administrative files, application files, etc. are all compiled for viewing in the Event Viewer. It can be very helpful in locating a source of a problem if your computer starts to have issues.
- For more information visit How to Use Event Viewer.
- To use Event Viewer to detect problems in your PC visit Microsoft Support - Event Viewer.
Uninstall Unnecessary Applications
- One simple way to clear disk space and keep your computer running smoothly is to uninstall applications you don’t need/use.
- NOTE: Make sure you know what the application function is before you delete it, some applications are key to keeping your computer functioning properly.
- Find the list of applications by following these instructions.
- How to Uninstall Windows Applications
3rd Party Tools
See the list of 3rd party tools below, or visit these websites:
- Mac 3rd Party Tools
- Etrecheck - Find serious problems on your Mac
- MacKeeper - DO NOT USE THIS! (Uninstall if present)
- Uninstall Instructions - be sure to clean up bits that may be leftover
- PC 3rd Party Tools
Change your macOS Login Password
macOS
How to change your macOS Login Password
Change your Windows 10 Login Password
Windows 10
If you use a Microsoft account on your Windows 10 computer, you need to follow the instructions in Method 2 of this guide (or sign into the Microsoft online website) to change your password.
Method 1:
Change the Windows 10 Password from Control Panel
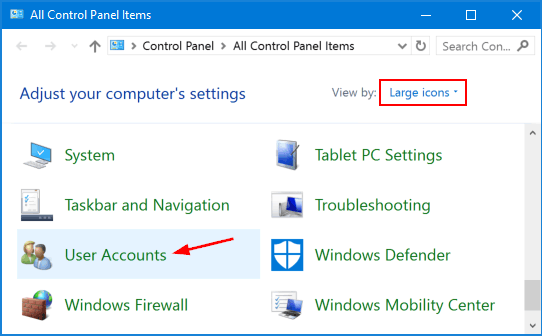
- Open the Control Panel. Set the View by option to Large icons. Click User Accounts.
-
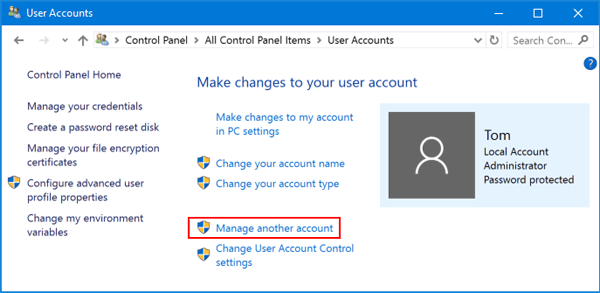
- Click the Manage another account link.
-
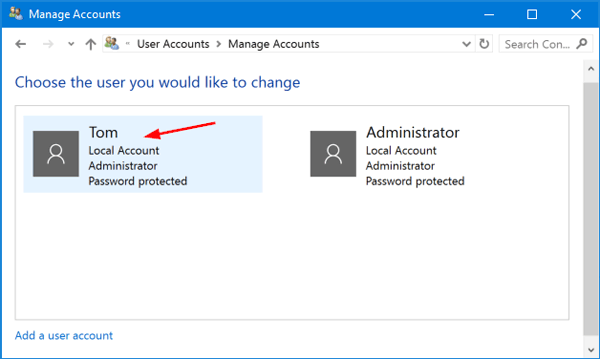
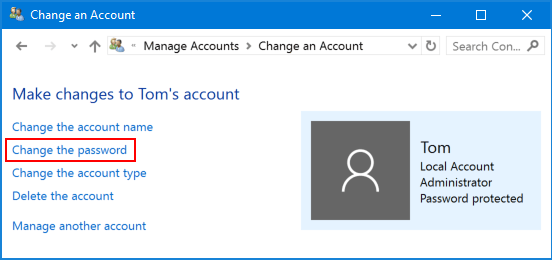
- Click the user account that you want to change the password for.
-
- On the next screen, click the Change the password option.
- Type in your current password and then enter the new one you wish to use. Click Change password.
-

Method 2:
Change the Windows 10 Password from PC Settings
- Press the Windows + I keys together to open the Settings app. Click Accounts.

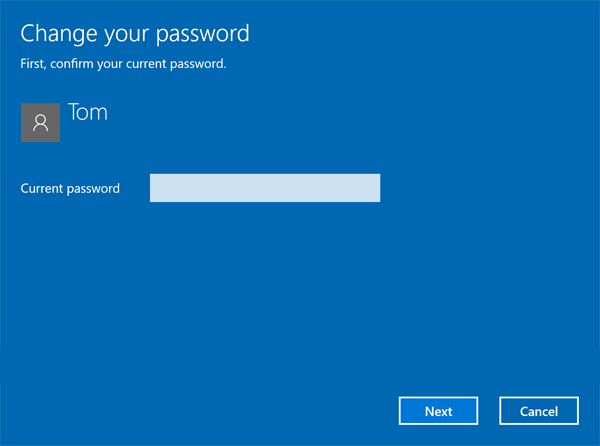
- Click Sign-in options on the left side, and click the Change button under Password section on the right side.
-
- Enter your current password and click Next.
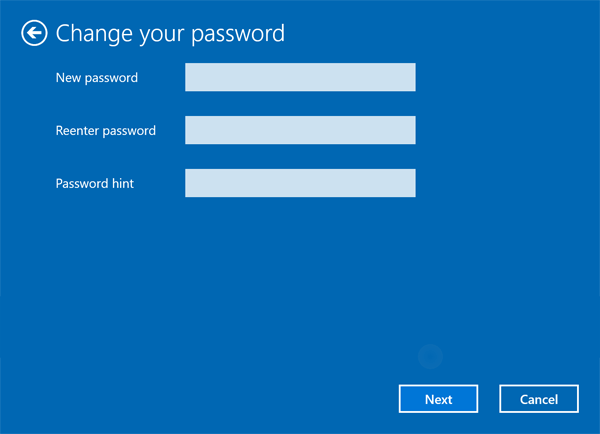
- Enter and reenter a new password, and set a password hint. Click Next.

Backing Up with Windows File History
Windows File History is a backup solution included with Windows 10 that behaves similarly to Apple’s Time Machine. These instructions assume you are running Windows 10.
Note that File History will backup all folders and their contents within your user account’s home directory (C:\Users\<your username>). That includes your Desktop, Documents, and Downloads folders among others.
Initial setup
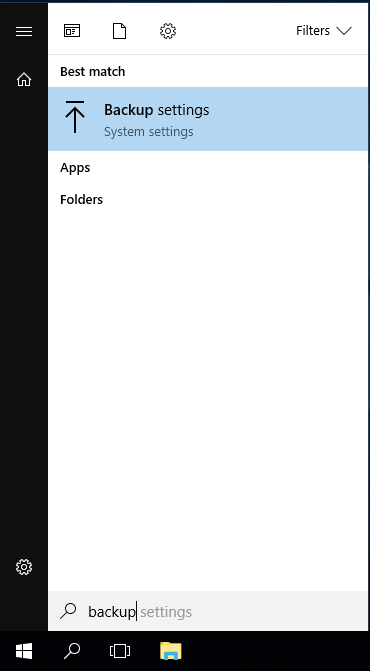
- Press the Windows key/click the Start button.
- Type “backup” without quotes.
- The search results should include “Backup settings”. Click “Backup settings”.

- Click “Add a drive” to bring up a list of eligible backup drives.
- Select your USB backup hard drive.
- Note that in this example a 32 GB USB flash drive is being used as the backup drive. This is an example only - use a USB hard drive for your backups.


- Note that in this example a 32 GB USB flash drive is being used as the backup drive. This is an example only - use a USB hard drive for your backups.
- “Add a drive” should now be replaced with an on/off switch for “Automatically back up my files” with the switch in the On position. Your files are now backing up automatically.
Additional configuration
- Return to the File History settings page (steps 1-3 of Initial setup above).
- Click “More options”.


- Back up my files: The default of every hour is good.
- Keep my backups: I recommend setting this to 3 months, which will simply remove backups from over 3 months ago. Any reasonable timeframe or the “Until space is needed” option are fine choices.

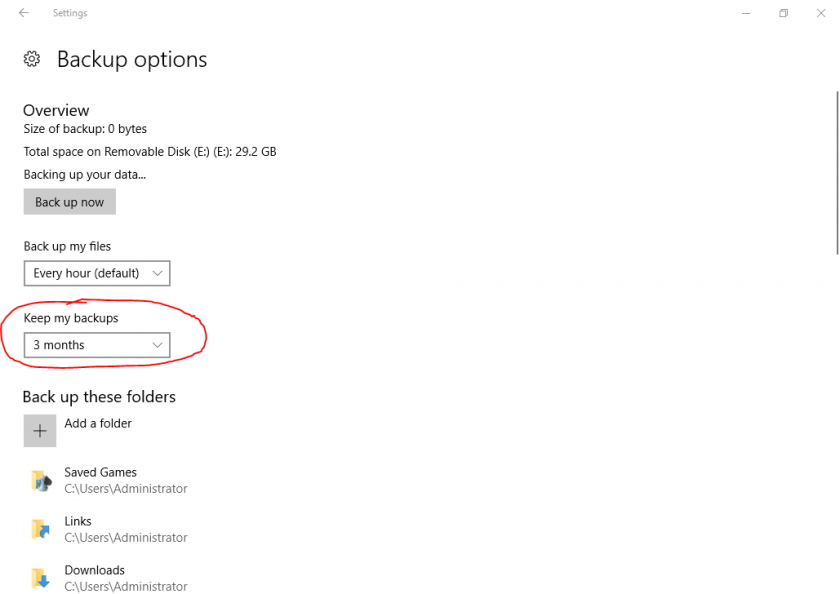
- Add a folder: You can optionally add folders you want backed up that are outside of your user account’s home directory (C:\Users\<your username>).
Restore files
- Return to the File History settings page (steps 1-3 of Initial setup above).
- Click “More options”.
- Scroll to the bottom. Click “Restore files from a current backup” under “Related settings”.
- Navigate to the time/date of the backup you wish to restore.
- Restore SPECIFIC files/folders in-place
- Select the file(s) and/or folder(s) you wish to restore.
- Click the big green restore button labeled “Restore to original location” to replace the current version of the file(s) and/or folder(s) with the one(s) from your chosen backup.
- Restore ALL files/folders in-place
- NOTE: You probably do not want to do this. Changes to every file and folder since your selected backup will be lost and replaced with the version from your backup.
- Click the big green restore button labeled “Restore to original location” to replace the current version of all your files and folders with the ones from your chosen backup.
Change the Default Application Associated with a File Type
Windows
- Right-click on the file you want to open.
- Mouse over the Open With... menu option, and select Choose Program...
- Select the desired program from the list, or browse for a program if it is not listed.
- Check the "Always use the selected program..." checkbox.
- Click OK.
macOS
Method 1 (Recommended):
- Right-click on a file and select "Get Info". (The shortcut is command-I)
- In the file info window, under "Open with", select the application you want as the default from the drop-down menu.
1. If the application you want to use is not listed,
click the "Other..." button.
2. If the application you want to use is greyed out in the
"Choose and application to open the document ________ "
window, change the "Enable" setting from "Recommended
Applications" to "All Applications".
3. Check the "Always Open With" check box and click "Add". - Once you have selected your application, you have the choice to make this change affect all files of this type, or just this one. To have this change affect just this one, simply close the window. For the change to affect all files of this type, press the "Change All..." button.
- When you are prompted to "Change all similar documents to open in the application _________ ", click the "Continue" button.
- The selected file type should now open using the application selected in the steps above when the file is double-clicked.
Method 2:
- Right-click on a file, point to "Open With" and select "Other..."
- Browse to your Applications directory and select the application you want to open the file type by default, check the "Always Open With" check box and click "Open". (NOTE: If the application you want to use to open the file is greyed out, change the "Enable" setting from "Recommended Applications" to "All Applications".)
- The selected file type should now open using the application selected in the steps above when the file is double-clicked.
How do I install device drivers?
Identify the device (Windows)
Determine the make and model of the device for which you want to update the drivers. If it's an external device (printer, scanner, webcam, etc.) you can usually read the make and model number right off the device. If the make and model info is not easy to determine, you'll need to do some research to figure it out. You should be able to find the information using one of the following methods:
Windows 10:
- Select Start, in Search, type Device Manager, and select it from the list of results.
- Select Search automatically for updated driver software.
- If Windows doesn't find a new driver, you can try looking for one on the device manufacturer's website and follow their instructions.
Download the Drivers
From the manufacturer's website (recommended):
- Go to the device manufacturer's website.
- Locate the Software and Driver download page on their support site.
- Search for the specific model number of the device.
- Locate and download the driver specific to your device and operating system. (Determine your operating system by right-clicking My Computer and selecting "properties".
Install the Drivers
Some drivers are provided as a self-extracting, self-installing executable package. Some will be a self-extracting archive that contains an installer you need to run. Others will be a file or set of files that need to be installed manually.
To install drivers from an installer:
- Double-click the installer file.
- Click through the installation process.
- After the installer finishes, restart your computer to complete the installation process.
To update drivers in Windows 10 click here.
Help for New Mac Users
A good place to start is Apple's Mac 101 web site:
http://www.apple.com/support/mac101/
Start your Windows Computer in Safe Mode
As of Windows 10, Windows will automatically start in Safe Mode if it detects that you are unable to boot up normally. It may take 2-3 tries before Windows starts in Safe Mode.
If your computer boots normally and you want to enter Safe Mode, such as to install software which isn't working in normal mode, follow these steps: https://support.microsoft.com/en-us/windows/start-your-pc-in-safe-mode-in-windows-10-92c27cff-db89-8644-1ce4-b3e5e56fe234
macOS Startup Key Commands
One of the features of macOS is the ability to issue commands during the startup of the macOS to perform specific operations or evoke different startup states. In order to issue the commands associated with the different key combinations, the key combinations must be pressed at the moment the startup chime sound is heard and the screen changes color from black to grey on system startup and held until the desired operation occurs.
Please note that these key combinations only work on Macs with Intel processors. For newer Macs with Apple Silicon chips, follow this guide to access different startup options: https://support.apple.com/guide/mac-help/macos-recovery-a-mac-apple-silicon-mchl82829c17/mac
- Option - Display all bootable volumes (Startup Manager)
- Shift - Perform Safe Boot (start up in Safe Mode)
- C - Start from a bootable disc
- T - Start in FireWire target disk mode
- X - Force Mac OS X startup (if non-Mac OS X startup volumes are present)
- Command-V - Start in Verbose Mode
- Command-S - Start in Single User Mode
- Mouse button - Force eject CD/DVD
More information about macOS key commands are available on the Apple website:
http://support.apple.com/kb/HT1343
More startup key-command information:
https://support.apple.com/en-us/HT201255
Use VirtualBox to Create a Windows Virtual Machine
Download VirtualBox:
Instructions for creating a Windows 10 virtual machine using VirtualBox:
-
https://www.extremetech.com/computing/1 ... al-machine
IMPORTANT: Make sure you install the Guest Additions and create shared folders.
(When you create a shared folder, make sure you check the "make permanent" check box)
Once you've installed VirtualBox and created a VM, you can use Ninite to install essential Windows applications:
Create a Disk Image Backup with Macrium Reflect
Creating a disk image is a great way to keep your computer and files backed up. This is one of two ways IT recommends backing up your devices. The other way is to back up with Windows File History or macOS Time Machine.
Follow the instructions below to create a disk image:
- Download Macrium Reflect
-
During installation:
- Do not include the PE environment
-
Reflect Defaults:
- Backup - set priority to 3/4
- Advanced - Disable backup notification
-
Once installation complete, configure backup settings:
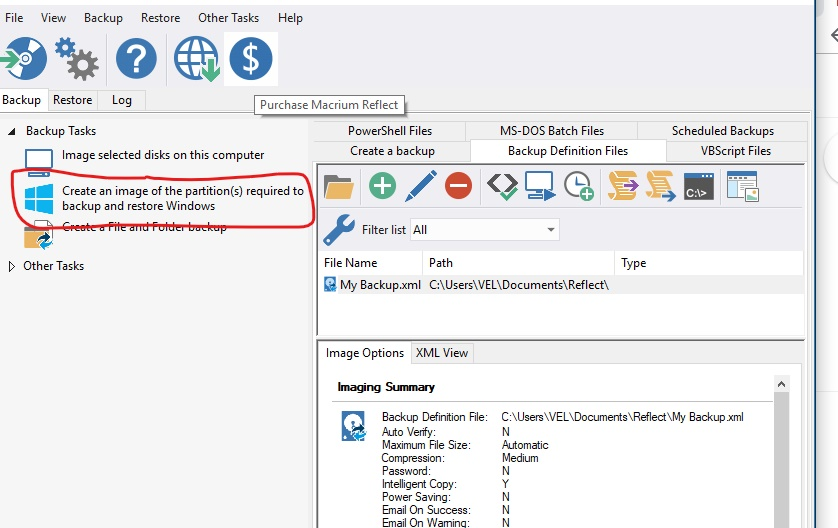
- Open Macrium Reflect
-
Select "Create an image of the partition(s) required to backup and restore Windows" on the left side panel of Macrium
- Make sure the whole disk is selected (far left box is checked, as well as all sections of that disk are checked)
-
Set your destination of the images you create
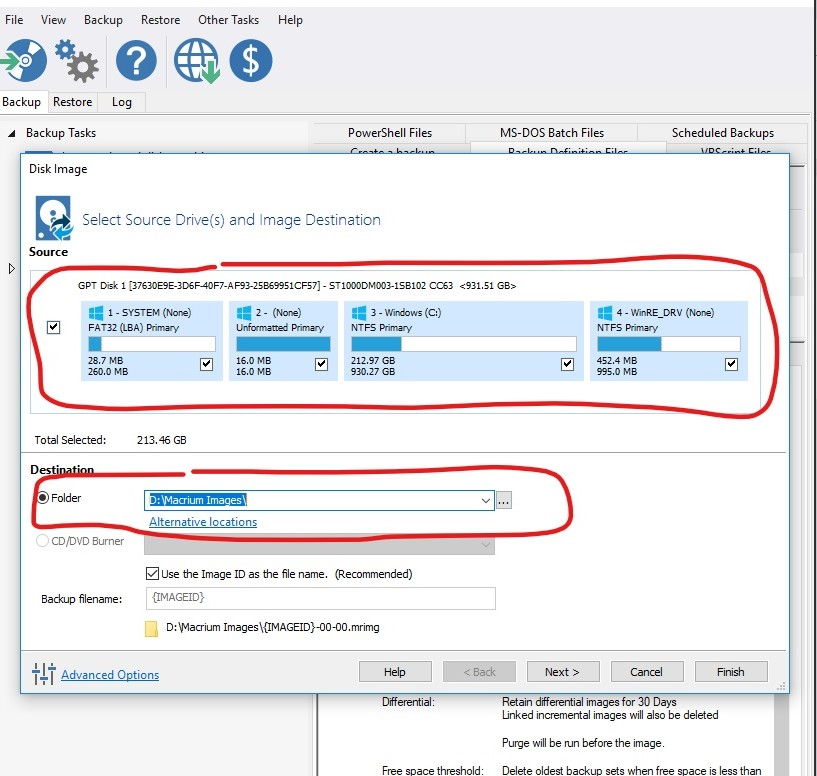
- Click Next
- Select a Template for your Backup Plan: Differential Backup Set
-
Select Edit Schedule with Full highlighted
- Configure settings:
- Monthly
- Every first Sunday at 3:00am
- Conditions: (check all mentioned)
- Run task as soon as possible after a scheduled start is missed
- Start the task only if the computer is on AC power
- Wake the computer to run this task
- Select OK
- Configure settings:
- Select Edit Schedule with Differential highlighted
- Configure settings:
- Daily
- Weekdays at 12:30pm
- Conditions: (check all mentioned)
- Run task as soon as possible after a scheduled start is missed
- Start the task only if the computer is on AC power
- Wake the computer to run this task
- Select OK
- Configure settings:
- Define Retention Rules
- Full: change amount to 2, change from "Weeks" to "Backups"
- Differential: change to 30 Days
- Hit Finish
- Hit OK
Microsoft Office
Information on installing and using Word, Excel, and Powerpoint.
Request Microsoft Office for State-Owned Computers
Free versions of Microsoft Office are only available for state-owned computers.
Discounts for MS Office for personal use are available for Faculty, Staff, and Students at SJSU and CSUMB OnTheHub.
Also, see the MLML Software Availability Page.
If your work computer is state-owned, and you would like to request an install of Microsoft Office, please submit an IT Helpdesk Ticket.
Microsoft Office Installation for Students
Note: If you are a student currently enrolled at MLML through SJSU or CSUMB, you can download Microsoft Office 365 for free using your school email account.
The Microsoft Office 365 Education package provides all of the software that students normally need, including Word, Excel, PowerPoint and more.
To download the package, please follow these directions carefully:
- Go to this link.
- Enter your school email address.
- If you are an SJSU student, make sure you enter your @sjsu.edu address. If you are a CSUMB student, enter your @csumb.edu address.
- Click the button that says "I'm a student".
- Enter the info needed to create a new account (You should have a new email in your corresponding inbox containing your verification code. If you don't see it immediately, be sure to check your spam folder).
- Once all of the information is entered, click start.
- Skip the invitations (or share with friends who might also need Office 365!)
- Arrow through the promotion/tutorial box that pops up.
- This should bring you to a page with Office 365 and a greeting at the top. From here you can choose to either download and install the entire 365 package for your computer (recommended if you have nothing on your computer), or just use the individual features from online.
- If you wish to install Office 365 on your computer, click the Install Office 2016 button in the upper right hand corner of the page.
- Double click the download to open the installer file.
- Complete installation.
- Sign in with the new account that you created to activate Office.
And voila! You should now have full access to Microsoft Office online and on your desktop.
Troubleshooting: What to do if the school sign in page does not work for you
If you get stuck at step #4 in this process because your school email address or password is deemed invalid, follow the guidelines below:
*Before you begin, make sure you are completely exited out of the Microsoft page and SJSU/CSUMB sign in page*
1) Log on to gmail in your web browser and sign in to your SJSU/CSUMB email
2) Click your name/account in the upper right corner and click "manage your google account"
3) Click "security" on the left hand side
4) Scroll down to "signing in to google" and click "password"
5) Follow the steps to reset your password
6) Exit out of the Gmail tab
7) Go back to the Microsoft sign up page and put in the new password you just made
8) It might take you through a series of verification steps for your phone number and a back-up email address - follow these steps
9) This should lead you to the school's Microsoft page, click "install office" in the upper right hand corner to download the suite
Microsoft Office 365 Info and Tutorials
Microsoft Office 365:
- https://www.office.com/
- http://www.microsoft.com/mac/
- https://support.office.com/en-us/office ... l=training
- http://www.microsoft.com/downloads/en/d ... 12f59bd428
- If you have access to LinkedIn Learning (All SJSU affiliates): https://www.linkedin.com/learning/learning-office-365-microsoft-365/increase-your-productivity-with-office-365
Configure Office to Save in Compatibility Mode
Word 2011 and 2016:
-
Open Word, click on File > Preferences... > Save.
-
Change the "Save Word files as" setting to "Word 97-2003 Document" (.doc).
-
Click OK to save the settings.
2019/365:
- On the File tab, click Save As, and then click Browse.
- In the Save As dialog box, in the Save as type list, click PowerPoint 97-2003 Document (*.doc).
- Click Save.
Excel 2011 and 2016:
- Open Excel, click on File > Preferences... > Compatibility.
- Change the "Save files in this format" setting to "Excel 97-2003 Workbook (.xls)".
- Click OK to save the settings.
2019/365:
- Click File > Export > Change File Type.
- Under Workbook File Types, double-click Excel 97-2003 Workbook (*.xls).
- In the Save As popup window, choose a folder location for the workbook.
- In the File name box, type a new file name (or use the one that’s already there).
- Click Save.
- If the Compatibility Checker appears, review any compatibility issues that were found.
PowerPoint 2011 and 2016:
- Open PowerPoint, click on File > Preferences... > Save.
- Change the "Save PowerPoint files as" setting to "PowerPoint 97-2003 Presentation" (.ppt).
- Click OK to save the settings.
2019/365:
- On the File tab, click Save As, and then click Browse.
- In the Save As dialog box, in the Save as type list, click PowerPoint 97-2003 Presentation (*.ppt).
- Click Save.
OneDrive Image Management FAQ
OneDrive is a cloud storage system by Microsoft as part of its suite of Office Online services. You can sync multiple Windows products together for easy access and automatic backup. Check out OneDrive's Help Center to learn about OneDrive's other storage capabilities.
How to sync with Windows:
Click on the following link to sync OneDrive on Windows.
How to sync with Mac:
Click on the following link to sync OneDrive on Mac.
How to upload photos automatically on your phone:
Android:
Click on the following link and scroll down to the “Automatically upload photos and videos you take to OneDrive” section
iOS:
Click on the following link and scroll down to the “Automatically save photos and videos you take to OneDrive” section
How to create an album:
OneDrive is capable of creating albums for your photos and videos automatically based on the date they were taken. Click here and scroll down to the “Automatic album creation” section. To create your own album scroll down to the “Create your own album” section
How to add tags to your photos:
Click here and scroll down to the “Edit or remove a tag” section.
Using PowerPoint's Presenter View
Utilizing 2 monitors, and in this case a laptop with a VGA output, you can view all of your slides along with notes on your laptop screen and only the full screen presentation is seen on the VGA output (projector).
NOTE: Before configuring PowerPoint, be sure that your computer is connected to an external display and that your video settings are configured as "extended desktop" or "dual view" rather than "mirrored" or "clone".
Here is a link on what Presenter View is all about and how to use it: https://support.office.com/en-us/articl ... 4736928ee3
Windows:
Configure the Display Properties:
- Right click on your desktop and click on Properties
- Click on the settings tab.
- Click on the secondary monitor, in this case most of the time it will appear greyed out and have a 2 on it.
- Next check Extend my Windows desktop onto this monitor and click OK.
Configure PowerPoint to use Presenter View:
- Connect your laptop to a projector or other external video device.
- In PowerPoint, on the Slide Show menu, click Set Up Show.
- Under Multiple monitors, select the Show Presenter View check box.
- In the Display slide show on list, click the monitor you want the slide show presentation to appear on.
- To start the presentation, click the start presentation icon, or press Shift+F5.
macOS:
- Connect your laptop to a projector or other external video device.
- Open System Preferences.
- Select the Displays System Preference and click "detect displays"
- Open your PowerPoint presentation and click on: Slideshow > View Presenter Tools.
Saving a Portable PowerPoint Presentation
Portable PowerPoint Presentations:
If you will be presenting on a different computer than the one on which it was created or if you wish to distribute your PowerPoint Presentation, save your PowerPoint in a portable format. This will insure that images and video in your PowerPoint presentations are saved along with the PowerPoint file itself and will load properly when played on a different computer:
Office 2003 (Windows):
- Open the PowerPoint file.
- Click File > Package for CD...
- Enter a name for the portable presentation and click the "Copy to Folder..." button.
- Name the folder, select a location to save and click OK.
More details about saving portable PowerPoint presentations on PowerPoint 2003 are available here.
Office 2007 (Windows):
- Open the PowerPoint file.
- Click the Office button at the top left of the PowerPoint 2007 screen.
- Select Publish > Package for CD
- Enter a name for the portable presentation and click the "Copy to Folder..." button.
- Name the folder, select a location to save and click OK.
More details about saving portable PowerPoint presentations on PowerPoint 2007 are available here.
Office 2010 (Windows):
- Open the PowerPoint file.
- Click the File tab.
- Click Save & Send, then click Package Presentation for CD.
- Click the Package for CD button.
- Enter a name for the portable presentation and click the "Copy to Folder..." button.
- Name the folder, select a location to save and click Select.
- When prompted to include linked files, click yes.
More details about saving portable PowerPoint presentations on PowerPoint 2010 are available here.
Office 2004 (Mac OS X):
- Open the PowerPoint file.
- Click File > Save As... and select "PowerPoint Package" from the "Format" drop-down menu.
- The PowerPoint presentation will be saved to a folder with all image and video files. Copy the entire folder to your flash drive or burn it to a CD in order to view the PowerPoint presentation on a different computer.
Office 2008 (Mac OS X):
- Open the PowerPoint file.
- Click File > Save As... and select "PowerPoint Package" from the "Format" drop-down menu.
NOTE: The PowerPoint presentation will be saved as a .pptx. If the version of Office you are using is not able to handle .pptx files, you can download and install a file format converter that will enable older versions of PowerPoint to open files created in the Office 2008. More information can be found here. - The PowerPoint presentation will be saved to a folder with all image and video files. Copy the entire folder to your flash drive or burn it to a CD in order to view the PowerPoint presentation on a different computer.
Office 2011 & Newer (Windows & Mac OS X):
- Since PowerPoint 2011, PowerPoint embeds images and video into the presentation by default when saving, making all recent PowerPoint presentations portable. There is no longer a need to specify saving the PowerPoint presentation in a portable format.
- On the File tab, select Save.
- Do of the following:
- To save to your local drive, such as your laptop, a flash drive, CD or DVD drive, select Computer.
- To save to a SharePoint Library, select SharePoint.
- To save your presentation to a web location, see Save and share a presentation to OneDrive.
- Under Save As > Recent Folders, select Browse, pick a path and file folder, and then name the file.
- Select Save.
How do I Uninstall Office?
Windows:
- Select the Start button, then select Settings > Apps.
- Choose the program you want to remove, and then select Uninstall.
- To remove an app you got from Microsoft Store, find it on the Start menu, press and hold (or right-click) on the app, then select Uninstall.
For more information, go here.
macOS:
- Open Finder > Applications.
- Command +click to select all of the Office for Mac applications.
- Ctrl+click an application you selected and click Move to Trash.
For more information, go here.
Word, Excel, or PowerPoint Crashes or Freezes (macOS)
What does this procedure actually do and why am I doing it?
You are essentially testing your Office .plist files to determine if they are the source of the problem with an Office application. "Testing" a preference file simply refers to removing the preference file from the default location (~/Library/Preferences/) and verifying that the Office application starts normally (the Office application will automatically re-create a preference file when it starts if the preference file does not already exist in the default location. To test a preference file, simply move the file from the default location to a different folder, for example a folder you create on your desktop.
Mac OS X only:
- Quit all Office applications.
- Navigate to your ~/Library/Preferences/ folder and drag the file(s) listed in the section below to your desktop. To access the ~/Library/ folder, from Finder, hold the option key and click the Go menu, then select the Library from the Go menu.
(NOTE: "~" indicates your user home directory. (ie. /Macintosh HD/Users/yourusername/) - Move the following files from your Preferences folder to a folder on your Desktop:
- ~/Library/Preferences/com.microsoft.Word.plist
- ~/Library/Preferences/com.microsoft.Excel.plist
- ~/Library/Preferences/com.microsoft.PowerPoint.plist
- Relaunch the problematic application (Word, Excel or PowerPoint).
The .plist file(s) will be recreated when you do so. - If the application starts successfully and is running normally, trash the old file(s). In the case of the Word Preferences/Settings file, you will have to reset some preferences (and, for versions earlier than Word 2008, the AutoCorrect settings).
- If this doesn't fix the issue, quit all Office applications again, move the Office .plist files to a folder on your Desktop. The Office .plist files are as follows:
- ~/Library/Preferences/com.microsoft.office.plist
- ~/Library/Preferences/Microsoft/com.microsoft.Office.prefs.plist
- Relaunch the problematic application (Word, Excel or PowerPoint).
- If this procedure doesn't work for you or causes other issues with your office applications, I recommend that you move the new files to the Trash and drag the original files back to where they belong. (If you are using Office 2008 or Newer, look for leftover preferences from earlier versions (see below) and remove them from your preferences folder).
In Office 365/2019, 2016, 2011, or 2008:
~/Library/Preferences/com.microsoft.Word.plist
~/Library/Preferences/com.microsoft.Excel.plist
~/Library/Preferences/com.microsoft.PowerPoint.plist
If testing these files in Office did not fix the problem, then check to see if you have leftover preferences from Office 2004 or earlier versions. The .plist files for 2004 are listed below.
In Word 2004:
~/Library/Preferences/Microsoft/com.microsoft.Word.prefs.plist
~/Library/Preferences/Microsoft/com.microsoft.Office.prefs.plist
~/Library/Preferences/Microsoft/Office Font Cache
In Excel 2004:
~/Library/Preferences/Microsoft/com.microsoft.Excel.prefs.plist
~/Library/Preferences/Microsoft/com.microsoft.Office.prefs.plist
~/Library/Preferences/Microsoft/Office Font Cache
In PowerPoint 2004:
~/Library/Preferences/Microsoft/com.microsoft.PowerPoint.prefs.plist
~/Library/Preferences/Microsoft/com.microsoft.Office.prefs.plist
~/Library/Preferences/Microsoft/Office Font Cache
In Word X:
~/Library/Preferences/Microsoft/Word Settings
~/Library/Preferences/Microsoft/Microsoft Component Preferences
~/Library/Preferences/Microsoft/Microsoft Office Settings
~/Library/Preferences/Microsoft/Carbon Registration Database
~/Library/Preferences/Microsoft/Office Font Cache
Converting your PowerPoint Presentation to Widescreen (16:9)
When presenting in the seminar room, for recording purposes the best presentation size is widescreen (16:9).
- Open PowerPoint.
- Select the Design Tab.
- Select Slide Size and click on widescreen (16:9).
Convert Columns to Rows, or Rows to Columns using Excel
Instructions for using the "Transpose" command to manipulate data are located here:
https://support.office.com/en-us/articl ... f862209744
Adobe
Information about Adobe Acrobat, the Adobe Creative Cloud package, and PDFs
Adobe Creative Cloud Information & Installation
The Adobe Creative Cloud (CC) Package provides many creative editing tools for Windows and OS X, including Acrobat, Illustrator, Photoshop, Premiere, and more. Adobe CC is available to SJSU faculty, staff, and students at no cost for the entire duration of their affiliation with either institution.
System Requirements
Installation of Adobe CC requires 50 GB of free space on the hard drive (HD). Please make sure that your computer system meets the requirements and has sufficient HD space before beginning the installation. System requirements for Mac OSX and Windows may be found here.
Adobe Creative Cloud Access Form
Not sure if you already have access to Adobe Creative Cloud?
If you are a current San José State University (SJSU) student, faculty member, staff, or administrator, please complete the Adobe CC Access Form to verify your eligibility and request a personal Adobe account.
Need Adobe on a Campus Computer?
For installation on a university-owned device, please contact SJSU ITS Desktop Support rep for assistance.
Already Have Access?
If your Adobe Creative Cloud access has already been approved and you need help getting started, follow the steps outlined in the Adobe Installation Guide.
Troubleshooting
Adobe CC displays "You don't have access to manage apps" error when installing apps
- Sign out of the Creative Cloud Desktop app and close it
- Open File Explorer (windows) or Finder (mac) and navigate to the ServiceConfig.xml file:
- Windows: C:\Program Files (x86)\Common Files\Adobe\OOBE\Configs\ServiceConfig.xml
- MacOS: Macintosh HD/Library/Application Support/Adobe/OOBE/Configs/ServiceConfig.xml
- Copy ServiceConfig.xml to your desktop
- Open the copy of the ServiceConfig.xml file with Notepad (windows) or TextEdit (mac)
- Change the following line from
<panel><name>AppsPanel</name><visible>false</visible></panel>
to<panel><name>AppsPanel</name><visible>true</visible></panel>
- Save the copy of the ServiceConfig.xml file to your desktop
- Rename the original ServiceConfig.xml file in the Configs folder to ServiceConfig-old.xml
- Copy and paste the altered ServiceConfig.xml file from your desktop into the Configs folder
- Restart your computer
- You should now no longer receive the error message when installing new apps
Additionally, here are some video walkthroughs of the procedure described above:
- Windows: https://www.youtube.com/watch?v=FyphY4QJk44
- MacOS: https://www.youtube.com/watch?v=jr2jlngK4wU
Save a Document or Image as an Adobe PDF
Images
Windows
- Open the image you want to convert to a PDF
- Right click on the image and select "Convert to Adobe PDF"
- Save the new PDF to the location of your choice
Mac
- Open the image you want to convert to a PDF
- Click File > Export as PDF
- Save the PDF to the location of your choice
Word/Excel/PowerPoint Documents
Windows and Mac
- Open the word document you want to convert to a PDF
- Click File > Save As
- Select the location where you want to save the PDF
- Select "PDF" as the file type from the drop down
- Save the document
Convert a document to a fillable PDF form using Adobe Acrobat
This procedure has been verified on Adobe Acrobat 8 Professional:
(The procedure outlined should work with Acrobat v7, v8 and v9)
- Save the document as a PDF.
(Instructions for creating a PDF are located here: Save a Document or Image as PDF) - Open the document in Adobe Acrobat (Adobe Reader cannot edit PDFs).
- Navigate to the Forms menu.
- Select Run Form Field Recognition and allow the conversion to complete.
- Save the document as a PDF. (Choose a different file name to avoid overwriting your original document)
- Be sure to verify that all desired fields are fillable prior to distribution.
HINT: Use the "Highlight Fields" button or menu option to show which fields were automatically created. - If more fields need to be created, use the "Forms" toolbar. Open the Forms toolbar from: View > Toolbars or Tools > Forms > Show Forms Toolbar.
Once the fillable form has been created, users can fill the form using any standard PDF viewing application.
For Adobe Acrobat Pro DC:
- Save the document as a PDF.
(Instructions for creating a PDF are located here: Save a Document or Image as PDF) - Open the document in Adobe Acrobat (Adobe Reader cannot edit PDFs).
- Within Acrobat, click on the Tools tab and select Prepare Form.
- Select a file or scan a document. Acrobat analyzes your document and adds form fields automatically.
- Add new form fields from the top toolbar, and adjust the layout using tools in the right pane.
- Save your fillable PDF form and share it with others, or click Distribute to collect responses automatically.
More information about creating fillable PDFs is available on Adobe's website:
https://acrobat.adobe.com/us/en/acrobat ... eator.html
Also see our DocuSign FAQ to learn how to convert PDFs into fillable PDFs online.
How to Fill PDFs Electronically Using Adobe Reader
When having to fill out a PDF form, some forms can be filled electronically. If your PDF form is fillable, here’s how you fill it out and print the completed form. For more information, see Adobe’s Support Page on completing electronic forms.
- Make sure you have Adobe Reader installed on your computer.
- Faculty or staff members with a valid SJSUOne ID can use DocuSign to have recipients fill out and sign documents online. Refer to our DocuSign FAQs for more information.
- Download the fillable form onto your computer and open the file in Adobe Reader.
- To make form fields easier to identify, click the Highlight Existing Fields
 button on the document message bar, if necessary.
 - Select the Hand Tool.

- Select the fillable highlighted field on your form. An I-beam will appear for you to type in the text or arrow to select or check boxes.
- Fill in the necessary information for each field.
Example:
- Once you have finished filling the form, Save your form by printing as a PDF in order to email or print.
- Windows:
- Select File > Print.
- Choose Adobe PDF as the printer in the Print dialog box.
- Click Print. Type a name for your file, and click Save.
- MacOS:
- Select File > Save As.
- Select a location to save, type a name for your file, and click Save.
- To flatten your form so that it cannot be edited, open the file in the MacOS Preview application.
- Select File > Export As PDF...
- Select a location to save, type a name for your file, and click Save.
- Windows:
Adobe Acrobat
Adobe Acrobat is an application that allows you to connect with your documents, access essential PDF and e-signature tools, and make collaboration on PDF reviews easy from any device.
Here is a list of uses for the Adobe Acrobat DC app:
-
Create protected PDFs
- Prevent others from copying or editing sensitive information
-
Edit PDF text and images
- Fix a typo or swap an image in a PDF from your computer, iPad, or Android tablet
-
Convert creative filed and images to PDF
- Turn Adobe Photoshop, Illustrator, or InDesign files into PDFs
-
Simplify and speed up PDF reviews
- Collect group feedback in one PDF file online with no reviewer login required. Let reviewers see ea h other's feedback and clear up any confusion with @-mentions
-
Export PDFs to Office
- Convert PDFs to Word, Excel, or Powerpoint and keep the formatting
Getting started with Acrobat as an MLML student
Firstly, please visit our Adobe Creative Cloud Information and Installation page to get information on how to access and download Adobe applications for free through your student account
Second, to find out how to use the Acrobat DC app to design and edit your documents, take a look at the following tutorials from Adobe's website:
-
Getting started with Acrobat DC
- Use this webpage to learn the basics of Acrobat, including how to create a new PDF file, edit and comment on your PDF file, and add a password to protect your file from unwanted visitors
- How to create PDFs from text and image files
- How to customize your Acrobat toolbar
- How to combine files into one PDF
- How to create PDFs from Microsoft Office
- How to add annotations and sticky notes to your PDF
- How to extract pages from a PDF
- How to split a PDF file
- How to turn paper documents into searchable PDFs
ArcGIS
Learn how to install, update a license, and enable toolboxes/extensions.
Gaining Access to ArcGIS Pro
To gain access to ArcGIS Pro, please follow the steps outlined below.
Note: you will need to run ArcGIS Pro on a windows computer.
Activating your ArcGIS Account
- Click this link to be taken to the ArcGIS portal.
- Click Sign in.
- Click SJSU Okta.
- Sign in with your SJSU TowerID number and password.
Downloading ArcGIS Pro
- At the top right of the page, click your profile picture and click My settings.
- On the My Settings page, click the Licenses tab.
- Your user type, role, and assigned licenses are listed.
- Next to ArcGIS Pro, click Download.
- Select destination folder - either default or browse & choose a different folder.
- This will initiate the extraction of the installation files.

Installation of ArcGIS Pro
- Once the files are extracted check the box at the bottom of the screen to open installation files.
- Click Close.
- The installation will commence.
- Accept the master agreement > Next.
- Choose your installation method preference:
- Complete - all apps and features installed (best for basic/intermediate ArcGIS users)
- Custom - you hand pick which apps and features you'd like to install (best for advanced users)
- Click Next.
- Select designation folder - either default or browse & choose a different folder
- This will occur twice in a row: once for installation files, the other for python files
- Check or uncheck the "participate in Esri User Experience Improvement program" based on your preference.
- Click Install.
- Allow the installation process to complete and click Finish.
- The ArcGIS Administrator Wizard will likely automatically open.
- Select Sign in with your organization's ArcGIS URL.
- Finish.
- Now ArcGIS should be installed.
Licensing of ArcGIS Pro
- Enter
sjsugisinto the URL box and click Continue. - Click SJSU Okta.
- Sign in with your SJSU TowerID number and password again.
- ArcGIS Pro will be activated and ready to use.
Troubleshooting
ArcGIS Pro gives the error “ArcGIS Pro requires microsoft .NET Desktop Runtime (x64). To download and install Microsoft Windows Desktop Runtime - 6.0.5 (x64) or greater, visit the Microsoft website or contact your system administrator.”
- Go to this link to download .NET Desktop Runtime 6.0.8 (x64). A popup should immediately appear to download.
- Once it is downloaded, run the downloaded file and click Install.
- Once the installation is complete, attempt "Downloading ArcGIS Pro" from step 5 again. The error should not occur.
Statistics Software
Information about R, SPSS, etc.
Install SPSS v.25 (PASW Statistics) Windows and Mac OS
Step 1:
- Submit an iTicket to request SPSS v.25
Step 2: Install
Step 3: Licensing
License SPSS v.25 (PASW Statistics) Windows and Mac OS
Licensing
- After selecting to start the Licensing Authorization Wizard, a Licensing window should pop up with two different options of licensing your product.
- Click Next
- Select “Authorization Code” (first option) → Next
- Enter the License Code provided to you from IT → Next
- Select Finish. You have now successfully installed and licensed your SPSS v.25 software.
If for some reason the licensing window does not begin after installation (or if you need to do it later), you can also license by accessing IBM SPSS Statistics 25 License Authorization Wizard from your Windows start menu or from the Applications folder in Finder on the Mac.
- Start the IBM SPSS License Authorization Wizard:
- Windows:
- In the search bar of your Start menu, type in IBM SPSS Statistics.
- Right click on the IBM SPSS Statistics 25 License Authorization Wizard application.
- Select Run As Administrator (make sure you are logged into a user account with full Administrator access rights).
- The License Authorization Wizard should then Launch.
- macOS:
- In your Applications folder, you should see either an IBM folder or an SPSS folder. Open that folder.
- Inside that folder should be a folder called SPSS or Statistics 25 or even SPSS 25 (or less if you have an earlier version). Open that folder.
- You may have one or more empty folders after that. Simply open each folder in succession until you find a non-empty folder.
- You should eventually see an application called License Authorization Wizard. Double-click that program.
- The License Authorization Wizard should then launch.
- Windows:
- Follow licensing the steps above to complete your process.
R - The open source alternative
Commercial software can be prohibitively expensive. Therefore, we strongly encourage you to try the open source statistical programming language R which runs on both Windows and Mac. You can use R like MATLAB, or you can try a myriad of preprogrammed packages for R that perform many of the same statistical procedures that are found in commercial statistical packages. There is a learning curve for R, but once you successfully master the R language you will never have to rely on obtaining an expensive commercial software license.
There are volumes of helpful R resources but here are several to get you started:
Install and License Resampling Stats 4.0 - Excel Add-in
Already installed but need a license?
NOTE: Submit a Help Desk ticket to get a license key.
- Run Resampling Stats for Excel from your Start menu or the Desktop icon. This will open Excel with Resampling Stats enabled.
- Select the Add-ins tab in the top menu bar.
- Click the Resampling drop-down menu and select RSXL License. Click Yes when asked if you want to enter a new license key.
- Copy and paste the license information you were given in the Help Desk ticket and click OK.
Requirements
- Microsoft Windows
- Microsoft Office 2007 or newer
Pre-install Excel Configuration
NOTE: These instructions were written with Office 2010 in mind. There may be minor variations in older and newer versions.
- Open Excel.
- In the File menu (or the Office icon in Office 2007), click Options.
- Click the Trust Center tab on the left, then the Trust Center Settings... button.
- Ensure everything in the Add-ins tab is unchecked.
-
- In the Macro Settings tab, select the Enable all macros radio button and check the Trust access to the VBA project object model checkbox, if available.
-
- Click OK.
- In the Add-ins tab, make sure the Manage: list has Excel Add-ins selected, then click Go...
-
- Check the checkboxes for Analysis ToolPak and Analysis ToolPak - VBA and click OK.
-
- Exit Excel.
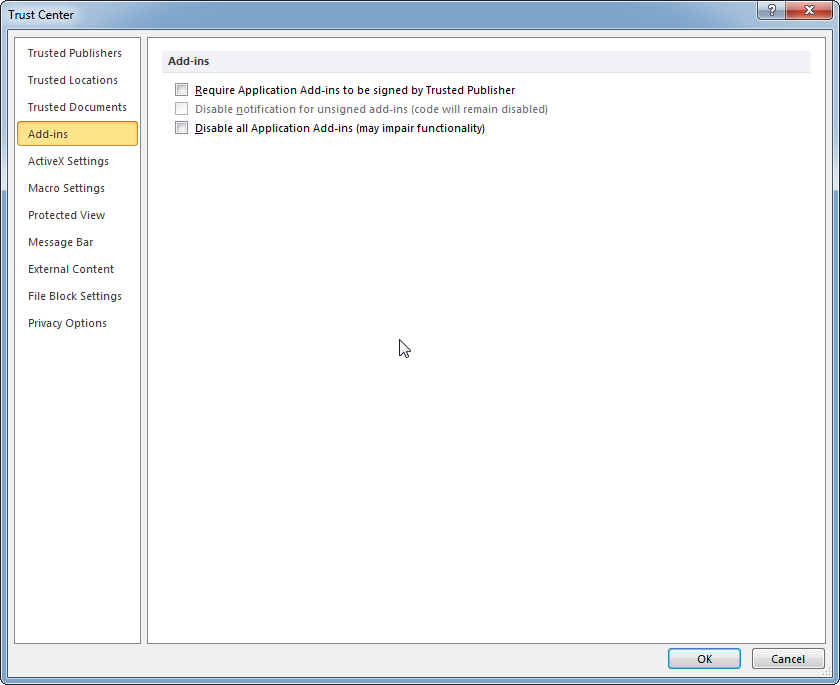
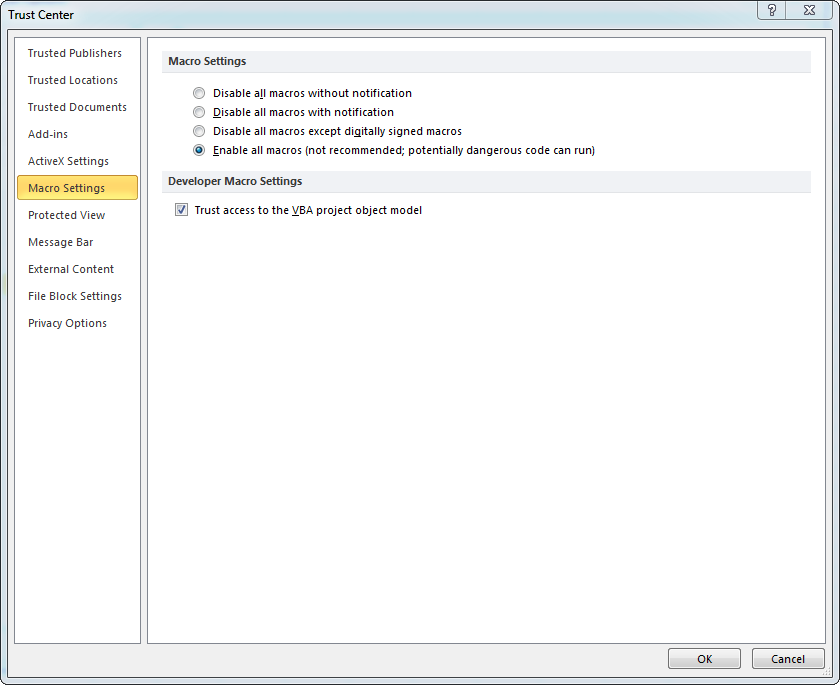

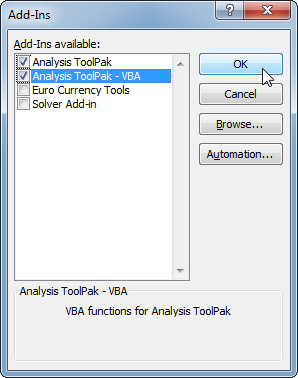
Install
NOTE: Submit a Help Desk ticket to get a license key.
- Download and install Resampling Stats from here.
- Run Resampling Stats for Excel from your Start menu or the Desktop icon. This will open Excel with Resampling Stats enabled.
- Copy and paste the license information you were given in the Help Desk ticket and click OK.
Having trouble?
Check out these links for more information:
http://www.resample.com/support/user-guides/
http://www.resample.com/support/troubleshooting/
JMP Pro
JMP Pro 13 Licenses are no longer available from MLML. If you'd like to download JMP visit SJSU OnTheHub for discounted rates or submit an IT Helpdesk Ticket at CSUMB.
How to Install MatLab
- Login to the San Jose State University MATLAB Portal.
- NOTE: You will need to create a MathWorks account using your SJSU email address.
(Please submit an IT Help Desk Ticket if you do not have an SJSU email address.)
- NOTE: You will need to create a MathWorks account using your SJSU email address.
- Follow the instructions in the SJSU MatLab QuickStart Guide to download and install MatLab.