Blog Manager Handbook

MLML Drop-In Blog
Blog Manager Handbook
First Edition by Erin Loury (September 18, 2011)
Revised by Vicky Vásquez (August 19, 2015)
Revised by Lauren Cooley (April 27, 2020)
Contents
Drop-In Blog Mission Statement
The goal of the MLML Drop-In Blog is to provide a first-hand account of the graduate experience at MLML, to showcase major MLML events and accomplishments, and to communicate basic aspects of marine science to improve public ocean literacy.
Audience
The primary target audience for the Drop-In is prospective graduate students at the college/post-college level, and middle and high school students who are considering pursuing marine science.
Other potential audiences include current MLML students, faculty and staff; local residents; MLML alumni or affiliates; family members; other marine research institutions; teachers; funding agencies; people with a general interest in the ocean.
The blog is a public face for the lab, and all posts should be appropriate for these audiences.
Blog Accounts & Usernames
**All passwords stored in Social Media Lastpass**
-
MLML Blog Admin Login:
-
- Username: mlmlblog
- http://mlmlblog.wordpress.com/wp-admin/
-
-
MLML Blog Email Address:
-
- E-mail: blogger@mlml.calstate.edu
- *For verification issues, submit an iTicket to reset password
-
-
Flickr Account:
-
- Login: mlmlblog*
- Username: MossLandingMarineLabs **
- *The login is what you need to enter at login but this is not the username that people will see on Flickr
- *Verification: confirmation code sent to blogger@mlml.calstate.edu
- **The Username is the name people need to search for to find us on Flickr
-
-
YouTube Account:
-
- Username: mlmlblog
- Email: blogger@mlml.calstate.edu
-
Blog Manager - Roles and Responsibilities
General responsibilities to be overseen by the blog managers include:
- Administration
-
-
- Update blog frequently (ideally weekly) with posts written by guest bloggers
- Maintain blogger@mlml.calstate.edu email account
- Moderate comments on the blog and post responses if applicable
-
Update the Blog Manager & Student Blogger Handbooks so they are current and coincide with the current version of Wordpress
-
-
Communication with blog team
-
- Recruit new students to write for the blog
-
Send out reminders to regular blog contributors
-
- Communication with MLML community
- Send links for all new blog posts to MLML Social Media Assistant so blogs can be posted on MLML social media accounts
- Work with faculty and TAs to get blogs written by students in classes
- Ivano’s climate change seminar
- Gitte’s marine mammal course
- Send links to the front desk for them to include in the weekly MLML email update
-
-
- Encourage blog contributions from students, faculty and staff
-
Student Blogger - Roles and Responsibilities:
- Choose to function as part of the Blog Team or as a Guest Blogger
- Blog Team: Contributes posts regularly (at least one post/semester)
- Guest Bloggers: Contribute posts at-will (many will be one time posters)
- Update blog managers when you have posted a new blog
What Qualifies as a Blog Post?
Almost anything related to the MLML experience can be turned into a blog post. Blog content spans a whole range of possibilities, including (but not limited to):
- Photos of field and lab work with descriptive captions
- Accounts of thesis research
- Write ups from class field trips or class projects
- Highlighting or recapping thesis defenses and science cafes
- Interviews with faculty, visiting scientists, etc.
- Accounts of MLML social events (no photos of alcohol)
- Posts tailored to K-12 teacher interests for use in the classroom
- Photos of marine-related projects other than science (ex: food art, crafts, artwork)
- Highlighting a student profile or alumni career interview already on the blog
- Profiling a particular marine organism (“Cool Creatures”)
- Updates from MLML alumni on “where they are now”
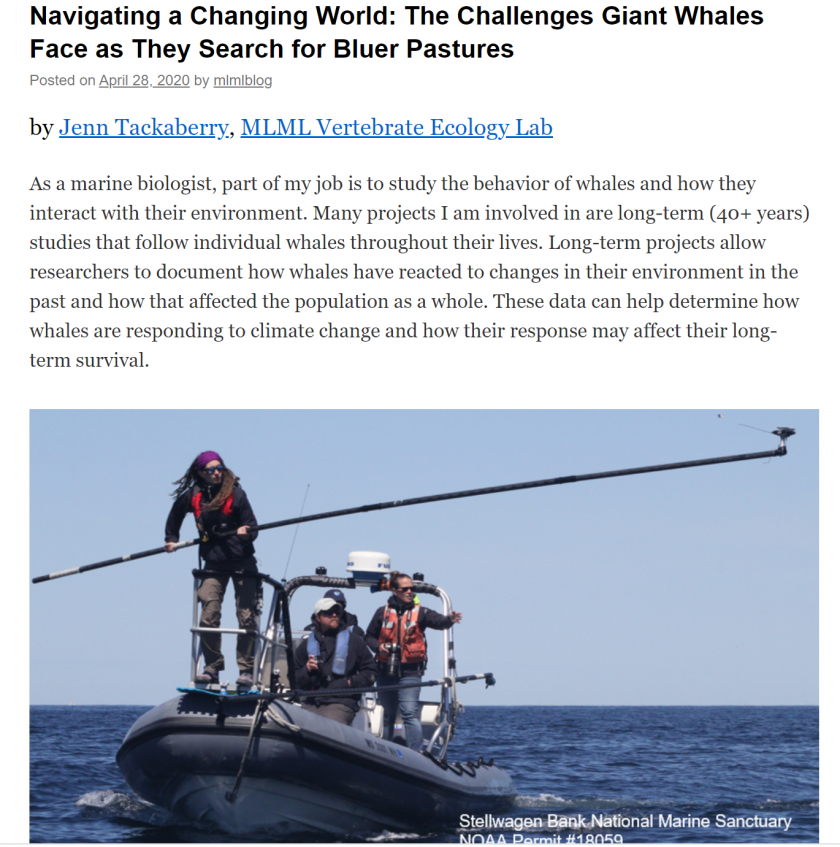
Example Blog Post
Tips for Writing Blog Posts
- Writing for the blog is a really great way to think and write about why you started doing marine science in the first place, what you like best about it, what excites you about it. Be honest about the challenges too, but remember we also want to encourage the future generation of marine scientists.
- The tone of the blog should be conversational, like you were writing an email to a friend. Use the first person and the active voice!
- If you use a scientific term, define it briefly right after you use it.
- Ex: “We can tell the age of the fish by counting rings in their otoliths, or ear bones.”
- Imagery and concrete details really help tell a story. Put the reader in the lab or field with you. What’s the weather like when you go out into the field? What’s the sensation when your face first hits the water on a dive? What are the tools that surround you when you’re working in the lab?
- Pictures make a huge difference. Every post should have at least one photo or video, even if it’s just a photo of the author. If you don’t have time to write a lot, a post could consist of just a really cool photo and a paragraph or two explaining what it is.
- Try to tie posts into content that is already on the blog by referencing and/or putting links to previous posts.
Blogger Checklist
Every blog posted needs to include the following things:
- Created as a Wordpress Post NOT a Wordpress Page
- Author byline at the start of the blog
- “By First Last, MLML ABC Lab”
- If possible include links to both the author’s profile on their lab’s website and the lab website
- Example: By Lauren Cooley, MLML Vertebrate Ecology Lab
- At least 2 photos or videos
- “Read More” tag
- At least one Wordpress “Category”
How to Create a New Post
- From the WordPress homepage, click on “Posts” on the left side menu
- Click the down arrow next to “Add New” in the top left corner and click on “Classic Editor”
- In the top box, enter the title of your post
- Capitalize every word (as you would capitalize a book title)
- Once you’ve created a title, a line will appear below the title that says “Permalink.” This is new url for the blog post
- Click the “Edit” button to change the text. You can make it something shorter if the title is very long, or delete any odd punctuation marks.
- Copy/paste the post content into the main text box.
- The text for all blog posts should be initially written in Microsoft Word or Google Sheets. Do not write directly in Wordpress.
- Start every blog with a byline that links to the author’s page on their lab website (if they have one) & their lab’s website
- “By Firstname Lastname, MLML Lab”
- Example: By Lauren Cooley, MLML Vertebrate Ecology Lab
- Click “Save Draft” to save a draft of your post. Save frequently!
- Check the formatting of the blog post by clicking the “Preview” button.
- Use the different Wordpress features to add Categories, Tags, Links, and Media to your blog. See IT materials for more information on WordPress
- Media: “Add Media” allows you to add photos and embed YouTube videos and Tweets. Every post needs at least 2 photos.
- In general, let horizontal photos fill the whole column (“Large” size). Vertical photos can be resized to slightly smaller dimensions by dragging on the corners (to about 330 x 450).
- More information below in the “How to Add Pictures and Embed Videos” section
- Links: Link to other pages by highlighting the text you want to turn into a link, then click the button that looks like a chain link.
- Categories: Add your blog to at least one Wordpress “Category.” You can use existing categories or add new ones as needed.
- Tags: Add optional “Tags” to help readers find your post
- Insert a “Read More Tag” to every post.
- Put the cursor at the end of the first or second paragraph and click the “Insert Read More Tag” button (to the right of the hyperlink button)
- This shortens the part of the blog that is visible on the home page. Leaving long posts on the main page is bad etiquette to fellow bloggers because previous blog posts are harder to find.
- Once the blog is finished, click “Publish” to post it on the blog.
Wordpress Media (Photos & Videos)

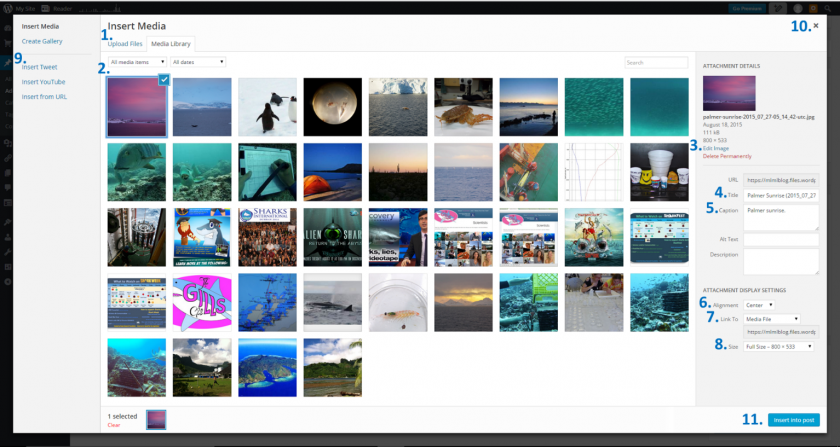
All descriptions below reference the numbers shown in the screenshot above:
- Upload Files (#1): allows you to upload your images to Wordpress
- Media Library (#2): all uploaded images will appear in the Media Library
- To insert a photo that is already in the Media Library into a blog post, click the photo so that it is checked.
- Edit Image (#3): allows you to crop, flip, rotate and/or resize the image.
- If photos are very high in resolution, please resize them before uploading to the blog server. There is a finite amount of server space that comes with our free WordPress account, so we want to use it mindfully.
- Title (#4): how the photo is listed in the media library. It is also what visitors see when they move their cursor over the photo on the blog, unless you enter something more descriptive under “Alternate Text.”
- Give photos a title that is descriptive of what’s in them. (ex: Deasy Nesting Leatherback Sea Turtle). This way you can search the media library later and find the photo again
- Caption (#5): should at the very least contain a photo credit, especially if it’s not your own photo. A descriptive caption is good too.
- Alignment (#6): Center is good for most photos
- Link To (#7): If you want the photo to link to another website when people click on it, put that link here. Make sure to link all photos from other websites to the original source (and put that source in the caption).
- Size (#8): You may want to toy with this depending on what fits best for your post. Full size is generally good but thumbnail is ideal for your profile picture.
- Insert outside media (#9): you can embed Tweets, Videos and other URLs here.
- Close media window (#10): You can upload all your photos at once before actually adding them into your post. The images save automatically. When you are done, click the close button to return to your post.
- Insert into post (#11): insert uploaded media into your post
Adding Contributors to the Blog
- Click on the “Users” Link in the left column.
-
At the bottom of the page, under “Invite New Users” type in the person’s email address.
- If the person does not have a Wordpress.com account yet, you’ll be able to invite them to set them up.
- Usernames should be formatted as FirstLast (ex: LaurenCooley)
- Once the user has set up the account, you can add them to the blog by typing in their email address.
-
Set their role as an Administrator, Editor, Author or Contributor
-
Administrator (IT personnel and student managers)
-
- An administrator has full and complete ownership of a blog, and can do absolutely everything. This person has complete power over posts/pages, comments, settings, theme choice, import, users.
-
-
Editor (All students)
-
- An editor can publish, edit, and delete any posts/pages, moderate comments, manage categories, manage tags, manage links and upload files/images.
-
-
Author
-
- An author can edit, publish and delete their posts, as well as upload files/images.
-
-
Contributor
-
- A contributor can edit their posts but cannot publish them. When a contributor creates a post, it will need to be submitted to an admin for review. Once a contributor’s post is approved by an admin and published, however, it may no longer be edited by the contributor. A contributor does not have the ability to upload images.
-
-
Administrator (IT personnel and student managers)

